June 30, 2011

Summer 2011 Bucket List Mini Album


Hi!  Lori here from ScrappinMyStressAway filling in at ShesASassyLady today!

I saw this tag book months ago and had to figure out how to make it!  It was on my list for a while.  At the beginning of this summer, I saw a cute article about a Summer Bucket List for kids.  I got to thinking about what would be on my own list.....and I remembered this project.  It was only fitting to use the book as my own Summer Bucket List mini album!


I started with a 6x12 piece of cardstock.  I scored it at 2", 4", 8" and 10".  The top of the paper measures 2 1/2".  I marked my center point and went 1 1/4" to either side and made a dot.  I trimmed from the dot on the top to the bottom corner on both sides to make this shape.

I used this K&Co. paper pad with 2 sided papers for my album.  I used two of each sheet and alternated folding them.

I used my Martha Stewart Score Board to score at 2", 4", 8" and 10".

Here are all of my pages.

I used my Crop-A-Dile to punch two holes in each page.  With the Crop-A-Dile, you can punch through several papers at once.
I cut out some tags from Tags, Bags, Boxes and More at 5.25".  I hid the slit in the tag.
I used my ATG gun to glue down the flaps.

I also glued down the outer flaps.
I cut out summer 2010 from Lyrical Letters Loop Dee Loo at 1".

I put one tag in each pocket.  I tied ribbon around each pocket and stapled ribbon to each tag.  I also tied some ribbons to the rings.

Here is my Summer 2011 Bucket List Mini Album.  My tags will be filled with memories from Baseball, T-Ball, Organizing, 4th of July, Crafting and our annual vacation to the Ozarks!
June 29, 2011

Save the Stickles!
With a recently renovated craft room I am trying really hard to be organized! One of my favorite embellishments is my rapidly growing Stickles collection. Organizing the little guys has been a quest for awhile; and then I thought about it. I can make what I need!

Recipe:
  • Gypsy with Tags, bags, boxes and more (bottom row, third from the left)
  • 4 pieces of card stock
  • assorted glue
  • brad
Here's how:


I hope you enjoy! Until next time...keep generating those gems! Nonna

June 28, 2011

My first guest designer post!

Hey everyone~Happy Tuesday to you~


This is Stacy from Lovethatbug!
Well, here it is. My first day as a guest designer at Sheila's blog. Thank you so much Sheila for having me over today!
I am a lil nervous, so I am coming in with my tail between my legs. LOL
Anyway, today I thought we would do a lil glass etching. It is really easy and you only need a few things to get started!

Just some vinyl, Armour Etch, Foam Brush and some transfer tape.

The design I chose was a flourish from the Cindy Loo cartridge. I find it works best with a design that isn't very intricate. Once you find a design you like lay your vinyl onto mat and load in the Cricut. You need to adjust your settings at this point. For my machine it was 3-3-3. You might want to do a test cut first. You want the Cricut to cut the vinyl but not thru the backing. (this is called a kiss cut)
I cut out as many as I thought I needed (6). Then you want to peel the vinyl off your mat.
Then you want to remove the inner part of the design, as if you were making a stencil.

Once the design is removed, apply your transfer tape to to the top of the design. Make sure you burnish once the tape is applied. Remove the backing of your design, making sure the vinyl sticks to the tape.

The next step is a lil tricky if you are working on a curved surface. If this is your first time I recommend trying a flat surface first. Take your design and apply it to whatever you want to etch. You want to burnish again, really well here. Make sure there are no bumps around the design. Bubbles on the vinyl are ok, just make sure they are not near the design. Once you have your design in place, remove the tape making sure the design sticks to the surface.


Next comes the fun part, the actual etching! Shake the container really well before you start to make sure it is thoroughly mixed. Working in small amounts, carefully apply the etching cream using the foam brush. Apply a thick and even coat, but make sure it isn't to thick to where it is going to run. I think the bottle says around 5 mins, but I usually allow the cream to stay on about 20-25 minutes.

Now it is time to rinse away the cream. I just use warm tap water and rub the cream off while the vinyl is still attached. I continue to rinse until there is no more white left. Once it is thoroughly rinsed off, remove the vinyl, and then wash with soapy water.

And Ta-da, that is it! Pretty easy right? Oh, there is one more thing, just sit back and enjoy what you created :)
These make great gifts, and the possibities of what you can etch are endless.
Hope you had fun!

Here is a close up of the design of the etching,


Ok, now I am off to go fill this up with a pretty chocolate cake! Once again, thank you so much Sheila for having me visit today, I had a lot of fun
Hugs, Stacy

June 27, 2011

Let Freedom Ring with a 4th of July Gift

Happy Monday Everyone! Aymee Gandy from 'A Scraphappy Southernbelle' here with you on this beautiful day to share an American made gift I have created. Can you believe it's almost the 4th of July? It's time to celebrate freedom and to get decked out in our red, white, and blue! As we enjoy this sweet land of liberty, it's the perfect time to let our friends and family know how much we care! We can create patriotic cards, altered art, banners, home decor', and so on.

 For example, here this Yankee Doodle Dandy has created a card and a cupcake wrapper to give away. I created each of these projects with my Cricut Expression, Sure Cuts A Lot Software, and files purchased at SVGCuts.com. Each of these gifts could easily be recreated with a Cricut and the cartridge of your choice if you do not have access to SCAL software.
 "Happy 4th" Card
Supplies Used
Cardstock: The Paper Studio, Bazzill Basics Paper
Patterned Paper: BasicGrey
Glitter Glue: Stickles (Ranger Industries)
Adhesive: Helmar
Electronic Cutter: Cricut (Provo Craft)
Electronic Cutting Software: Sure Cuts A Lot 2 (Craft Edge)
SVG's: SVG Cuts (Made In The USA)
This star shaped card was so easy to put together. I had this card put together in under an hour. I love the vintage feel the card has.
 I have 2 layers of dimension on this card. I popped up the scalloped star shape as well as the silhouette of the kids running.
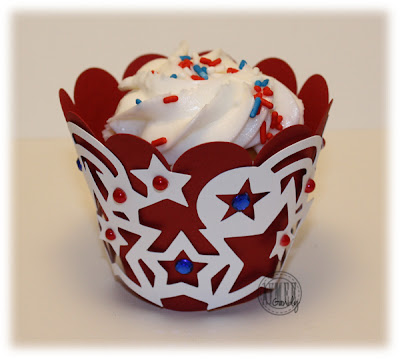
 "Happy 4th" Cupcake Wrapper
Supplies Used
Cardstock: The Paper Studio
Pearls: Queen & Co.
Electronic Cutter: Cricut (Provo Craft)
Electronic Cutting Software: Sure Cuts A Lot (Craft Edge)
SVG: SVG Cuts (Made In The USA)
Tasty Cupcake: Shur-Fine :)
I thought a little sweet treat along with my card would be a nice gift and who doesn't like cupcakes?!
 Yummo! I have to confess, I've already ate 2 of these cupcakes! LOL!
I hope today's post will inspire you to start singing the star spangled banner and creating a festive project of your own!
Also, I hope you have a wonderful, safe 4th of July! God Bless!
And Happy Scrappin'!!!

June 26, 2011

Blog Award Times Two

I am so excited to recieve this award from a special lady that I am sure most of you know.... Sandy of Sandy From Ukiah. She is a wonderful  spirit filled woman with plenty of talent to share with all of us. But she left me two rules to accept this award. I have to tell 7 random facts about myself and pass it on to 8 other bloggers..
Now before I even had a chance to post my response I was awarded this for a second time by Roberta The Texas Scrapper Mom whom I had the opportunity to spend time with at the Texas Stampede. She is a very talented lady too.
  1. I am a Christian and love to see God at work in my life and the lives of family members.
  2. I have been married to my high-school sweet heart for 40 years and he is still the love of my life.
  3. We have one of those Intex blow up pools in our back yard that is 4’x18’ and hubby and I are like silly little kids in it.
  4. The beach is my favorite place to go.
  5. I love my paper crafting hobby.
  6. I hate to shop unless it is for crafting supplies.

 Now I must pass it on to 8 other bloggers... So I am passing this sweet award on to some fairly new bloggers that I am sure will really grow fast. I hope you take the time to take a peek at their blogs.. these are all AMAZING ladies...
  1. Stacy at Love That Bug
  2. Teach4U
  3. Cricut Croppin’ with Cassandra 
  4. Robin of Scrappin’ Delta Diva     
  5. Rockin’ Renee from I Came, I Saw, I Created
  6. Leirad from Leirad’s Card Making Corner    
Be sure to visit these amazing ladies and wish them well and click their follow buttons.
signature

June 25, 2011

Gypsy Made Simple - Window Birthday Card

Good Day! I know you are going to LOVE - LOVE - LOVE this card and it is so easy that you will be making window cards in no time at all. Just turn your Gypsy on, grab a cup of coffee and let's get to work.
Today you will make any type of window card you want or need. I made this cute little card for my grand son Aiden who turns 2 in July. He is such a little cutie and loves cars and trucks, so this will be perfect for him.
This little video will take you step by step through the designing process on your Gypsy. Use any frame for the base of your card. I like Gypsy Wanderings as I am so familiar with it and the others I really need to search to find and the selection is pretty good. Remember people will be looking at the artwork and the way you decorated rather than the base of the card.
These are the yummy colors I used from DCWV the Primary color stack. I alos used left over glitter paper from the Shadow Box I made and that worked out great.
Look at this cut.... one piece and it came off the mat just beautifully. I love DCWV it cuts like butter.

Well I got everything cut and then went on an inked the little hub caps and then Glossy Accented the window so it would look real. I also inked around the edges of the base of the card so that the inside would look nice.
See how easy it is to make one of these cards! I just love the look and you just don't see anything like these window cards in the store. I sure hope you like today's project. I challenge you to make a window card of your own, for any occassion and then link it up to my blog for everyone to see how beautiful it turned out.

Click HERE for a copy of today's file and all you need to do is change out the number for the age of the little boy you are gifting to. Or, if you prefer keep the base and change out your artwork too, to fit your special person. Thank you for joining us today and for your sweet sweet words of encouragement. Your comments continue to inspire me to share with you.
signature

June 24, 2011

A Quick Tip

Hi all,

I thought I'd share a quick tip with you all. Today I'm making bookmarks with the children at the school I work at. Normally I would use my Gypsy and Expression to cut some bookmarks out, but I thought they may take a little time, sizing and making sure I had enough white 12 x12 card. I had my Tim Holtz tag die and thought this would make a great bookmark.

Over here in the U.K we size our card / paper by calling it A1, A2, A3 and so on. The larger the number the smaller the piece of paper. I used A4 card (11 6/8 inches by 8 5/16 inches). I know I can get three tags out of one piece of card. But instead of cutting the card down so I cut one at a time. I folded it so I could cut three out at the same time. I scored the card at 3 1/2 inches, 7 inches and 10 1/2 inches. I then did a concentina fold. I then placed it on the die and cut through all three layers.

As it's a die designed to cut chipboard I thought it would be able to do this.
I hope this tip is useful to you. Sorry I haven't posted a project but I will be next time. I'm in the process of making something and I didn't get it finished in time for this post. I don't know where the time has gone.
Thanks Sheila for having me today.

Kelly x

June 23, 2011

Happy Birthday Matey!

Ahoy! Roberta here from TXScrapperMom. I've been very busy crafting the last few days, but tonight I crafted for a special event - my nephews birthday! I made a little gift set to go with his present, which includes a card and a little treasure chest filled with some sweets...yum! This is actually my very first ALL Imagine project, so I was especially excited to share with you all today!!


Here's a closer look at the card...


With this being a fairly new cartridge, I thought I'd give you a

quick tutorial on assembling the chest...

These are all the pieces in the cut...

Fold all the tabs along the edges...


Assemble the bottom first (that's the easy part :));

then adhere the half circle to the tabs...

And voila!! Cute, huh?!

Thanks for stopping by! Comment are always greately appreciated - I LOVE to read them! And fyi, I am fairly new to the world of tutorials, so if it totally doesn't make sense, let me know :)

June 22, 2011

Printing Cards with your Imagine

Hi everyone, Beth here from thunderbirdlindybydesign.  Today I am going to show you how to print easy note cards with your imagine.  Now printing in a certain spot on a piece of paper on the imagine is not my idea, I originally saw the idea from LindaK on the Provocraft Message board from paperboutique.blogspot.com, she printed sentiments inside her cards.   I wanted to use this technique to print my own notecards.  Once I started, I saw that the possibilites are as endless as the carts you own.  I used Damask Decor for the design, and All wrapped up for the color, but you can use the standard colors the Imagine comes with.

I started with an 8.5 x 5.5 piece of paper on my Imagine mat.  I placed in on the top left hand corner of the mat.  I took the picture correctly, but when I downloaded the image from my camera, it got rotated so the top of the mat is on the left of the pic.

I selected the image I wanted to print, sized to 3" high and then pressed next on my imagine.


I set my page size to 5.5 wide and 8.5 tall.

Here is what is looks like so far.  Since you can't manipulate the images on the Imagine mat like you can the Gypsy, Expression, etc.  I had to get my image down to the bottom of the paper and in the middle. When CCR(Cricut Craft Room) is finalized, you should be able to manipulate the images on the imagine mat, just like you can the Expression.

Pressing the back key I added plain squares from the standard images that come with the imagine.  the first square I sized to 3x3, and then I added 7 more squares sized to .5" tall.  I did not color these images, and these squares were added in front of the damask decor image I already added to my Q.  The above pic is what it looks like when I was done.  The image is right about where I want it.

I then selected my damask decor image and chose a color to flood fill it.  The sqaures I left colorless.  The Imagine will ignore these and just print the Damask Decor Image.

before you hit next after you have everything the way you want it, you need to select settings and chose print only, so the imagine will print but not cut.

Here is what it looked like after I printed it.  The top of the card is to the left.

I trimmed one of the prints to be approx 4.25x5.25, punched the edges, added some bling, and adhered it to a clear plastic note card box I ordered off of Papertrey ink. 

Here is a sample of my finished note cards, they are 5.5 wide by 4.25 tall. I punched the corners, added bling and ribbon. 


I put them all in the clear box.  Wouldn't these make a great gift for someone?  You can write or stamp any sentiment you want in them.

If you look through you carts, I bet you could find all kinds of images to use on these cards.  Who needs fancy stamps(even though I just love fancy stamps), when you have your Imagine.

Thanks Sheila for having me today on your blog.  I really have fun trying to come up with projects.

Until next time, Beth.