Welcome to my fun little site. My name is Sheila, you may know me as Sassy Lady. I am a Chicago transplant to the Birmingham, Alabama area. I like to say I am southern by the grace of God! My blog was started to share with family and friends my love for scrapbooking and of course special moments with those around me. Being an avid scrapper I also dabble in card making as I love to remember people and their special times with a card. Click Here To Read More!
Grab my button for your blog! Copy and paste the text below:
GET $10 OFF DIGITAL SOFTWARE
CLICK PHOTO TO ORDER YOUR SOFTWARE TODAY. YOUR DISCOUNT CODE IS STMMMS32096
Unless otherwise stated within the post, this is my original work or design. You are free to use any of my designs as INSPIRATION for your own personal use. My work is not for use for publication, contest, message board entries or for profit. If my designs inspire you in any way please give credit where credit is due. If you post information about my files to any message board or mail group, please direct users to this blog rather than attaching the file itself. Leave me a comment and by all means post a link to my blog. Thank you!
I am so excited over all the entries for this wonderful prize. Such beautiful designs I am just blown away at all the talent! I am so happy that I chose to use the random method as I don't think I could have selected on my own. Thank you so much for entering your work. but I can only have 1 winner soooooo.... Please watch the attached video.....
It is Sunday morning, I slept in this morning due to the long hours at work this morning so you are getting me before coffee!!
Well doesn't it figure, Blogger is acting up and isn't allowing me to embed this in the body so please click HERE for the 2 minute video of the winner. (While you are there be sure to subscribe to my You Tube Channel.) Hopefully Blogger will be working a little later.
Just in case here is the original...
Congratulations to our winner please contact me at ShesASassyLady@gmail.com with your full name and address so I can get this out in the mail to you.
Good morning! Today's project is super simple. First I want to say Thank You - Thank You to Ohhh Snap for the wonderful gift; the Botanicals Cart and the beautiful card she made from it.....
Well it presented the same problem that I have with most of the carts that have cards on it.... seems the cards are not designed for a standard envelope size! That is fine for when we are giving a card in person or it is in a gift bag or box, but it won't work for my needs. You see most of my family and friends are out of state and I need my cards to fit a standard envelope so it mails properly. That is what today's post is all about... a simple alteration to make a beautiful card from the cartridges that we purchase.
The above card is a birthday card and took only minutes to design. So turn your Gypsy on, grab a cup of coffee and follow along. Now if you don't have the Botanicals cart choose a card from another cart and let's get to work. Keep in mind that I am keeping it SUPER SIMPLE this week.
This card is the same design, different paper that I cut out the words Thank You. That also is from Botanicals.
Here is the quick little video that will help you in any card situation. Just remember to line up your extra piece either by manually adjusting until the lines turn yellow or use x and y in the upper right hand corner to line up the position exactly.
This is a quick video showing how I put these cards together. I actually made 4 all together and was thrilled to add these beautiful cards to my stash. Click HERE if you would like a copy of this file for your Gypsy.
I hope you enjoyed today's post and will make something on yours this week. I challenge you to link up ANY project that you make this week. Summer is almost over and we need to get ready for all the action that starts up in the fall. If you are anything like me your card file has dwindled over the summer months and you need to get it back to normal. I figure I make on an average 4 cards a month but I have been sending out about 7!!! It doesn't add up so I have doubled my efforts and am getting back into the swing of things.
Thank you for your sweet sweet words of encouragement. Your comments continue to inspire me to keep sharing with you.
I am back from the beach!!!! And anyone that knows me knows I LOVE THE BEACH!!! So for I thank you for running Gypsy Made Simple this week so I could have fun in the sun!
I Challenge You to Link Up ANYTHING you made this week to this post for us all to enjoy! You could win this wonderful Creative Memories album complete with pages, page protectors, some paper and even a package of Creative Memory markers. Anyone that links up their project and is a follower will qualify for this random drawing! (Note: Due to the weight of this item I can only ship within the US but if one of my out of the country friends wins don't feel left out as I have a special gift card to send to you for winning.) Okay everyone link up your projects!!
I want to mention a lovely lady that I am copying the Link Party from; Tracy of Craft Junkie Too. She has a linky party every Friday that I never miss. It is so much fun to see all those wonderful designs! I promise you Tracy this is a Sassy Lady is on vacation and has her mind on the beach party! I will arrive home the day this posts so I get the fun of seeing all your wonderful designs be it a card, scrapbook page or a box. I can't wait as you are all so talented.
So get busy and link up your projects and you could win some blog candy! All entries must be made by 11PM July 30th. You need to use your Cricut somewhere on your project to be eligible. Winner will be announced on Sunday July 31st. Limit entries to 1 project per day per person.
Well, today, I get to be a "Sassy Dude" again. Hee! Hee! Thanks so much, Sheila, for letting me play with ya'll again. So... I know around here, it's been so stinkin' hot! I guess this project was just wishful thinking, but I was really excited with the way it turned out. A dear friend of ours sent us a card that they made. They got a kit where the cards rock and wobble. When I saw the card, I thought it was really a cool idea and knew that... with enough time... could figure out a way to make one with the Cricut and Gypsy, so that is exactly what I did. At the bottom of this post, you will find the Gypsy file for this particular one so that you can play and make your own too!
Isn't he just too much fun?!? This was actually pretty simple to make, but it did take a few cartridges to get the reindeer out of it all. The cartridges I used are 3 Birds on Parade, Christmas Cheer, Create a Critter, George and Basic Shapes and Plantin Schoolbook.
There are several basic shapes used together to assemble the body and the base. Layer 1 is really all you need for any design. The intricate details are on Layer 2. You can see the body on the bottom right, the rocker base on the bottom left, the 3D legs in the middle-upper right and the tail on the top right. The hooves are on the top left. The two rounded rectangles on the bottom left are going to be used later...
Layer 2 is going to be for your personalizing to make it the type of critter you are going for. The base of the head shape is actually one of the fat little birds from the 3 Birds cartridge. The antlers are from another type of reindeer on Christmas Cheer. The Saddle was made using Plantin Schoolbook with the banner backgrounds.
This is using the eye view so that you can see what will actually cut. It makes it easier to see the actual shapes with the red welding removed.
This is also using the eye view so that you can see the other layer without all the red. This one is easier to describe, so on the left bottom, you have your deer head shape and the second 3D layer. On the top left, you have your antler layer, chin and back of the nose. On the top right (left side) you have white eyes with the cut out for the black. The black is on the right side. On the bottom of this 6 inch square on the left side, you have the nose. On the bottom right you have the center of the saddle.
To make this a little easier to follow, I threw in a couple of mat pics. Above, you will see how to layout the paper for Layer 1.
When cut, this is what comes out when you pull away the extra card stock.
This is how the paper is laid out for Layer 2. You can use whatever pattern papers you like, but I just wanted to show my choices so that you can see the finish product, but all of the layers through out the process.
This is what you have when you remove the extra card stock. Staring to see it? Hee! Hee!
The next thing is to ink all of your pieces. I used Cocoa with a makeup wedge to ink everything. Super easy. I don't always ink everything when I make cards, but for this one, you pretty much have to because so much of it is solid.
The next step is to put start assembling your pieces. Here is where the magic begins. Can you see where you could make lots of other critters with this design? You could do a cow, pig, horse, etc. Really fun! I simply used Scrappy Glue to put all of these layers together.
The next step is to put together his head. I used 3D foam adhesive on the back of the pieces. Then just peel and stick!
This is what his face looks like when it's all stuck together! Cute, huh?
The next thing is to take a black marker and draw on his mouth. Also, use a white opaque marker to dot his eyes and add a little glow on his nose.
The next step is to fold a couple of pieces. Fold the body in half, score and fold. Also the tail. Take the white rounded rectangle pieces. Fold one direction in the middle and then fold the opposite direction in the middle again, going the other way. This will give you the zig zag shape as shown in the picture above.
Next, open the folded body and glue on the tail in the center. Then add the white rockers to the bottom. Glue one side first, then fold it back to make sure you have even placement on both sides. Otherwise, it may not stand up. It does need to be pretty precise.
Next, glue in your zig zag pieces. Folding this way will allow the card to stay flat so that you can send it in a regular envelope.
Now you have your rocker platform! Cool, huh?
Finally, add your saddle to the body, 3D adhesive on your leg pieces and take a piece of acrylic 1/4 inch to 1/2 inch wide and 3 inches long. For mine, I always cut all of the flat pieces out of my Cricut Cartridge wrappers and they are perfect for this project! I just used ATG tape on both sides to make it stick. This actually will hold the head on the body with strength, but when the card is rocking, the head will jiggle.
This was such a fun project and I couldn't wait to share it with you today! There are so many more cards on our blog. Visit anytime! We would love to have you over! Here is a link to Cricut Couple.
As always, we would really love to hear your comments!
In closing, hopefully, he cooled you off a little bit in this heat! We are so excited about Christmas this year. It's never to soon to start planning. Below is a link to the Gypsy file for you to try as well! Thanks so much for visiting today!
I am back from the beach!!!! And anyone that knows me knows I LOVE THE BEACH!!! So for I thank you for running Gypsy Made Simple this week so I could have fun in the sun!
I Challenge You to Link Up ANYTHING you made this week to this post for us all to enjoy! You could win this wonderful Creative Memories album complete with pages, page protectors, some paper and even a package of Creative Memory markers. Anyone that links up their project and is a follower will qualify for this random drawing! (Note: Due to the weight of this item I can only ship within the US but if one of my out of the country friends wins don't feel left out as I have a special gift card to send to you for winning.) Okay everyone link up your projects!!
I want to mention a lovely lady that I am copying the Link Party from; Tracy of Craft Junkie Too. She has a linky party every Friday that I never miss. It is so much fun to see all those wonderful designs! I promise you Tracy this is a Sassy Lady is on vacation and has her mind on the beach party! I will arrive home the day this posts so I get the fun of seeing all your wonderful designs be it a card, scrapbook page or a box. I can't wait as you are all so talented.
So get busy and link up your projects and you could win some blog candy! All entries must be made by 11PM July 30th. You need to use your Cricut somewhere on your project to be eligible. Winner will be announced on Sunday July 31st. Limit entries to 1 project per day per person.
Hi there! Roberta here from TxScrapperMom! I am sad to say that I will be leaving the She's a Sassy Lady Design Team, but I wanted to take a moment to say thank you to all the wonderful people who have taken the time to read and/or comment on my posts! I have enjoyed being a part of such a great group of ladies and share my creations with all the wonderful She's a Sassy Lady followers! :) On to my post......
I apparently can't stop making boxes from Sweet Tooth Boxes, but I really do think this is my favorite cartridge of all times!! I'm a baker, and a crafter, and this brings my two passions together! What could be better?! Today I decided to give the cupcake box a try, and it is absolutely adorable, and so easy to put together! The only thing I would change next time around is adding some glitter to the cherry and embossing the cupcake "wrapper" - for whatever reason, I tend to forget my Cuttlebug ALOT lol :)
I am back from the beach!!!! And anyone that knows me knows I LOVE THE BEACH!!! So for I thank you for running Gypsy Made Simple this week so I could have fun in the sun!
I Challenge You to Link Up ANYTHING you made this week to this post for us all to enjoy! You could win this wonderful Creative Memories album complete with pages, page protectors, some paper and even a package of Creative Memory markers. Anyone that links up their project and is a follower will qualify for this random drawing! (Note: Due to the weight of this item I can only ship within the US but if one of my out of the country friends wins don't feel left out as I have a special gift card to send to you for winning.) Okay everyone link up your projects!!
I want to mention a lovely lady that I am copying the Link Party from; Tracy of Craft Junkie Too. She has a linky party every Friday that I never miss. It is so much fun to see all those wonderful designs! I promise you Tracy this is a Sassy Lady is on vacation and has her mind on the beach party! I will arrive home the day this posts so I get the fun of seeing all your wonderful designs be it a card, scrapbook page or a box. I can't wait as you are all so talented.
So get busy and link up your projects and you could win some blog candy! All entries must be made by 11PM July 30th. You need to use your Cricut somewhere on your project to be eligible. Winner will be announced on Sunday July 31st. Limit entries to 1 project per day per person.
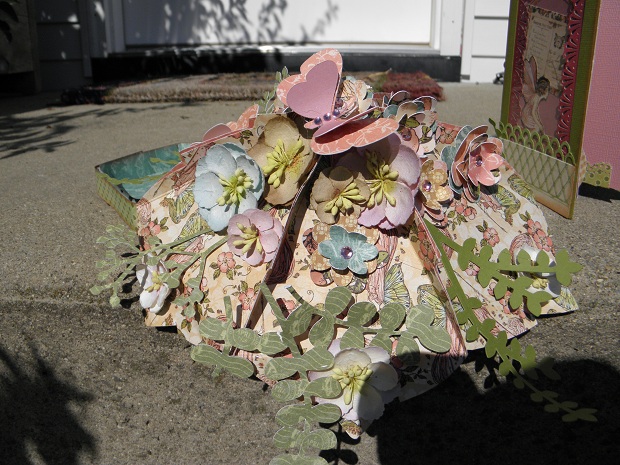
Hi everyone, Beth here from Thunderbirdlindybydesign. Today I wanted to show you a project I have been working on, off and on for several month's. I started it awhile ago and decided to finish it so I could post it today as my project. I can't really show you how I made the gazebo or the mini album because I used a pattern I purchased from Laura Denison from Follow the Paper Trail. The pattern is called Hexagon Box Mini Album and can be purchased here if you so desire. I wanted to add that I am in no way associated with Laura, and do not get any monetary gain from this. I just love her patterns. Anyway. I used only one Cricut cartridge on this project and that was Serenade for the flowers, ivy and butterflies on the roof of the Gazebo. I also used the Once Upon a Springtime paper from Graphic 45. Most of the other elements I either hand cut or used paper punches on.
The walls of the gazebo are acetate and the fairy images peek through.
Here is the roof with all the cuts I did using Seranade.
The Roof lifts off to reveal the mini album/albums inside.
There is enough room in the album for 42 pictures, 14 per Gazebo side.
Here is the roof off.
Several Pics of the pages.
Cut outs using the Paper pad.
The Album has 9 pockets.
Here is a close up of the images behind the acetate.
To be truthful, I loved the way this turned out, but was not to keen on the colors once they came together, not enough contrast. I am maybe, possibly, perhaps thinking that I might try this again with bolder colors, or not:)
A big Thank You to Sheila for allowing me to be a guest designer today. Until next month,
I am back from the beach!!!! And anyone that knows me knows I LOVE THE BEACH!!! So for I thank you for running Gypsy Made Simple this week so I could have fun in the sun!
I Challenge You to Link Up ANYTHING you made this week to this post for us all to enjoy! You could win this wonderful Creative Memories album complete with pages, page protectors, some paper and even a package of Creative Memory markers. Anyone that links up their project and is a follower will qualify for this random drawing! (Note: Due to the weight of this item I can only ship within the US but if one of my out of the country friends wins don't feel left out as I have a special gift card to send to you for winning.) Okay everyone link up your projects!!
I want to mention a lovely lady that I am copying the Link Party from; Tracy of Craft Junkie Too. She has a linky party every Friday that I never miss. It is so much fun to see all those wonderful designs! I promise you Tracy this is a Sassy Lady is on vacation and has her mind on the beach party! I will arrive home the day this posts so I get the fun of seeing all your wonderful designs be it a card, scrapbook page or a box. I can't wait as you are all so talented.
So get busy and link up your projects and you could win some blog candy! All entries must be made by 11PM July 30th. You need to use your Cricut somewhere on your project to be eligible. Winner will be announced on Sunday July 31st. Limit entries to 1 project per day per person.
Hey everyone~Happy Tuesday to ya~ This is Stacy form Lovethatbug. Thanks Sheila for having me back with you again today.Today I don't have an actual project for you but I do want to share a great tip with you that I had seen on youtube awhile back. Cricut meest Drywall Mesh
Using drywall mesh to lift items off of your Cricut mat helps keep your cuts even plus it makes it easier to transfer the cut itself. Since this is a little hard to explain I filmed a shore video showing you what I mean, hope you enjoy. Hugs, Stacy