May 31, 2012

Make it Your Own: Simple and Sweet

Hi!   It is Charlotte here from A Little Bit of Detail.  I am thrilled to be here as a part of the Sassy Design Team.  First, a byg THANK YOU to Sheila for the invitation and another big THANK YOU to Sheila hosting our second card party.  Oh, how I wish you all could have been there.  It was great fun, food , and fellowship.  And I went home with a boatload of new cards!!

Last month I made  monogram cards for two dear friends.  It was so much fun, and gave me a chance to really look closer at all the fonts on the Cricut cartridges.  Well, one that really stole my heart is from the Elegant Cake cartridge.  It is so pretty and yet not too fussy. 

I decided to make some monogram cards for myself.  Here is one of them.
I really do not think the photo does it justice.  This is just a simple little A2 cards with a pretty background mat from K&Co.  I created the border with a coordinating paper and a Martha Stewart border punch.  It is topped with a little lace for texture.   The mat and border are both inked in gold and bronze.  The initial is cut from the Elegant Cake cartridge and also inked a little in gold and bronze.  I added a sweet little gem to complete the card. 

Most of the time I over indulge in layers and elements on the cards I make.  However, there are times that I like to keep it simple.  As it is said sometimes  less is more.  I hope it is true with this card.  Please drop by A Little bit of Detail often.  I just love having company. 

Have a Super Sassy Day!!
Charlotte

May 30, 2012

3D Shelf Card

Hi Crafter's :)

Good Day, Adele here from Adele's Cricut Creations and today I am sharing my 3D Shelf Card with you here at She's A Sassy Lady.

I created this card after receiving over 400 requests for the Template from last year


I used my Imagine & Baby Boutique for this card, after printing 2 12x12 sheet's of white paper in 2 BB patterns
I used my Template to cut out the shapes I need (this time I used my Silhouette to cut the shapes out)

Here is the Template in JPeg format
Here is the Studio File


After cutting the shapes from my 2 BB printed paper I added the embellishments below


Precious was cut at 2.5", all the rest were cut at 1"


I added glossy accents to the letters for added shine :)

I hope you enjoyed my 3D Shelf Card.

Thank you Sheila for allowing me to share my project with you today :)

Happy Crafting

Hugs

Adele

May 28, 2012

Personalized Boardbook With Matching Card/Giftbox

Hey y'all! Good Morning! Aymee Gandy of 'A Scraphappy Southernbelle' here with you on this beautiful day to share a new project I have created. This project was a special request and I had so much fun creating it! The customer who asked me to create it wanted a pink/brown/leopard print theme. The recipient of this set has the cutest Yorkie named Sophia. This boardbook will be a place for her to add her favorite photos. I created a little card and gift box to go with it too since it will be a present. Here is the set:
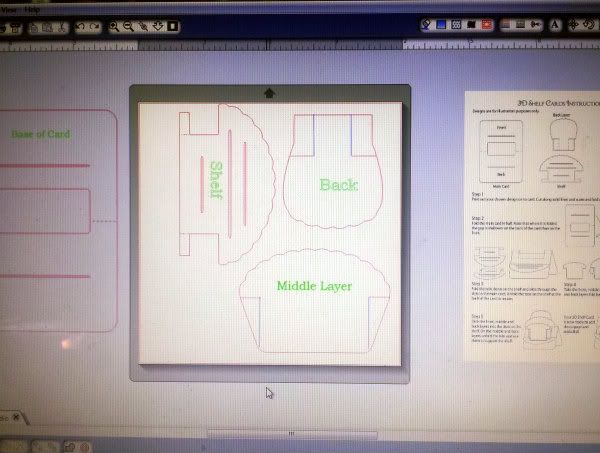
Here is the giftbox I created. I used my Cricut and SCAL software to cut out the giftbox. I used a SVG file from My Grafico. For the Yorkie silhouette, I designed the file myself using Inkscape and cut it with my SCAL software.
 I added a cluster of floral embellishments to the corner.
 The crinkle ribbon is from My Craft Spot.
Here is a view of the gift box lid lifted off... 
 I lined the inside of the gift box with coordinating paper from Momenta.
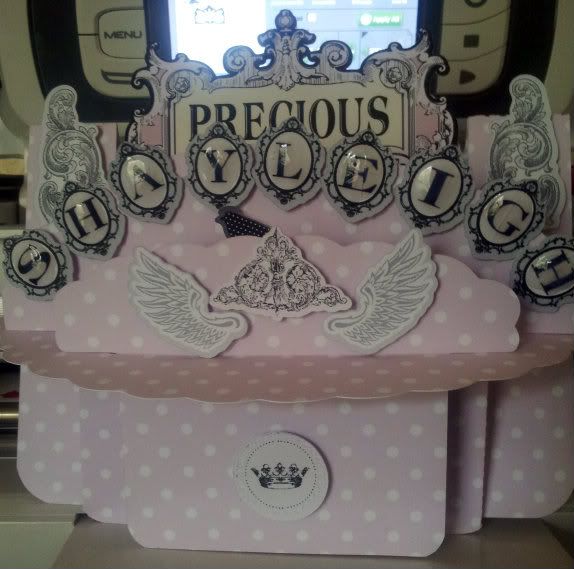
 Here is the card I created:
 A cluster of embellishments
 I'm not sure if you can see it or not, but check out these leopard print looking bling I found at Michael's! I had a fit over them when I saw them! LOL
 Inside of card has a stamp from Stampin' Up!
 Back of card (I thought the hostess could write a message here for the recipient).
 Here is the boardbook. It spells out the name 'Sophia.' I used my Inkscape program to design the boardbook and my Cricut to cut it out. This is the view of the front. All of the blank white spaces you see in the book are where photos will go.
 I used my Zutter Bind It All for the binding. I added some leopard print tulle and pink ribbon to the binding.
 I added Alphabet Stickers from Making Memories for the 'S' page. The flowers are from Michael's too. I cut the Yorkie silhouette. I also inked the edges of the pages with some ColorBox Chalk Ink.
 Love these sparkle flowers from M's!
 Back of 'S' and front of 'O' pages....
 I cut out 'woof' using my Cricut and SCAL. This font is called Mr. And Mrs. Popsicle. The 'S' on the Yorkie stands for 'Sophia.'
 Up close of the bling...
 Back of 'O' and front of 'P' pages
 I used my Cuttlebug and the Swiss Dots folder to emboss the pink cardstock behind this Yorkie silhouette. I designed the Yorkie file on Inskcape and cut it out using my Circut/SCAL as well.
 Up close of embellishment...
 Back of 'P' and front of 'H' pages...
 More embellishment...
 Can you tell I'm addicted to bling? Tee hee!
 Back of 'H', front of 'I' pages...
 Sophia has a doggy brother named Peyton. I thought she might like to include pix of them together here.

 Back of 'I', front of 'A' pages...

 I used my Cuttlebug and the Swiss Dots folder here as well.

 Back of 'A' and front of back page...


 Back of book....
 I love this Yorkie cut. It is my fave! I designed it on Inkscape as well.
 Here is the book laying flat...
I hope you guys have enjoyed these projects today. I apologize for the pic heavy post! Tee hee!

Have a great day! Happy Scrappin!

May 26, 2012

Gyspy Made Simple - Altering A Card Size From Cartridge To A Standard Size & A Scraplift!


Good Times Ahead! Don't you just love that sentiment for the front of a card? Boy you can use that for just about anything positive! Today on our Gypsy Made Simple series you will learn how to alter a ready made card that is on a cart to fit the size that you want while still retaining all the detail that you loved. I am also scrap lifting this AWESOME card from Aaron Brown of Booth 32. She sent me a similar card and I just had to make it on my own and share it with you today. I am a fairly new follower on Aaron's blog and I just love the awesome projects that she shares. This card though got sent right to my door and that is when the trouble started... I had to make this awesome card.
Now let's get out your Gypsy, grab a cup of coffee and let's get to work.


Now wasn't that easy? I used the Art Philosophy Cart but you can use any cart you want that has complete cards on it. You know, Just Because Cards, Birthday Bash, Wild Cards just to name a few. Use what you have already. See how easy it is to put together! Just take your time and do all the steps that give your card a finished look. Use hide contour if you don't like the score marks and if you chose a card with a window in it, remember you can hide that too.

Here is one of my completed cards and I have to tell you I love it! I used the Workshop On The Go Cruisin' Kit from Close To My Heart to create this card and I just love the papers. It even came with the bottle caps and stamp set. I just my own inks and I was good to go with Grey Flannel, I used the twine that I had from My Craft Spot, some left over paper scraps from the card party, and some black ribbon. I was trilled with the way this turned out.


Now wasn't that easy to put together. I kept Aaron's card close at hand the whole time as I didn't want to miss any detail on it as I thought the card was just perfect. I love the colors and the detail she used and I think I accomplished a very successful scrap lift that the original crafter would be proud to say yup that looks good! I always like to make mine as good as the original even if I don't have all the material they used.

This is a close up of the 2 fronts. Aaron's gorgeous card is on the left and mine is on the right. Aaron used the Adventure USA stamp set They both have the same look and feel even though I didn't use the exact materials.
Don't you just love how easy it is to alter a card from the cart and call it your own. The Gypsy makes it so easy and remember just like a computer if you make a mistake, just redo or restart your project. No loss it is like putting in a fresh sheet of paper each time you use it.
Now I challenge YOU to make a card this week by using one of the carts that offer cards on it and make the card fit an A2 size, then make it 2 up so that you are actually making two cards with one cut! Then link it up. Also try to scap lift from something that you love the design and link it up. Be sure to give your original designer credit on your blog and I am sure they will be flattered that you thought enough of their design to want to make one of your own. Let's see those awesome cards. Link up your card today.
Thank your for joining us, I hope you enjoyed today's post, be sure to come back every day for a new project offered on She's A Sassy Lady. Thank you for your sweet sweet words of encouragement. Your comment inspire me to continue sharing with you.

We Have A Winner

We had so many beautiful entries this week that I just love. I was able to visit some new blogs and became a follower of some very talented ladies this week. I just love this blogging as you are able to meet so many wonderful and talented people. I hope you did the same this week.
Thank you everyone that participated in this weeks challenge. I visited everyone of you and was really impressed with your work. Thanks to Random.org we have a winner. Today's winner is Mylene of Simply Mylene with this great little shape card.
Please contact me with your full name and address so I can get this cute little stamp set out to you.

May 24, 2012

Sassy Dude... Create your own shape card...


Hey Ya'll,
Sassy Dude here from Cricut Couple.  Today, I had really great intentions, but for some reason, I can't get a correct answer from Provocraft on how to be able to update my machines or pull files from my Gypsy, so let's do a little lesson in welding, since I can't share the simple file with you.  Hee! Hee!  This is a really fun scarecrow card that I created with the Gypsy and it's actually really simple.  The hard part is having a design in your head and knowing your cartridge library enough to find shapes to pull it off.  Hee! Hee!  Fortunately, I kind of knew what I needed.  The hardest part was finding the hat.
 Here is what the finished card looks like from the front.
 I used these four cartridges for the card and all shapes.
 To start with, you have to cut shapes that are going to be the layers you add on the front of the card.  The following are the cuts you will need.
The hat is from Paper Dolls for Everyday.  Cut 2 at a height of 8.50 (this is an accessory layer, so you really have to blow it up big).  You will need one for the hat (denim paper) and one for the hat ribbon (leather look paper).  For the hat ribbon, cut the hat and then use a craft knife or scissors to remove this piece from the overall cut.
The circle is from CTMH AP and cut at a height of 4.00.  I used cream colored card stock.
The bandana is from Old West and cut at a height of 4.30.  I used bandana card stock.
The hay is from Pop Up Neighborhood.  This is a circle exclusive cart, so if you don't have it, there is a grassy type piece on Pooh and Friends that would work too.  For the P.U.N. cuts, you need two at a height of 3.90 and one at a height of 4.60.  These are cut from a golden card stock (dark yellow).
 Add a layer with your Gypsy and copy one of all shapes over to the next page.  Then you need to contour out the inner cuts on the bandana and hat.  Place them all together and then weld them.
 This is what the welded piece looks like.  Basically, this is giving you, not only the shape of the card, but also giving you a base layer for assembling your card.
 Finally, add a 3rd layer to your Gypsy file and pick a card base to use for your inside sentiment.  For this one, I used Close to my Heart Art Philosophy for this oval card shape.  You can use it as the file is, but I like to contour the score cuts out and score with a bone folder.
 You can see here how the card will open up.  You can also add to the Gypsy file and cut an extra oval, slightly smaller, out of he cream card stock for a sentiment mat.
 I inked everything for this with cocoa ink.  I also used colored pencils to give the hay a little more color and detail.  For the face of the scarecrow, I hand did the face with black sharpie.  I then used markers for the nose and freckles.  I also used a little tomato colored chalk to add a little blush.  I used the beautiful May 2012 CTMH Stamp of the Month set for the sunflower.  I simply stamped it with black archival ink and then colored it in with my colored pencils.  You can see in this angled picture how I used liquid glass on the eyes and center of the sunflower.
So... Looking straight on, this is the finished project.  I really love the way he turned out and had so much fun seeing the original thought come together.  I have to admit, I am pretty proud of this one.  Hee! Hee!  I hope you all will fire up that Gypsy and play with some shape card ideas.  This really does sound complicated, but the entire card took about 15 minutes to layout on the gypsy, probably 15 minutes to cut and about 15 to assemble.  I think I am going to make several of these this fall.
The finished card is pretty large, so if you like smaller cards, you will probably want to lay everything out with the measurements provided first to get the feel of it and then shrink things down a little bit to get the size that you want.
Again, I am so sorry that I don't have a gypsy file to share with you.  If I can get these machines to start getting along again, I will repost and share the file.  I will also e-mail it to Sheila so that she has a copy to share with you too.
So... think about something fun where you can really manipulate other shapes into a fun design!  It's really worth the work and lots and lots of fun!  I would love to know what you think about this card today and thanks so much for my friend Sheila for letting me play over in Sassy Land today!  If you have time, we would love for you to hop over to our blog for a visit!  Cricut Couple Blog