July 30, 2013

Hand Made, Hand Painted Card


Hi!!  I’m Leslie from http://scrapnlifeaway.blogspot.com/ !  I am brand new to blogging, but I have been a die-hard scrapbooker  for about 6 years now!  This is my very first post here at She’s A Sassy Lady!  Thank you to Sheila for giving me the opportunity to be part of your Design Team family!!  I hope that I can encourage others to be creative!  I am not gonna lie, I’m rather nervous, but onward and upward!!  Let’s make a card!!


I started out with a basic 8 ½  x 11 piece of ivory card stock and cut it in half to create my 5 ½  x 4 ¼  card base.  I then cut one 5 ½  x 4 ¼  patterned paper from my DCWV Stack 7 pad.  Chalk the edges of the patterned paper with my Prima Branch Bark chalk.  Then adhere it to the front of the ivory base.  Cut two 5 x 3 ¾ mats using dark tan paper from my DCWV Mariposa Stack.  I trimmed the bottom of each mat using one of my EK punches.


Using my VersaMark watermark stamp pad, I randomly stamped three different flowers (from Scrappy Cat) on the mat that will go on the front of the card.  I stamped my “thank you” sentiment from the CTMH Casual Expressions stamp set in the lower corner of the mat.  I then covered my stamped images with Rangers Copper embossing powder and then hit them with my heat gun.  I also stamped and embossed a flower on the mat that will go inside my card.


I wanted to add color to my flowers, but I don’t own any Copic Markers, and I didn’t like the look when I tried my water color pencils.  BUT, I do own some Perfect Pearls by Ranger!!  I used Blush, Forever Violet, Blue Smoke and Forever Green.  Using a paint brush with a very thin tip, I painted each flower.  I allowed about ½ an hour for my painted mats to dry.


After my flowers were dry, I chalked the edges of the mats with my branch bark chalk.  On the mat that goes inside the card, I stuck a ½ in. strip of the patterned paper on to the top of the mat.  I thought it would add some nice contrast and tie it into the front of the card.  After looking at the mats, I decided they still needed a little “something”, so I glued some small gems onto the centers of the purple flowers.


And here it is!!  A hand made, hand painted card!!  You can make this card so versatile by simply switching out the sentiment!!  I hope that you enjoyed my very first tutorial!  Please feel free to stop by my blog!  I am starting on a wonderfully creative journey and I would love for you to follow along!  Who knows where we will end up!  A huge thank you to Sheila for having me visit today!  I’ve had a creative blast!

July 29, 2013

Fridge Magnet Project

Hi Friends,
 Sandy here with another post for She's a Sassy Lady.  Today I am going to show nice project that I made for my sister. Her and the family are leaving for Africa in 4 days for two years. She will work as a teacher/missionary.  So...yeah, I'm a little emotional right now.

She asked me to make some thank you cards to give to those that support Martin's 4 Africa.  But, I got to thinking, thank you cards are nice and all, but I wanted something that people can see everyday.  And when they do, they might be reminded to say a little prayer for her, Joe and the kiddos.  I came up with refrigerator magnets. It is something that people will see when they head to the fridge. She loved that idea and even helped me make them.  We spent the night, laughing, remembering and just enjoying each others company.

So let's get started...
You will need:
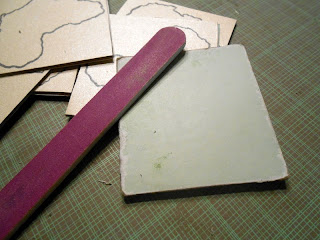
  • 3x3 chipboard square ( I got a poster board sheet of chipboard at the craft store, we made 50 of these from that sheet)
  • Mod Podge
  • 1 piece of 3x3 cardstock 
  • 1 piece of 3x3 Pattern Paper
  • Adhesive
  • Nail File
  • Distress Ink Pad
  • Embellishments- punches, stamps, die cuts, etc.
  • Magnet strips (can get in a roll or on a sheet at the craft store)
Here are the magnets that I made for my sis ...
  • The Africa shape is just a clip art that I downloaded and printed from the computer. 
  • First, Adhere the card stock and pattern paper to the front and back (great way to use up scraps) on the chipboard square
  • File the edges, this will help the paper stay on the chip board.
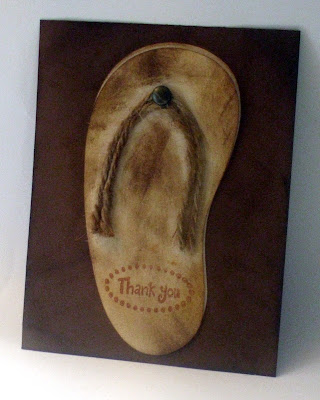
  • The heart is from Cricut Craft Room Basics, cut @ .5" and the sandals are from Life's a Beach and cut at 1".
  • I wrote the sentiments on the front with a calligraphy pen and ink the edges and sides with the distress ink, 
  • After you decorate the front of your chipboard, do the back if you would like 
  •  You are going to Mod Podge with a couple of coats (we did 3-4 coats and it is well worth the extra time).
  • The Sandals represent the money (over $2000 that the kiddos raised for Shoes 4 Africa)
  • The heart is over Ethiopia, where they will be
  • Their Faith, Hope and Love is what has gotten them this far in this calling on their lives.
This is the back. 
                                 
As you can see, I decorated that back with this cute sentiment stamp. And using my Just Right 15pt. font set, I was able to sign them Martins 4 Africa.
Everyone was amazed that these are chipboard/paper and not wood.  With the Mod Podge texture and the extra coats, they are so sturdy and will last for a long time.

I hope you were inspired with this project.  Very easy to do, makes great gifts. Other ideas, are using photos of people or places that you have been, making personalized magnets to hold the kiddos school projects or even a to-do/shopping list.

ps: here are the "thank you" that I did previously for my sis. I used Life's a Beach and welded the letters together.  I attached with a brad to swing the top sandal over.


Hope you have a blessed day and thanks for stopping by,
 

July 27, 2013

Making The Artiste S Fold Card On CCR


Shh, don't tell anyone but I am showing you a card made from a stamp set not yet released!!! So shh, don't tell Amy at May May Made It that I am showing it off! I am so excited to spend some time with you making this adorable card from the Artiste cartridge.... it was so easy on CCR I just had to share it with you. Once the base of the card was done I had the hardest time figuring out how to decorate it as I have so many beautiful stamps, just like most of you do too. But this little bee was just too cute to pass up so hang in there I understand Amy will be releasing them soon.


Look what a little glitter and Glossy Accents do to this adorable stamp. Don't you just love him?


See how easy it is to make your card on CCR... I know, I know I talked alot but it has been a week since I spoke with you!!!


I find that in card making or scrap booking it is the little details that set your project apart. Taking time to ink, stamp, glitter or even stickle really adds life and dimension to your project. This video shows you how to add glitter that won't fall off.


In this video I change the card up a little offering you 2 different ways you can put this card together. I love how beautiful both turn out, don't you?


Here is the second card and it is all ready to stamp a sentiment on it if I need to or I can just leave it as is and write a little note on the inside of the card. I just love working with these stamp set as they really add life to the card.
Thank you for joining me today. I know this was a long post but there are so many things you learn from it that will save you time in the long run. Thanks for your sweet sweet words. Your comments inspire me to continue sharing with you.

July 25, 2013

Adding Layers

 Hello! Leah from Paperblossoms here to share a simple technique I use all the time while designing my cards, layering. I have been a card maker for about 7 years or so now and I have tried to improve my own personal style as well as learn from others. One thing that I noticed early on in my papercrafting is that the more eye catching creations have a lot more layers and interesting details going on. When I sit down to create a card I usually don't really have a complete picture of it my mind already, so I'll start with a basic layout and focal image and build from there.
Here is where the above card started. I knew what focal image I wanted and started the layering by placing the flowers on a tag. I layered the sentiment on top of the tag as well. This would be an o.k card, but not great. Bringing in contrasting colors to make your image pop is good as well as other layers of shapes and paper patterns. For my card I chose to layer a black mat behind the polka dot base as well as the dark teal oval to kind of frame my tag and focal image. I also added a small border to the bottom of the tag which helps ground it. The final details I added were machine stitching and sequins. Even though I have gotten a lot more comfortable with my own style I still need to remind myself of this design tip when creating. When I don't I'm not nearly as happy with the outcome. I hope you'll be inspired to create something yourself today! Thanks so much for visiting.


Supplies:
* Botanicals Cricut cartridge
* Inspired By Stamping Spring Blossoms (for the sentiment)
* Tag die and border die from PTI
* Sequins from Hobby Lobby

July 24, 2013

Gypsy Made Simple - Shape Cards

Don't you just love fun cards.... those that bring out the child in your nature? I do. This card was so easy to make and so, so simple that it is must have in your card making arsenal. As long as you have the base of the card stored on your Gypsy as a template you can add any artwork you want to fit the occasion.


See how easy that was. Make your self a template and name it as such and when you need a fast card this little one will do the trick.... even if it is just adding words to the bottom.


These cards went together so fast and all I used is 1 1/2 sheets of 12x12 paper and 7 inches of trim that I picked up at Hobby Lobby.

Now doesn't this look cute? I must say the picture doesn't do it justice as it is so cute. The pattern paper are from Close To Heart, the Dotty collection, Coordination's for the gray and I used scraps for the white sentiment area.

I inked the edges with Cotton Candy ink and I love how it brings the pink to the inside of the card.

In less than a 1/2 hour these 2 cards were designed, cut and put together. Love that as I have such a busy schedule and often times I just need a card now! You know what I mean? This little card will do the trick.
Thank you for joining us today, I hope you enjoyed this little project and it helps you with your Gypsy. Thanks for your sweet sweet words of encouragement. Your comments inspire me to continue to share with you. Have a blessed week.

Making Envelopes Of Any Size


I just love making cards and as of late they seem to be getting larger and larger and of varying sizes and shapes. That is all fine and dandy and people love getting handmade cards, but it does create a problem. You need an envelope to place the card in that fits. Well you are going to love this little post as it will take you step by step in making you own envelopes. The only limitation is the size of paper you have to work with.


Now wasn't that easy? And I have to chuckle now as I was so nervous doing this video that I even forgot to use my corner rounder on the little flap area. Bet you didn't know that I get nervous did you? I even made my own little cheat sheet that I typed up and keep at my side as I always forget what step I am on an it makes an easy reference for me. Oh, if you want a copy of my cheat sheet just click HERE for the PDF file.

Here is a close up of the envelope with the card in it and you can see how great it fits. I love being able to have envelops to fit any card. Oh, if you would like instructions for making this card just click HERE.


Here is a close up of the stamped image on my card. I just love the simplicity of stamping the green on green. It looks awesome, don't you think?


And this is how my card looks when it is pulled out of the envelope and they are sitting side by side. Don't you love how well they coordinate? I love it.
Thanks for spending a little time with me today. I hope I have helped you a little today and made it easy for you to make you very own custom envelopes. Thank you for your sweet sweet words of encouragement. Your comments inspire me to keep sharing with you. Have a blessed day.

July 23, 2013

Gypsy Made Simple - Making A Shape Card From A Single Shape

 Don't you just love everything about summer? The bright sunny days that are so nice and warm, swimming, playing outside, visiting with friends and neighbors, backyard BB Q's just to name a few. Yup, summer is the best. And when you think of summer somehow you always get around to having icy cold water melon! YUMMY! Well today I thought we would practice making shape cards by taking a single shape and welding it together to produce a card. Add the layers and you have got a card that anyone would love to receive. So grab your coffee and turn on your Gypsy and let's get to work.


See how easy it is if you just take your time and go step by step, before you know it you are cutting your card out. I have to admit I am feeling a little strange on this one as I usually set up my card 2 up so that I end up with two but because of the size I only did one. Now I am just going to have to cut another so I have a spare!


Now wasn't that just too easy to put together? I just love this little card and I love how fast it was to make. This is just what we need for the summer months when we still have the urge to craft but don't have a lot of time as we are spending it with family and friends doing the things we love to do.


 I love how easy this card went together. I inked the edges using Close To My Heart ink in Topiary, New England Ivy, Colonial White, and Holiday Red using a simple round sponge that I cut into six pie shaped pieces.


I love how a little Holiday Red ink just gives the inside of this card the perfect look and feel and it took only seconds to apply. I used the word sweet right off the same cart; Simply Charmed.

Well this is the finished card and as you can see it stand up nicely too.
This week I challenge you to make a shape card from a single shape and then add the appropriate layers and link it up. You too will be amazed at how easy it it to make a shape card. Let's see what you do.
I hope you enjoyed today's post, I know I had fun spending time with you. Thank you for your sweet sweet words of encouragement. Your comments inspire me to continue sharing with you. Have a blessed week.

July 21, 2013

Artiste Mini Scrapbook Layout Featuring Artbooking Cricut Cartridge

Hi, this is Donna Lee from http://stampinnscrapinwithdonnalee.wordpress.com/.  Not long ago I received the new Artbooking Cricut Collection from Close To My Heart and I was oh so happy to get to play with it!  I have a Mini Album that I made using the Artiste Cricut Collection that need to add some embellishments to. You can see that album on this post,http://stampinnscrapinwithdonnalee.wordpress.com/2013/06/08/mini-album-2-artiste-cricut-cartridge/ .
One of my favorite cuts on the Artbooking cartridge is this branch (border) and adorable owl (Icon).

I was not able to use my Gypsy or CCR because the Artbooking Cricut cartridge has not been added to the updates. I started with cutting the Icon images at 4.25 inches to get an idea as to how they would size because they are set to cut based on the size of the entire layout they are attached to.  That being said, you can use the Real Dial Size key to get them to the exact height you want but I wanted to see what they would cut like at different sizes. I also cut two at 6.75 inches. The eyes and feet cut, but I chose not to use them.


Just like the Close To My Heart Art Philosophy and Artiste cartridges the Artbooking cartridge cuts with great detail at very small sizes! You are going to love this Cricut Collection! 


I needed a title for my Mini Scrapbook layout and thought this "look whoos here" would be perfect. This is cut a 6.75 inches. I am using a vellum from Hobby Lobby. My blade is always at 6 for any paper, my speed is at Medium and speed is set at a High. 

As you can see, it cut perfectly! 

I added some bling for her eyes and inked the edges of my branch and leaves. I used dimensional adhesive to pop the 4.25 inch branch and owl onto my mini layout.


A simple 3X3 mat was added for a photo and this page is done! The Artbooking Cricut Collection makes scrap booking or card making a breeze no matter what size you are working on! The images on this cartridge are very versatile for all paper crafters. 

You can learn more about this Artbooking Cricut Collection http://stampinnscrapinwithdonnalee.wordpress.com/2013/07/15/artbooking-cricut-collection-details/. Thanks for stopping by today and be sure to subscribe to my blog at http://stampinnscrapinwithdonnalee.wordpress.com/ for more creative paper crafting projects. Have a blessed and crafty day!

Learn How To Place Your Cricut Cartridges On You Ipad, Kindle or Tablet


Good Morning! I am sharing this post with you today as I get at least 2 emails a week asking how to put your cartridges on your Ipad, Kindle or notebook. It will work the same for all of them so I thought I would give you a quick lesson. the above is for the Ipad. I downloaded an app called Ibook and it is a free app that is wonderful.... As you can see it has my cartridges in it.


This is the method of seeing the books that I prefer as it is a little easier for my eyes to see. I love how everything is alphabetized as it makes it so much faster to find the individual book that I am seeking.


Now wasn't this just too easy? I want to tell you I added 175 in  just one long rainy afternoon on the beach while we were all just sitting around and talking! I say long because we had 5 children that afternoon in a 2 bedroom condo.... this kept me busy! LOL

See how easy it is to see the artwork. I love how you can choose exactly what you want just like in your books without having to go through a big stack of boxes.


But I have to tell you my favorite feature is being able to enlarge it so I can see the images better to see every little detail and that means alot if you are creating on your Gypsy of CCR.
I hope you enjoyed today's little post and it helped you to place your books on your Ipad or notebook too as it really helps you to plan what you want to create.
Thanks for your sweet sweet words of encouragement. Your comments inspire me to continue sharing with you.

July 20, 2013

Just A Simple Thanks A Bunch & The CTMH Artiste Cartridge


Hello there. I am so excited as I got a little craft time in. Monday is my day to get the house clean and the laundry done... you know I was little Miss Suzie Homemaker! Well I just made a simple little card using the CCR and my Close To My Heart Artiste cartridge.... I just love the simplicity of making these little cards. The height is 4.25 and in just 1 cut I made the card with the matching envelope.


With Close To My Heart anytime you spend over $35 they give you the option to purchase the stamp of the month for only $5, a $17.95 value! I just love that and that is what this stamp is from; June of 2013. Each month it is different and sometime I just order goodies just to get my stamp set! I know that is silly but I just love their little sets.


I know that was a little long but I honestly never noticed the time as I was busy sharing with you! Besides I hadn't colored anything in a long long time!


Look at these papers, I used a My Minds Eye for the envelope and the card was made with a basic white that I used Tim Holtz Antique Linen distress ink on. I stamped the flowers and sentiment and then matched the colors of the flowers to the envelope and they now look like a matched set.... Don't you just love having ink and markers!


Then I got out my Stickles and had fun coloring in the little flowers with my CTMH Markers so again it would match the glossy envelope! Love it!


Here is a final close up of the card, I just love it don't you? I sure hope you enjoyed today's post today and take the time out of your busy schedule to create something too!
Thank you for your sweet sweet words of encouragement, your comments inspire me to continue sharing with you! Have a blessed week!