April 30, 2011

Gypsy Made Simple - Shaped Window Cards

Grab your coffee and your Gypsy and let's get to work on this adorable Happy Bee-Day Card. It is so easy and I will even give you a FREE file to download at the end of this post if you want! This is a close up of one of the cards so you can see the detail.

Well we are back with another Gypsy Made Simple Design! And this is such a fun little card I know you will love making one along with me! I was at my mothers a couple of weeks ago helping out after she had a surgery and made a little sketch and proceeded to make the design that very day... I just love owning a Gypsy and being able to design where ever I am!

This video gives complete instructions for you to make your Happy Bee Day Card. I used Create a Critter, Gypsy Wanderings and Straight From The Nest for the artwork and lettering on this card. Remember if you don't have then just substitute for something you do have. (NOTE: I am excited to share with you that I went out and bought a new camera and next week my Gypsy screen will NOT be blurry at all! I checked and you will love the clarity of next weeks project.)

This next video is cutting and putting together this adorable little card. So - so easy to do and the little window in it is sure to set it apart from others.
Don't you just love this completed litte card? I challenge you to make one too on your own and link it up to my blog so everyone can see your beautiful creation. It always amazes me the we can have all have the same basic design and each one looks so different and beautiful on it's own. Also as promised click HERE if you would like the Happy Bee-Day 2 Up file. You will love making 1 complete cut and getting 2 cards to add to your stash.
I hope you liked todays little project and play along with my challenge. I thank you for your sweet sweet words of encouragement. Your coments continue to inspire me to keep sharing with you.
signature

April 29, 2011

Ready to POP!

Hi! Roberta here - aka, TXScrapper Mom. I am so very excited to be a guest designer today here at She's a Sassy Lady, and even more excited to be joining the wonderful groups of ladies that make up the Design Team starting next month!!!

Here's what I got for you today....

I saw the cuttest baby shower invitations online, and I loved that it wasn't just pink/blue. I have a baby shower coming up in the next few weeks, and a few of us decided to put together a basket for the mommy-t0-be. I made this little treat (inspired by the invitations) to include in the basket - hope she likes it!


Recipe


Box - Matchbox from TBBM


Mom - New Arrival


Popcorn - Slumber Party Lite


"Ready to" - Feeling Groovy Lite


POP! - Don Juan

April 28, 2011

A Little Pickup For You

Good morning friends! Its Leah today and boy I am pleased to have my day come up here at She's a Sassy Lady. I've been saving this project for a while now so I am excited to finally get to post it!
My project today is more about adding details then really any certain technique. However I found it interesting to show you step by step how much adding more detail can make a project come alive!

I started at my Cricut Imagine and cut this great truck from Just Because cards and used prints from Elise (Imagine pattern cartridge). So here is the basic truck, cute, but basic with inked edges...


And here I've added just a few details. Glossy Accents to the window and small punched hearts on the tires, gel pen stitching and mini Prima's and pearls. Now this is cute!

And finally added to my card...The title was cut from Just Because cards but the print comes from Hopscotch (gotta love those cloud designs), the layering I cut in blue card stock and stamp with a script design. Added the tab cut background paper and the truck and its a darling card...but what if we added just a bit more....?


So lastly I have added a few clouds stamped with a definition stamp in a complimenting color. Added grass and more little flowers and pearls to ground the truck and now its perfect!

I know there is a whole CAS (clean and simple) style out there and that is great but sometimes a little bit goes a long way and you'll learn more and grow when you push yourself. I know how much I have changed in the past year or so by just stopping and adding a bit more to each project.
Thank you for coming by today and having a look!

Leah

April 27, 2011

Spring Bird Houses Made With Love And A Big Mess!

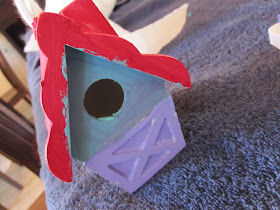
All my grandchildren were over - all 6 of them- and we kept the older 4 busy making bird houses I picked up at Michael's. I did see them at Joann's too and they were only $1. The children loved making them. I through some old garage towels down on the kitchen counter got out the paints, some brushes, paint sponges and a pallet for each one and away they went. I had paint everywhere. The floor, the counter, their arms, faces and even the chairs they were sitting in..... what a mess to clean up. The good news is they had a bawl and each has a little bird house too! Above is little Sydney concentrating on painting while Brianna is scoping the situation out.
Carissa starts hers using a very nice pallet.
Brianna's bird house has a red roof.
And Justin stays with a gold roof and forest green and navy on the walls.
They really concentrated on what they were doing.
They picked out their own colors.
Here is Sydney again moving right along.
She caught me with the camera and starts posing.
.
Syd's is finished, isn't it beautiful?
Even Flat Stanly got in the act, he said he hadn't painted a bird house before.
Carissa had paint every where and a nice thick coat on her pastel house.
Now isn't her little bird house just lovely. Matches her beautiful headband.
.
Justin did a very good job of painting his birdhouse and it looked masculine with the clean lines and bold colors he chose.
Stanley gave up so Brianna was able to get to work on her house.
It turned out nice, didn't it?
After we got the children cleaned up it wasn't so bad after all. Love working with these garage towels as you just throw them in the wash and they are ready for the next dirty task.
Hope you enjoyed today's post. The children love sharing with you. Thank you for your sweet words of encouragement for them. They are always inspired by your comments!
signature

April 26, 2011

Embellish Your Cricut Cuts


Good morning.   I'm Cher from Cheryl's Window and, once again, I am honored to be a guest designer today here today at She's a Sassy Lady.

Today's project is a beginner project as well as a reminder, and some tips, about embellishing our Cricut cuts.   We have so many adorable as well as elegant images available for us to cut with our Cricut(s), but sometimes we just want to give them a little more umph, pizazz, bling, pop, pow... you get the idea.   There are so many ways to do this, but here are just a few different ways to embellish your cuts as well as a big tip for making the process a little easier.
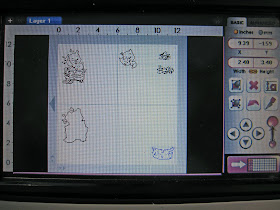
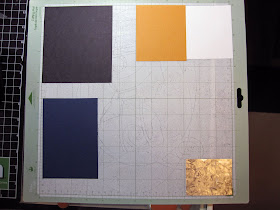

For this card above, I positioned my layers on my Gypsy for easy placement of my papers and then arranged my papers on my mat accordingly.  Notice that for the tub, I actually used a sticky back piece of metal from Making Memories.  That is an embellishment right there.  You could also use plumbers aluminum tape from the hardware store, but you'll need to vary your settings as it is thicker.  When I cut the metal used here, I was able to pause my Gypsy just before this one cut and adjust my blade depth and pressure to perform a "kiss" cut as you would vinyl.  This way I only cut the very thin metal layer rather than the sticky back tape.
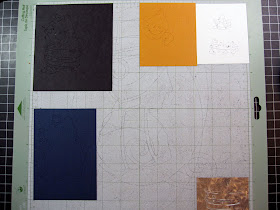

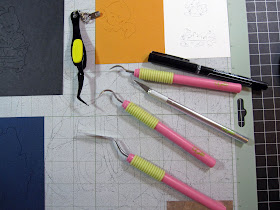
Once your cuts are complete, leave them on the mat, but clean up all the negative pieces and weed all your little cuts.   To do this, you really need to use your tools here.  Here are some of my favs that I reach for every  time.   You need to take a few minutes to clean up your cuts sometimes.  As much as we would love to get perfect cuts each and every time, we all know that we don't.   Just a few minutes of your time here will make it look like you do though.
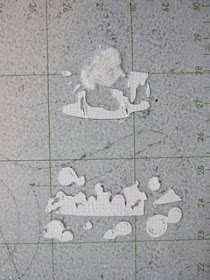
Use your poky dental pick to weed out those little bity inside pieces.   Again, notice that I am leaving ALL my essential layer pieces ON the mat where they cut.   This ensures that I don't lose a piece and/or can remember where each layer goes.  How many times have you cut out all those little pieces and then lost the dot for the i or a little layer for those characters?   This way you won't lose those pieces.


When a piece just does not cut out all the way, don't be scared of using that X-acto knife right on your mat.  You don't have to saw into this cardstock; you usually only have to break a few fibers of the paper to release a cut.   NOTE:  Don't have a cappuccino right before this step.  LOL


Finish weeding all your layers before embellishing or assembling.

You probably noticed that some of these pieces are very tiny! I want to add some glitter, flock, and beads to these cuts also. If I moved these off the mat, I would definitely lose a few and I would have a very hard time embellishing these.   So I now glitter/flock/etc these tiny pieces right on my mat.   If it is a larger piece, you could very easily take it off your mat and it would be fine and that is what we do for most of our cuts, but here is a way that we can add something to those bity layers. 
When I am layering images with detailed layers, I prefer to use a liquid glue that dries clear.   There are many out there, so pick your favorite.   By using a liquid glue, I have a few moments that I can add my embellishing and when assembling the layers, I can still slide it into place before it dries.  


For this layer, I wanted to flock with Sparkly Fluff on the washcloth, glitter the water splashes, and add glass beads for my bubbles.   I used just a tiny bit and did one at a time...again, right on the mat.   I used my finger to press the flock, glitter, and beads into the glue on the paper.  By using only a little, I don't have a lot of waste and it dries rather quickly too.  

While that finishes drying, I move on to start assembling my layered images...right on the mat.   

I like to use a super fine black pen and outline the eyes, smiles, and little cut marks on many of my images.  If your background placement cut is black, this just gives your cuts a more 'finished' look.   It hides those little imperfect cuts many times.  

Now I can add my little embellished pieces.   When these are all layered and dried, you can then place these on your shadow image.   Once the entire images is dry (it only takes a few minutes) you can remove your design and apply it to your final project.  Once it was on my card, you'll notice above that I added a little cheek and ear color with my Copics and a few highlights to the final image as well.  


When your layers have been removed from you mat, use your scraper to scrape off any bits of paper, glitter, etc from your mat.   When I use glitter and stuff, I will also wipe my mat with a baby wipe.  I do not do this for just paper usually, unless it is black paper because black paper always leaves fibers on my mats.  

By using that mat you've already got out, it makes assembling your project so much easier, doesn't it? 

Here are some other options for embellishing those cuts.   Notice that I just embossed only one layer of this image with my Cuttlebug Japanese Scales folder.   I also added just a little bit of Stickles to the rest of the fish and rubbed it in with my fingers.  I wanted just a little shimmer here like fish scales, not a thicker Stickled layer.   And, finally, don't forget to use a googly eye whenever possible! LOL.  

I know many of you have great ideas for embellishing those cuts, but maybe my mat trick and my pen tip will help you too.  

Thanks for stopping by today and I hope you'll visit Cheryl's Window too.   


April 25, 2011

Pitchin' A Tent

Hi y'all! Happy Monday! Aymee Gandy of 'A Scraphappy Southernbelle' here with you today to share a few cards. First, I hope all of you had a wonderful Easter holiday with your families and friends! Did you snap lots of pix of the kiddies hunting eggs? Those always make the best scrapbook layouts!

Anyways, have you ever been in need of a few cards but you are short on time? I know I have found myself in this predicament many times. Well, I found a tutorial on Splitcoast Stampers on making 'tent cards' and decided to give it a try! I love any type of card that will prop itself up, like easel cards, so this technique is definitely going into my list of favorites! If you would like to check out the tutorial on how to create an 'tent card' go HERE or http://www.splitcoaststampers.com/resources/tutorials/tentcard/ for full instructions! I promise they are so easy to follow and you'll have cards created in no time flat!

I was able to create the following 2 cards in about 20 minutes! That is for both cards too! I have never been able to create that fast and am so glad I did because my card stash is running low! I hope to make some more of these this week. For full supply lists, you can visit my blog if you are interested in the supplies I used.

Here is my first tent card...
 See how when opened the card props itself up like a tent?
 Now, since these cards do not open like your standard card, you will need somewhere to write/stamp your sentiment. I chose to do this on the back. I just cut another 4x4" piece of white cardstock and stamped it with my personalized stamp. When I'm ready, I will write my message to the recipient here.
Here is another tent card I created in a matter of minutes. I did the same thing on the back of this card as the card above. I can't wait to send these out!
I hope you will give 'tent' cards a try! They are amazingly easy and FUN!!! Have a fabulous week! And Happy Scrappin' to ya!

Aymee