October 27, 2012

8 Easy Halloween Cards

Well hello! I have been so busy but I have 6 grand children and a great nice and nephew that I had to get halloween cards out to so I stopped on my way to work at Joanns and picked up a few supplies.

I bought 4 sheets of black paper and a bunch of scrap white paper from home along with My Pink Stamper Halloween stamp set and my Close To My Heart black ink stamp pad and a stamp block I also had a few rolls of close out ribbon from last year and 1 Jolee set.. I had the cutter at work so it was a quick in and out and Joann's. Fortunately the Halloween goodies were marked 40% off so I grabbed a couple sticker sets from K and Company and a DCWV Halloween mat stack, and some Zip Dry glue. So I was good to go.

All I did was cut my card bases, the mats and inside sentiment area and I was good to go. I kept it simple by stamping the same thing on the inside of every card.... Trick or Treat, Smell My Feet!

This is a close up of one of the K and Company stickers.... they sure made putting these cards together easy.


And here is another card.... Cute isn't it?

They even had a little rosette in one of the stickers... look at the next photo so you can see the wonderful dimension. I can't beleive after the discount I only paid $1.80 for 3, tha't only 60 cents each.


Pretty isn't it?
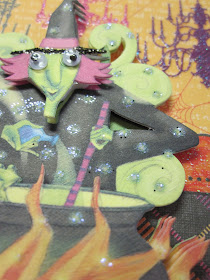
Here is the little witch.


And a close up of the glittery clothing on the witch.

I love the papers that I used. DCWV always has wonderful paper, perfect for any occasion.

Here is another K and Company witch and it really looks cool.

This is from the Jolee package that I picked up for only 25 cents... it mad a great little card.

See how great the papers match.


And here is the photo of all 8 cards. It only took me 1 1/2 hour to make and stamp all of them including the time it took to take all of these photos.
I hopw you enjoyed today's cards.... it just goes to show you that you can craft anywhere you just need to adapt your supplies to the setting you are working in.
Thank you for your sweet sweet words of encouragement. I enjoy your comments they inspire me. Have a blessed day.

October 26, 2012

Anniversary Card

Hi all,

Today I'm sharing with you a anniversary card that I made for my husband. This stamps is adorable and you can get it from Lili of the valley or LOTV for short.

I made it quite simple and as masculine as this image could get. 
Here it is


I hope you like this card. Thank you Sheila for having me today.

Kelly x

October 25, 2012

Baker's Dozen - Fast Cards...

Hey Ya'll,
It's Sassy Dude Day here from Cricut Couple.  I am calling this the "Baker's Dozen". All of these cards were made simply with one basic pattern and one paper stack. Sometimes, you get so bogged down with decisions on where to find this and where do I have that and get lost during the process and then when you get to the end of the day, you didn't accomplish anything, right? Well, hopefully, this will help a little bit with that.
The paper stack that I used for this was from Michaels by Recollections called "Today, Tomorrow and Forever". It's not really my taste, but I thought it would be a fun challenge and I know these are all very popular colors, so I just had to try. Besides that, I needed a bunch of cards in a hurry. I got all 13 of these done in one afternoon! YES! One afternoon!
So... I started with cutting for the cards. I used 13 pieces of 8 1/2" x 11" kraft card stock and folded it in the middle. I then pulled decorative papers from the stack, two coordinating patterns at a time. I cut two mats 8 1/4" x 5 1/4" inch from one patterned paper and then two mats 7 1/2" x 4 1/2" from the other patterned paper. I then cut white mats for sentiments from white card stock 3" x 6". Everything was inked with Chocolate Ink. There is a page in this stack with fun little tags, so I fussy cut all of them out and then there is another sheet that is stripes of lace borders that I cut with a craft knife. Those were also inked. I then pulled from the stamp stash... some from Anna Griffin, some from CTMH and some from My Craft Spot and did some sentiments. I then got out the Gypsy and came up with some images that wouldn't take very long to cut and started laying them out.
On layer one, you can see a birdhouse layer that I cut from scraps remaining from cutting my mats.
I then used other scraps to cut the roof layer and some birds.
I used a dark gray card stock to cut the background layer for the birdhouses.
I then used some colonial white cardstock from CTMH to stamp on and pulled some random images from the Art Philosophy and Artiste cartridges.
Once I had matted cards and piles of fun accessories, I then just started assembling them. For this card, I used a bird, bird house and left the sentiment as it was on the decorative paper. I added a bitty gem for the eye of the bird. You can see how the chocolate ink goes perfectly with everything and really adds a great finish to the shabby chic look.
For this one, I used a CTMH stamp on the provided lable shape and punched a couple of flowers from scraps with a martha punch. I also used a piece of the lace across the center.
For this one, I used a My Craft Spot stamp and an Anna Griffin stamp, some lace flowers and some cute buttons from CTMH.
This one was just a bit different. I used scrap strips and cut them 8 1/4" long to mat the card. The Cherish is also a provided label shape from the paper set. The butterfly strip is from a full card stock sheet.
I used a CTMH thanks stamp on a label shape for this one, three birds, a border strip and a lace strip.
I added a simple bow and a strip of scrap for the center of this card. I really like this one.
This one had a great graffiti look with the wood grain paper. The lable shape on the right is stamped with a CTMH stamp, but is one of the provided shapes. The Happy Birthday to you is a straight clear stamp sentiment from My Craft Spot. I cut the banner shape from Artiste and then put my clear stamp block over the shape... then I curved the clear stamp on the block to fit in the swirled shape of the banner.
This one is more of the same, just different papers. The stamps used are Anna Griffin sentiments.
This one is super easy. The label was from the provided shapes and I just added a lace strip and a bird.
This one is like the others. I added a lace strip and then another scrap piece from leftovers.
I love this woodgrain paper. It's so fun and goes great with the coordinates!
This one also used a label shape provided, but I stamped it with a CTMH stamp.
I think this one is probably my favorite. I love how the birds stand out against the wooded wall. This paper was printed with lace and painted flowers already, so it didn't need much. The banner shape also came from the paper set and was stamped with a CTMH stamp set. I also added some glitter here and there to finish it off.
So... this turned out to be a really fun experiment and I will be doing this again since I am SOOOOO far behind on my cards. This was a paper stack with a cost of $11.99. So far, 13 cards and I haven't even used half of the stack yet. I really tried this to see how far I could get with one stack. With having a simple group of goodies to work with, I was able to complete these 13 cards, start to finish, in about 4 hours. I have never knocked out cards that fast, even with a kit. Hee! Hee!
Well, I hope you like today's project! I will be sharing pictures of these individually over the next week, so I would love to hear your comments. Thanks so much for visiting today!

October 24, 2012

My Favorite Little Pumpkin

Hey guys!
It`s Candy here again from Candy`s Craft Corner! It's my turn to share a project here at She's a Sassy Lady! Thanks Sheila for having me.
I want to share with you a Halloween card I made for my son. 
Here`s the video:


 Thanks so much for stopping by today!
Take care,
Candy

October 23, 2012

Onsie Shape Card


Hello Crafty Friends.....
Sherri here from Sherri's Crafty Place.....I know it is a bit late...but  I am not feeling well.....pretty sure it is the flu...uugghh and I was convinced all day that it was Monday...it is now 9 pm and I am discovering that it is indeed Tuesday.....so I would like to say how sorry I am for being late....
now lets get to my project.....it is a Onsie Shape card......
cute right......lol
so after designing my shape card on my Gypsy...
using the onsie shadow feature from the New Arrival Cartridge, 
I welded 2 together the onsie is 5.70 height 5.73 width
 the paper is DCWV
 the sentiment is also from New Arrival, cut at 7.40 height
 also using my Gypsy, I made a stencil for my I-Rock (love this tool) 
each little circle is .18 in height and .19 in width....
you definitely need to work with the zoom on making these stencils...
the font is from the Pooh Fonts Cartridge....
I use 2 layers on my Gypsy to design the stencils
on the first layer is the word I choose....
the next is where I place all those little circles over the letters....
it takes a little time, but so worth it....
 than placing the stencil on the card, I place all the bling, 
then using the I-Rock, I adhere all those little gems 

 and here is the card finished....
It fits into a 6x6 envelope
this was for a baby shower gift, so size was not an issue...
it was just a littke to big to fit the standard A2 envie, but this would be easy to shrink down to fit if you needed to mail it....
thank you so much for stopping by today, I hope you like my card,
and if you have any question.....please let me know
and a big thank you to Sheila....for putting up with my tarttiness....lol
Happy Crafting....
❀Sherri❀

October 22, 2012

Halloween Party Invitation


Hi folks,

It's Ian from A Newbie Crafter.  I am having a Halloween Party for my staff members in a week.  At yesterday's staff meeting I handed out their invitations, which I have attached below.  Check out the pictures and directions for more info!

I will admit, I did scraplift this from a crafter online, but it was too cute not to pass on to everyone.


Here's the entire invite.  I cut the base layer at 4.25"x5.5 (which allowed me to get 4 bases of the invites from each 8.5"x11" piece of white cardstock).  The black cardstock was cut at 4.25" x 3" and the orange cardstock was cut at 4 1/4" x 3 1/8".


The next thing I did was stamp BOO! on each corner of the base layer in black Stazon Ink.  I also used Stazon Ink to stamp the pumpkin image on the same orange cardstock.  I used the 1 1/4" circle punch to cut that out, as well as 1 3/4" scallop punch on black cardstock and 2 1/4" scallop punch on the orange cardstock.  I also did a scallop punch along the edge of the black cardstock to make it pretty.


I first lined the orange cardstock up with the top of the white cardstock and placed a pop dot directly below it on the white cardstock so it had something to stop at.  I then took the black cardstock and put two pop dots on the bottom of that.  I used a 1/8" punch to punch a hole in the black and orange cardstock and put a brad there.


After that was done I took a white gel pen and put a dot on the scallops of the black scalloped circle and a black gel pen for the orange scalloped circle.  I also used pop dots to adhere the pumpkin image to the black scalloped circle, a pop dot for the black scalloped circle to the orange scalloped circle and a pop dot on the bottom of the orange scalloped circle on the black cardstock so it wouldn't interfere with the maneuvering of the top of the card.  To finish it up I tied purple ribbon around the orange cardstock for a splash of extra color.

The Close To My Heart stamp sets I used for this was:  Perfect Fit - Halloween (B1413), and the November 2012 Stamp of the Month.

Craft on!
Ian