December 31, 2012

Happy New Year


New Year Wishes


I wish you Health...

So you may enjoy each day in comfort.


I wish you the Love of friends and family...

And Peace within your heart.


I wish you the Beauty of nature...

That you may enjoy the work of God.


I wish you Wisdom to choose priorities...

For those things that really matter in life.


I wish you Generosity so you may share...

All good things that come to you.


I wish you Happiness and Joy...

And Blessings for the New Year.


I wish you the best of everything...

That you so well deserve.

HAPPY NEW YEAR MY FRIEND!

Author Unknown

December 29, 2012

Revisit Of The Dallas Stampede Card


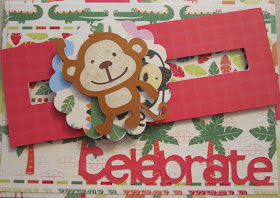
This is a re-visit of the Dallas Stampede Card from when us ladies went to the Dallas Stampede. I thought I would share it again as I LOVE LOVE LOVE spinner cards.... I hope you enjoy this post.
We played a wonderful table game in Dallas. Pam of The Bug Bytes, Melissa of Melissa Made and Elizabeth of 217 Creations each designed, cut and prepared cards for someone else to put together at the Stamped. Well I liked my card so much that I cut 2 more using scrap paper just for myself. You can never have too many birthday cards!
This is the coolest card as children just love it! Everything they do is interactive so this card fits bill. It takes a little more time than a regular A2 card but very much worth the effort when you see the smile on the face of the person that you give it to.


Look at this little monkey, isn't he just too cute?


And the DCWV Animal stack is just perfect for this card design with the little monkey!!


This first video shows how to get ready for a crop or swarm, how to pack and what to pack to enable you to be productive while you are visiting and enjoying yourself. I was able to complete a 2 page layout, 2 Happy Birthday Cards, 2 Happy Birthday Spinner Cards, 2 Get Well Cards and 8 Easter cards at the Stampede as well as take an afternoon class with Teressa Collins and get a good start on a personal album! That is a lot considering all the play time I was able to get in! And I was able to do that because I took the steps in this video.


This second video is me racing against the clock. What you don't see is the little group of ladies that were passing the other slider card around and watching how to put this together. I did it in less than 10 minutes! Yeah which means my card fit with in the allotted time our little contest allowed! You see I was a little worried that the person that drew my card wouldn't be able to complete but I was able to do it. If you would like the Gypsy file for this card just click HERE (NOTE THIS FILE IS A GYPSY FILE). You will need to change the center art to what ever you prefer as the file is set up for a little butterfly. 
I hope you enjoyed today's post. Thank you for your sweet sweet words of inspiration. Your comments continue to inspire me to keep sharing with you.

December 28, 2012

Zebra Ornament


Hello Crafty Friends,
Sherri here from Sherri's Crafty Place
I hope you all had a fabulous Christmas, I know I did....
you are all probably all Christmas'ed out but.......
I have one more quick and easy Christmas crafty for you.
I just received my Christmas gifts from my SIL, did I mention she is a Stampin' Up Demonstrator...Yea for me!!!!...all my gifts were from Stampin' Up!!!!
 I have been wanting this ornament punch and stamp set for a while now....
so I just had to play with it and make one last ornament.......
ok maybe its not one of your tradition ornaments, but I think it is pretty cute....
So using my Ornament punch, my mini Martha Stewart Score Board and some of my favourite paper....Zebra...I started to punch
After punching out 7 ornaments I scored them all down the middle
using my ATG and zip dry I attached all the pieces, but just about half way I attach some twine down the middle...
I left a little hanging out the bottom and the top to add a bow and some bling 
and there you have it, I love how it turned out, I will be making alot of these next year......
Thank you so much for stopping by today,
I would also like to wish you all a Happy and Healthy New Year.

❀Sherri❀

December 27, 2012

A Very Sassy Christmas Gift...


Hey Ya'll,
Bobby here from Cricut Couple.  Well, some of you have probably heard now that the Sassy Design Team and Bug Bytes Design Team members had a Secret Santa.  Well, I was so excited to find out that I was Secret Santa for Miss Sassy Herself!  I sent a couple of goodies that were store bought, but I had so much fun making her special gift.  This entire project was made using my Singer Futura SEQS-6700.  I am in LOVE with this machine!  Here is the finished project!
 To start, I wanted to do something very personal.  Well, Sheila has this adorable character on her blog!  I sort of asked for permission without asking for permission and asked if she would send me the picture file from her blog.  This is what she sent.
I opened up the picture file with Adobe CS5 and the used the pen tool to cut out everything from the background so that I just had the character left.  I put it on a bright green background so that it would work better with the embroidery software.  The SEQS-6700 comes with Auto Punch software that lets you create a stitch file from just about anything.  Here is the screen from the machine software once it stitches the graphic.  Obviously the colors are all off, but I did that intentionally so that it would be easier to see the differences when I had to switch out the threads.  I just took a piece of black fabric and hooped it and started it off.
 Here you can see a close up of Miss Sassy in Stitches!  Hee! Hee!  I then found this fun font on the computer and used Hyper Font that also comes with the machine and stitched it out in the same colors.  I then went thought and did a bunch of free motion stippling for the quilting.
 I brought this in close so you could see the differences in stitch colors with the quilting.
 I put it all together into a personalized tote bag!  Look Mom!  No Pattern!  I have made several tote bags in the past, but since this started with the embroidery piece, I kind of had to go it on my own to put everything else together.  In our fabric stash, we had this beautiful paisley fabric that has the same colors as the Sassy Blog colors.  I mixed it with a little red and some more black to put it all together.
 I used a pre-quilted black fabric for the inside.  I also made some inside pockets on the lining to help with organizing everything.  I know that Sheila works very long days and sometimes gets little craft breaks here and there, so I thought it would be very useful.
 This is the front of the finished bag!  It's all complete and ready to go to Alabama!  My favorite thing about this is that if it gets dirty, just throw it in the washing machine!  I hope that it lasts for years and years!
 Well, the minute Sheila received it, she had to call me and tell me about it.  I was so thrilled with her reaction as she really does love it!  I think the picture with Sheila's beautiful smile here pretty much says it all!
So... Merry Christmas my friend Miss Sassy Lady!  I am so glad you love it and thank you for being such a great friend!

Today is my last regular design team day as Sassy Dude.  I'm not really going anywhere, but with life twisting and turning lately and missing my November commitment, I asked Sheila if I could take some time off from the regular schedule.  She graciously agreed.  I will still be Sassy Dude and Still popping in from time to time as a guest designer, but I just feel terrible when I miss my commitment dates.  So... we will just leave you in suspense on when you see a Sassy Dude design.  Hee! Hee!  I want to thank everyone on the Sassy Design Team and especially Sheila for everything!  I hope to get things to calm down a bit around here and to get back to a regular schedule soon.

December 26, 2012

Gift Card/Money Holders

Hey guys! It`s Candy here from Candy`s Craft Corner!
It's my turn to share today at She's a Sassy Lady! Always a pleasure to be here of course!!

Hope you all had a fantastic Christmas! Ours was wonderful!

Today I want to share some of the gift card/money holders I made for some of my nieces and nephews. All the kids are getting older now and it's so hard to buy for them. The always enjoy a little cash at Christmas!
This was not my original idea. I got all the instructions from Mary over at Cardcrazy09 on youtube
I used a Scrappy Moms Stamps for the sentiment. There was  Dec 25 in the middle of the stamps but I wanted to put the kids names on the front so I just cut the stamp. Don't be afraid of your stamps. A little snip here and there can make your stamps very versatile. 
This inside sentiment is also from Scrappy Moms. 
Thanks so much for stopping by today. 
Hope you all have fabulous New Years! All the best to you and yours!
Candy

December 24, 2012

School Scrapbooks!

Hi Folks!

It's Ian here from A Newbie Crafter!  For awhile, I have been working on a very large project.  My mother approached me and asked me to create a scrapbook for my nieces and nephews in regards to their school years.  She had several requests.  She wanted it 8.5" x 11", she wanted it to be a double layout so that one side was a folder, and she wanted certain papers.  The rest was up to me.  Oyy.  I have two nieces and two nephews.  This was a huge undertaking but I enjoyed it and loved making them for them.

The first thing is that I used DCWV Grade School and High School stacks.  I couldn't find them in person - so Amazon.com and Joann.com was a lifesaver.  :)  I also went through my Cricut cartridges and made the titles with Varsity Letters cartridge.  I loved this idea because it really ties the school theme together.  The white for the inside of the letters was way too small, so to save some sanity, I used a white gel pen and embellished them that way.  Yes, it's not the same "feel" but it gives it a little more pop.  Also - I realized AFTER I was done that the N in Oriana is upside down.  Ugh!  :(


Here are the rest of the photos.  I used several Close To My Heart school themed stamp sets to give it some more character.  The folder on the left side was punched with a Martha Stewart punch and adhered with some Scor-Tape.  The photos below are from the two boy's books, the girls have a couple different papers that I chose for them, but I decided not to post them as they are the same thing, just with a different patterned paper on about 3 or 4 grades.  


I hope you enjoyed them as much as I did making them.  My sisters will open them Christmas morning.   I hope they like them!!

Craft on!
Ian

December 23, 2012

My Secret Santa Was Bobby Hardgrave Of The Cricut Couple!

OK, it is time for me to share my special - special Secret Santa gift made especially for my by Bobby at The Cricut Couple! This is a picture of me looking a little on the rough side as I just got off work after a twelve hour day.... but it is the only photo I have with me holding my new bag. My daughter Jen took it just minutes after I opened the gift. Can you believe it, he actually made me a quilted bag! Don't you just love it? I know I do, it has my Sassy Lady on it and everything! Be sure to watch the quick video so you can see how awesome it looks!


Now wasn't that just too awesome? Thanks for the opportunity to share my special gifts with you and THANK YOU THANK YOU BOBBY!

December 22, 2012

Peppermint Fudge Cake Pops Make GREAT Christmas Gifts And Are Fun To Make!


Christmas is the time of year to spend time with family, and that is exactly what we did. I spend the day with my grandchildren, Brianna, Carissa, and Aiden making Peppermint Fudge Cake Pops and we had so much fun and made some great little gifts for their teachers and school bus drivers. So join us today and learn how you can make this great recipe.


Now wasn't that easy? And so much fun.... oh before I forget you can get the little lollie pop die cut set at My Creative Time. The children were so enthusiastic and this really was fun. Now mind you if I had done this on my own it would take a lot less time but I guarantee you it would not even been half as much fun as spending the time with them.


Here is our little Carissa better known as our Sassy Chef!!! She is showing us how the little balls look before we placed them in the freezer to set up. Note you can also place them in the refrigerator but that would take about 1 hour and we went for the shorter time in the freezer.
The all wanted to show you the cake balls so here is a photo left to right; Aiden, Brianna and our little Sassy Chef Carissa!


As you can see we used our time wisely. While the pops were setting up we got the sticks ready and the sugar for dipping.
Our big boy Aiden did a great job of making the white sticks look like candy canes.
This is my daughter Heather and even she shelped us in this project.
Carissa wasn't trilled with the stick decorating but she hung in there with us.


Well as you can see there are many steps along the way, but we had some great times getting them done and that is what I like about Christmas.... just slowing down enough to spend time with those you love! If you would like the recipe for just click on the word RECIPE and you can have a copy.... mind you when I typed it up I didn't have a photo so I got one off the internet. There are many recipes out there for the same thing and all are similar but I can tell you from first hand experience this one is YUMMY!
Here is what the pops look like after you take them out of the frig or freezer and are ready to dip in candy and decorate....
And here is the tray of finished Peppermint Fudge Cake Pops! It was so much fun and these taste so yummy. The children were thrilled to be able to take them to school for their teachers and actully tell them they made their this little gift! They even gave to the school bus driver and Sunday School teacher is getting one too.
Thank you for joining us today, I hope you enjoyed spending a little time with Brianna, Carissa, Aiden, Heather and I and we would like to wish you all a very Merry and Blessed Christmas!

Creative Memory Bag Winner

I am so excited to give out wonderful gifts like this one. The photo is actually upside down. The op of the bag has black netting that you can see through and it is very durable. I have had mine for almost 10 years and it looks brand new. I used the Random number generator and our number is 16! Join me in Congratulations Beth Ann.... I know you are going to love this little bag! Be sure to claim within 1 week or gift will be forfeited.
So be sure to hit the contact button and send me your name and address so I can get this in the mail.

Prize NEVER claimed gift forfeited. Sorry.