April 28, 2016

Thank you


Hi Everyone,

Lisa from Lisa's Craft Room here sharing another project for this month. I hope you are all doing well. Thank you Sheila for allowing me to share my creations.

So, I went to a friend's demonstration party. The company is called Pink Zebra. It's soy Sprinkles that you put in warmers. They sell warmers and lights and other things. Their products are beautiful and the Sprinkles smell amazing. Check the company out. They also do community things. It's popular down south but fairly new to us here in the South Coast area. I ended up booking a party to help my friend out. So, I wanted to make these darling favors as a thank you for my guests coming. They have little hand sanitizers in them. I purchased them at Walmart. I used my stitched lollipop die from Emma and cut out 20 of them in different colors. (Not that I'm having 20 people :) just to make sure I have enough and extra just in case.


For each color, I punched out scallop circles in the same tones, then punched out white circles. I used dimensionals on both the white circle and the colored scallop. The punches are from Stampin' Up. All the inks used are also from Stampin' Up. I stamped the Thank you also in the same tone colors. The Thank you is also from Stampin' Up.


Isn't that stitched lollipop die adorable? I love it. I haven't made one with a lollipop yet though :)

The last thing I did was add ribbon to each one. Again, they all have ribbons to match.
So, that is my project for you. Thank you so much for looking.

April 22, 2016

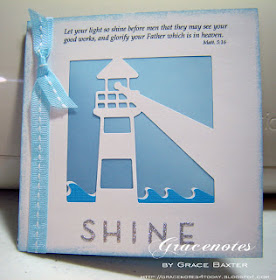
Let Your Light Shine

Throw-Back Thursday

Hello fellow crafters! This is Grace from Grace Notes for Today and I have something to share with you that has been in hiding for a long time.

Back in 2009 when I was fairly new to blogging, I created this card. I just came across it again today... waaayyyy down in the list of cards. I think it needs to be shared again. It can be used for almost any occasion: Pastor's Day, encouragement, Get Well, Birthday, even Graduation.

The Inside is blank to allow for any personalized message or poem.

The Lighthouse

There is something about a lighthouse that is welcoming, yet by itself it seems forlorn. My card post will give you all the details on how I made it. More importantly, though, it gives you my reasons for making the card and exactly what the Lighthouse means.
Following are some pics from the original post. Click any pic to see it bigger.

The cartridge used for all cuts is "Live Is A Beach".

I invite you to enjoy the whole blog post from October 19, 2009.

Let Your Light Shine

By the way, I still have this card in my possession... waiting to give it to someone special for a particular occasion or reason. Have you ever made something and then had a hard time giving it away? This card speaks to me in so many ways, I may have to keep it forever as a reminder of God's love and grace towards me.


SHINE, all occasion card by Grace Baxter


Do any of you remember a little song called "This Little Light of Mine"? We sang it all the time in Sunday School, years ago. Join me in letting your light shine... for Him!

For all my cards and projects, drop by my blog and stay awhile!

April 21, 2016

An Adorable Purse that you can LOAD with goodies.

Thank you for stopping by and I hope you have as much fun as I did making this ADORABLE little purse that you can give someone that might need a little cheering up, loaded with LOTS goodies!  I had so much fun making them  that I have made 2, they are a little addicting once you start making them.


I am having to make this video into 2 parts so it doesn't end up being an hour long.  So grab your coffee (or Pepsi) and lets get started with Part 1:


 I haven't used a hot glue gun in years so be very careful because it is REALLY hot and dries really fast.


Well now that wasn't too hard was it?  They are really fun to make and you can decorate them in so many ways.  I think I am liking the black polka dot one the best.  Thank you again for having me back as one of your guest designers Sheila.


April 18, 2016

Stitched die cuts SVGs


Hi, everyone, this is Charlotte C.  Thank you, Sheila, for having me visit all of you again.  Recently I was lucky enough to win a gift certificate to Digiplayground and I want to share with you some of what I was able to buy.
Stitched dies are quite the rage nowadays, but a set of 4 or 5 are very costly.  Can you imagine how excited I was to find SVGs that replicate the different shapes and sizes of stitched dies at Digiplayground that I can bring into my Explore or Cameo to create layers for my cards and scrapbook? 
These are the three I now own, and notice that each shape comes in a set of five which makes it perfect for mat layering.   Of course, you can resize to whatever fits your design.  


I did find that my Cameo cut faster than the Explore, but both of them had me poking out the stitches on two different brands of card stock.  When I have more time I plan on playing with cut settings on both machines.  However, the gold card stock I used for the layer on the butterfly card below came away from its mat much cleaner.  I used the point of my Xacto knife to poke through where needed and just scraped the back of the die cut to remove the excess; that and some Scotch tape behind the stiches helped.  A little work, but I think for the price, it’s worth it.  They cost $1 a set.
Here’s three cards I quickly put together to show you how the cuts looked.


 The black and white card pivots open.
 Thank you for stopping by today.

April 14, 2016

My Card class


Hello everyone! Java Jen here from JAVA JEN CREATIONS. Thanks again, Sheila, for allowing me to share here! Recently I introduced a card class that I am offering in my home and I thought I would share the 3 types of cards here. I kept the designs simple to make it easy for participants to assemble. I'm keeping some of these cards on hand for when I need a quick card! 

In my class, participants will be making 5 of each card. Thank You, Get Well and Happy Birthday.


This is one of my favorite cards because the embossed layer gets ripped and then adhered with the Cricut bandages adhered on top of that! Isn't it fun??

The birthday cards are fun because I picked 5 different colors for the stamped layer and added an embossed layer. I think the participants will have fun learning these simple but impressive techniques! 

Thanks for stopping by today! 

April 12, 2016

Spring Birthday Scene Card

Good morning - Adrienne from Eagle Canyon Arts.  It's always a pleasure to be a part of Sheila's talented Sassy Lady design team.  Thank you, Sheila.

Happy Spring!  Here is a bright card made with the Cricut and CTMH Artfully Sent Cartridge.  This card is a variation on the folding card made on p. 33.  The card is 5" x 7".

Other Close To My Heart supplies used include:

Confetti Wishes Paper and Complements (retired - use Zoe - X9197B, Kaleidoscope - X7202B or  Calypso (available in May)
Daisy White Cardstock (1385)
Inks - Thistle (Z2640), Buttercup (retired - use Honey - Z2162)
Enamel and Glitter Duos - Blue Dots (Z3122)
Artfully Sent "Just To Say" Stamp (D1629)

Other Supplies:

ek Corner Scallop Tool

For the main card, cut one "whole" card as directed (at 7") and one "front half" (the one with the scallop design) in contrasting paper.  If you are unsure about how to place your paper to get that half a card right, go ahead and cut the whole thing, slice off the back and use it later.  Glue the 2 pieces together, matching the design.  Instead of folding the card OUTward, fold it INward and glue it down.


Cut the corresponding sentiment sheet (at 7").  I used the corner scallop to add pizazz.  Some stick on compliments and the edge stamping completed the inside.  The blue dots are on the front of the card at the center of each scallop.

Such a fun card to make - very versatile and a great look that will change with the different papers and embellishments used.  Thanks for joining me!

Blessings,
John 3:16


April 8, 2016

Join Design With Sassy on Facebook Today!

Be sure to join today as we will have many exciting things happening and you don't want to miss the first one on Motivation Monday! Note you are welcome to share your own crafty designs with us just no selling in this group. You can start adding your crafty designs right away and be sure to tell your friends!
JOIN TODAY


April 7, 2016

Know what I love?


Well hello strangers. I'm so glad to be back. I had to take some time off to move and get settled. I'm still trying to find my mojo though :) LOL Thanks so much to Sheila for allowing me the time off and thank you for letting me come back.

I decided to make a card. I have to start back slow, until I can get my creativity flowing again.

I used the stamp set, What I Love, to create a background, stamping off in most areas to make it lighter, using Baja Breeze ink, then I added a piece of blue card stock as a layer. I stamped the sentiments with black Momento ink.


I stamped the chick from the stamp set Honeycomb Happiness, colored it yellow and the beak and feet orange with markers, cut it out and adhered it to the card. I added a honeycomb embellishment to the belly. I stamped three flowers from the Petite Petals stamp set, punched them out using the matching punch, then used dimensionals to make them stand out, then added rhinestones to the centers.


Well, that is my project for today. Thank you for taking the time to stop by. Thanks again Sheila :)

April 6, 2016

Announcing A New Facebrook Group

Be sure to join today as we will have many exciting things happening and you don't want to miss the first one on Motivation Monday! Note you are welcome to share your own crafty designs with us just no selling in this group. You can start adding your crafty designs right away and be sure to tell your friends!
JOIN TODAY


April 4, 2016

Me and You Wood Sign

Hello!  I am so happy to be here this month!!  I have taken some time away since and am glad to be  back!!  I have not been paper crafting in a while - instead I have been painting wood signs, and using my heat press.

Today I want to show you how I made a sign for a very sweet couple.  My friend built the sign and painted it black. She distressed the paint and asked me to do the lettering.
I opened up my Silhouette program and put a 12 x 24 mat on my screen.  I use the grid to help center my designs.  When making a large sign, I create a rectangle that represents the sign.  I found a pretty font and typed out my message - his one is a line from a Kenny Chesney song.  I start out smaller and enlarge the words.  

I use small dots to help line up my sign pieces since I can only cut 12 x 24 strips of  Oramask 813 stencil film as it comes on a 24" roll.  The center red dots are the center of the sign.  The other dots help me line it all up.

I cut out the design in sections and piece them together on the wood sign.
I almost forgot to take a picture of this part!!!  You can see the stencil on parts of the wood.  I used three thin coats of white acrylic paint.  I peeled off the stencil when the paint was almost dry. 
In this picture you can see the outlet on the wall - it shows just how big it is 28" xx 52"! 
Here it is in the back of my Honda Pilot on its way to my friend.
This was a gift to his wife - the line is from their wedding song.  I was honored to be part of this special gift!!!

Thank you Sheila for having me on your blog today!!!


April 2, 2016

Announcing A New Facebook Group

Be sure to join today as we will have many exciting things happening and you don't want to miss the first one on Motivation Monday! Note you are welcome to share your own crafty designs with us just no selling in this group. You can start adding your crafty designs right away and be sure to tell your friends!
JOIN TODAY


April 1, 2016

Sigma Shirts

Happy April Sassy People!!

I do not have a paper crafting project to share with you today. No, this is NOT an April Fool’s Day joke! I honestly have not done a card or anything in weeks. Instead, I will share a snippet of what I have been busy doing. 

Aside from being a house manager, I started a custom hobby/business a few years ago. Sublimation is part of what I do. Sublimation is a digital transfer of an image and burning the image into a substrate using a heat press or heat wrap. A substrate can include, but not limited to, t-shirts, mugs, picture frames, towels, phone case, and really the sky is the limit! The good thing about sublimated items is the images lasts forever. 

Today, I am sharing a shirt for the Sigma Gamma Rho division in my area. They had a conference and asked me to do the shirt for them. The client created the file and sent it to me. I converted it and I did my magic! What is awesome about these T-shirts is the fact they do not crack, peel, or fade! The Soros will have these shirts until the threads fall apart!

While this is not a traditional project share, I really do hope you enjoyed it! Remember to stop by often to check out other projects from the talented Creative Team. Until next time, enjoy the rollercoaster of weather we will have this month! Kenya~