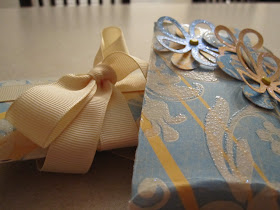
Thanks to Crystal aka MyaMagoo over at Design~Create~Inspire, when I needed a quick pillow box for a gift... I was ready! I had downloaded this file from her site a few months back. Don't you just love it! Crystal did such a good job of designing these little boxes I just had to share them with you along with my directions or experience in creating them!
First let me share.... I don't follow directions very well, I remember seeing the pillow box, loving it and downloading it on My Gypsy Woman.... I know she shared I remember seeing photos, we all did. Let's face it when we first got our Gypsies we were all soooo busy trying to make files to share and our excitment was constant. We started our blogs.... then nothing... I have only seen one person show off a box they made from someone's hardwork and it too was Crystal's!
Well I don't know about you my my schedule is FULL to the brim! And when I looked at my gift, all I thought about was that little pillow box of MyaMagoo's.
I had the file so I chose my paper... this is my big mistake I made it with glitter paper a no-no for these adorable boxes.
I cut and then scored on the score lines.
Folded the sides.
While I was scoring and folding the flowers for decorating were cutting on my Cricut.
Oh, I placed this photo here so you could see one of my favorite tools for cleaning off my mat! I purchased this little flipper from Pampered Chef and works wonderful!
Now its time to pack my bag... I took an 8 1/2x11 hard plastic bag and inserted all the components for the box including the Zip Dry glue and skittles.
See very little room needed and it protects all the little pieces.
I told Mya I would show you what is in My Little Bag of Tricks, so here is a quick peek.
 Notice I keep all my recent scrap paper with me as you never know when you feel inspired and have a moment to put it together. I have pop dots, glue dot, glue pens, ink spots, acrylic word phrase stamps (thanks to NurseViper), pens, markers, scissors, flowers, brads, basic stickle colors, skittles, tweezers, and a couple of plain folded cards ready for decoration. I learned also to keep a bottle of zip dry glue with you at all times especially if you like to experiment with different materials and fibres. This project was made on the run!
Now back to the project at hand. Remember I told you don't use glitter paper the reason is it does not fold well and it is hard to get anything to stick to it. Zip Dry glue to the rescue! Put plenty on and hold till it dries.
Notice how it pulls apart easily.... glitter paper, adjust and glue again!
Here is the second problem with glitter paper... it does not fold well, or I should says it folds, but not it will not give you a smooth look as seen below. Often times it cracks the surface too.
So I kept playing with it on each side and decided that the best looking side would be the only side that opened!! I kept playing and folding as this glitter paper, great for flat surfaces was not doing well on a curve... In the final photos you will see I did get it to work out. I did glue one side which I didn't want to do but it was the only way I could get it as pretty as Crystal's..... I want to add... THIS IS AN EASY PROJECT!!!! Just difficult paper. I will use it over and over in the future but it will be with cardstock... I'll bling it up on my own!
See how nice it actually came together! Next time I will follow what Crystal did and follow her style of paper too!
I made a ton of flowers as you can use these on so many projects. Let me stop her an interject another of Jen's great tips: always cut extra flowers like these. If you can't use the color, no problem take your ink blotter and stamping ink and change the color to match your project!!!
I then glued the flowers on, stickled them and viola the box was complete. Note the edge closest to you is a fold not the glued edge... again do not use your glitter paper for these boxes unless you plan to allot a little extra time and extra glue.
I made 2 boxes, my handsome hubby didn't like the ribbon as much as the flowers so me being so surprised he even noticed changed so that both boxes were adorned with the flowers!
See how pretty they turned out! One is for the gift and one is ready for a last minute gift.... and we all have those crop up in our lives, don't we? This was an easy project. Crystal's design was wonderful, offering the ability to be any size you need with the touch of a button! Had I used a different paper this would be a half hour tops from cut to finish! If you haven't made this box it is a must and be sure to stop by and leave some blog love for Crystal aka MyaMagoo over at Design~Create~Inspire.
Let me challenge each of you that have downloaded a file from my blog or another to make it this week.
Thank you for visiting today, I hope you enjoined this project! Thanks for taking the time to leave a comment, I love hearing from you and am always encouraged by you words.


Oh so cute. Love flowers. And thanks to lovely ladies like Mya who share their files and make our jobs so much easy.
ReplyDeleteOH SHEILA!!! THESE ARE DROP DEAD GORGEOUS!!!
ReplyDeleteI am so happy that someone actually used the file (other than me lol!!).
Your mom is going to love this box - you did such a great job :) Thank you for saying such kind words about my file :) lots of people download these files, but they never come back and say if it was easy for them or not....YOU ARE WONDERFUL!!!
just a gorgeous job, gorgeous :) :)
I agree with you Magoo, Shelia is awesome... I love how you give such great directions. The boxes are just too adorable, I am going to go see if I can get the .cut file. Thanks for the tip on the glitter paper.
ReplyDeleteSheila, you are AWESOME! Those are so cute!!! Love the colors, love the paper, and I've always loved those boxes!
ReplyDeleteI'll be seeing you!
Oh those are gorgeous Sheila! I love how you show things step by step for us!
ReplyDeleteI have chosen you as one of my blog award winners! Please stop by my blog to pick up your award!
www.disneydreamerdesigns.blogspot.com
Those turned out lovely! What paper line is that? It's gorgeous!
ReplyDeleteThese are beautiful!!!
ReplyDeleteSheila, these are adorable! Love the colors and the glitter paper is perfect for this. Thank you for sharing the directions, that is so sweet of you! Happy weekend!
ReplyDeleteOk so I keep meaning to come over here and tell you how excited I am about your mission next year!
ReplyDeleteI saw your comment on Sandy's blog with her stunning album with her son, and you sooo made me cry!
I bet this mission is going to change your life! I would love for you to share your experiences with me if you have time, maybe we could exchange email addresses.
Alright..so onto this project! lovin' it! I ADORE the colors..they are sooo Spring! love the step by step!
Beautiful pillow boxes...love the way you placed your flowers...wonderfu papers and colors as well...always something fun to see here...thanx for that and for all the lovely blog love you share with me!
ReplyDeleteThese boxes are very pretty!! TFS
ReplyDeleteThank you so much for the file! I can't wait to use it to make some cute St. Patricks files!!
ReplyDeletebeautifulll!
ReplyDelete