I started out by picking 4 coordinating pieces of cardstock and cutting them into 6 in. x 6 in. squares and placing them on my Cricut mat.
Next, I used my Gypsy and the Mini Monograms cartridges to make some circles. The sizes I used were 3 in, 2 1/4 in, 1 1/2 in. and 3/4 inch. I layered the circles on top of each other and I was not really careful about getting each one perfectly centered because I kind of liked that they were not perfect circles!
Here are the circles once they were cut.....
I took each circle and distressed it with my Tim Holtz distresser. If you don't have one, you could use scissors instead. I was very messy with this process and tried to bend and "wear down" the paper as I went. I did not want it to be perfect and stiff.
After they were all distressed, I inked them with a red ink.
I started with one of the larger circles, a piece of white cardstock and a glue gun. I glued the first circle to the cardstock, making sure to bend and fold as I went. I like using the circle rings instead of solid circles because I think they bend better when doing this part.
For the next layer, I decided to use ribbon instead of paper.
You continue the process until you have completed the flower.
Once the flower is complete, I used my scissors to cut flower off the card stock leaving a white cardstock circle as the base....
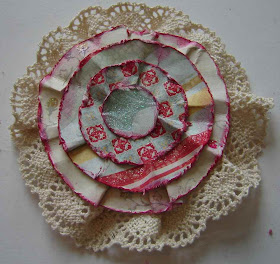
You can see the white cardstock circle base in this photo. To add another layer and make a lacey edge on the flower, I used my hot glue gun to glue the lace to the back of the flower.
When I flipped it over, this is what I had. (And yes, this is a different flower from the one I started with at the beginning of the tutorial. I made several of them, but this is the one I added lace to the back of!)
I added a pearl button to the center of the larger flower and just a pearl sticker to the smaller flower. I also used some Prima roses to add to the flower "bunch".
Thanks for stopping by and reading this very long post with a lot of photos!! If you would like to see more of my work, you can find my blog HERE!! Have a great Thursday!


Wow!! Those look AMAZING!! I absolutely love hand made flowers and yours certainly take the cake..
ReplyDeleteHugs
Nanné
Wow ~ these flowers look great! Love the lace and ribbon layers!
ReplyDeleteOOOhhh. I do like these made with the rings, and you save so much pretty paper to make even more with. The whole layout is lovely.
ReplyDeleteoh these are going on my list to try! so pretty thanks for sharing the how~to!
ReplyDeleteStaci
oh these are going on my list to try! so pretty thanks for sharing the how~to!
ReplyDeleteStaci
Look how pretty your page is with these beautiful flowers. TFS
ReplyDeleteOh look at these BEAUTIFUL flowers and the tutorial is great!!! You have a beautiful family! Thanks for sharing with us today.
ReplyDeleteLove the combination of the ribbon and the lace. Gonna have to try this soon :)
ReplyDeleteBeautiful layout and thanks for the tutorial!!!
ReplyDeleteOh, Barb, these are wonderful. What a great idea not using a solid circle. And I love the mix of paper and lace! I will have to give these a try soon!
ReplyDeleteBarb, these are fabulous! Love the page and also your flowers. Can't wait to try them!
ReplyDeleteYour flowers are soooooo awesome, Barb! I will have to try that! Love the whole layout!
ReplyDeleteThe flowers are beautiful!! Your instructions are great!!
ReplyDeleteBarb, you know I love you my friend -- great layout, great tutorial, and I love that flower!!!
ReplyDeleteDarling, I love these flowers.
ReplyDeletethunderbirdlindy