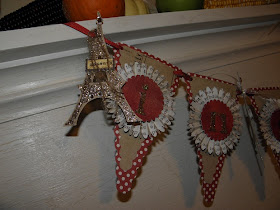
Hi everyone, this is Beth from thunderbirdlindybydesign. Earlier this week I showed you on my blog how I made Tim Holtz inspired rosettes, and said I would be posting a project made with them later in the week. Well here is the project.

It is a banner with the word inspire on it. To make this banner you will need:
Country Life Cart
Any Cart with a scallop circle, I used Straight from the nest
TBBM for the rosettes
any cart with a pleasing font, I used Base Camp
Assorted Cardstock
an Eifel Tower cut, I used the sizzix die(gasp) for the Eifel Tower and my cuttlebug
Glitter
Ribbon
Hole punch
assorted bling
Glue of choice, I used my Pink ATG, my low temp melt hot glue gun, and my xyron both the sticker maker and the 500
From Country Life, I cut 7 banners at 6" tall from the red polka dot cardstock. I also cut 7 banners at 5" tall from the printed Kraft cardstock. Adhere the kraft on top of the polka dot cardstock.
Using the red cardstock cut 7 scalloped circles at 2". I used SFTN to do this.
I then cut the words INSPIRE in lower case letters from Base Camp at 1.75" tall. Putting them face down in my sticker maker, I adhere glue to the front side of the letters.(see pic)
Then I applied gold glitter the the sticky side of the letters so they would be nice and shiney.
I have a video on my blog that shows you how to make the rosettes, along with a free cut file to make them. You can get that Here.
Below are 2 pics of the rosettes in progress.
After you have 7 rosettes made, attach the scalloped circles using hot glue on top of them, then attach the letters on top of the scallop circles.
I took my sizzix die of the Eifel tower and cut out 8. I attached two together so I ended up with 7 Eifel Towers. I ran then through my xyron and glittered them like I did the letters.
I added assorted bling and sentiments to the Eifel Tower cuts after they were glittered, tied ribbon through holes punched in the cuts, and strung every thing on ribbon, and hung up.
If I had it to do over again, I would have used a lighter glitter on the letters, they kind of blend in with the scallop background and you can't see them too well.
I hope this "inspired" you to create this banner. I have been making a lot of these banners lately and hanging them up. They really do add something to the room. If you get busy today, you could have one done in time for Thanksgiving. Speaking of Thanksgiving. Everyone have a wonderful Turkey day tomorrow, and don't eat too much.
Until next month, see you soon, and thanks Sheila for having me as a guest designer.
Beth.


Beth this is gorgeous!!! You have inspired me!!
ReplyDeleteYour banner is gorgeous! I love that you used the My Minds Eye paper with the glitter. Such a beautiful collection! Thanks for sharing your beautiful creation!
ReplyDeleteBeautiful!!!!! Love it. Have a blessed and fabulous Thanksgiving!
ReplyDeleteBeth this banner is GORGEOUS. Love the detail and the glitter just catches my eye. Great tutuorial too. I guess I will have to break down and make one of these banners! Thanks for sharing your talent with us today.
ReplyDeleteWonderful banner, so festive. Have a great thanksgiving.
ReplyDeleteBeautiful banner Beth! I specially am attracted to it because I have been placing eiffel towers around my house so the "Universe" will align and I'll be on my way to Paris!! I know it sounds silly, but it works for me every time!!
ReplyDeleteI'm inspired!
Gaby
Wow, what a wonderful banner project!!! Great job!!!
ReplyDeleteHave a great Thanksgiving holiday!