I had so much fun making this card! I made the yellow and pink flowers with my Gypsy and the Mothers Day Bouquet cartridge. The white flower I bought and is a tiny Prima flower. (Scroll down for a video tutorial)
Cut base card 11 x 4 1/4 and fold in half. Trim 1/2 inch off the front side as shown in picture below:
I made a border on my gypsy using the George cartridge (rectangle and circles) The rectangle is 5 1/2 inch by 1/2 inch. Each little circle is 0.40 wide x 0.37 high on my Gypsy. All are welded and the picture below shows the welded view. Click HERE to see a video showing how to make borders with your Gypsy.
I inked the border and then glued it in between the base card and the blue piece of patterned cardstock. I also added a strip of patterned cardstock (cream from Crate Paper) on the inside edge of the card.
I punched hoes and added eyelets.
The grass is cut from the Paper doll dress ups cartridge. I sized it on my Gypsy so that it was 5.5 inches wide and cut 2.
I ended up trimming the 2 pieces of grass to fit my card front. I inked everything on this card with vintage touch ink from Paper trey ink (the lighter color).
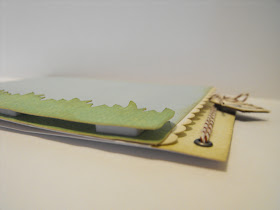
I used these thick pop it squares from Ranger to add dimension to the grass and the bunny.
When I trimmed the grass I offset it so the blades would be staggered.
Here is a side view showing the pop it square.
I tied Chocolate Bakers Twine through the two brads, looping it through twice and tied a tag on.
I like to put pop it squares behind my tags so that they stay where I want them!
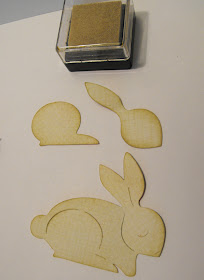
I inked the bunny with the Vintage touch ink from Papertrey.
Then I layered the bunny with the pop its and also used a chalk brush to do the bunny cheeks. The eyes and nose are so small on this cut that I added a dot of zig 2 way glue where they needed to be and then used the Quicker Picker upper from Quickutz to pick up the tiny pieces and place them exactly where I needed them.
I love Glossy Accents and brushed (with my finger) glossy accents glue all over the bunny.
I also used the glossy accents to make the stamped sentiment stand out. Both stamps come from My Pink Stamper.
To add the Bakers Twine flower stems, I first added a line of glue with my Zig 2 way and then set the bakers twine in the glue.
As soon as the bakers twine was secure, I glued the flowers over the top of the 'stems'.
Not sure if you can tell from the picture, but I added a few 'dew drops' to the flowers with the glossy accents.
Here is a video showing how I made these sweet little flowers with my Gypsy and the Mothers Day Bouquet cartridge:
Pictures of the finished card:
Be sure to check out my blog, My Craft Spot , for more cards, scrapbook layouts and videos!
Have a wonderful day!


Wow ~ this card is gorgeous!!! I like your flowers better than the prima ones! Thanks for the tutorial!!
ReplyDeleteGreat card! I love how you made the bunny. Thank you for including the step by step pictures.
ReplyDeleteGeorgiana
Fantastic tutorial, your card is sooo cute. tfs.
ReplyDeletemexicopetshop@hotmail.com
Kimberly this card is just too cute! LOVE LOVE LOVE the flowers and the great tutorial...
ReplyDeleteAnd look at that adorable bunny! This is such a wonderful card thank you so much for sharing with us today.
Super cute and detailed! Very clever with your video on making the prima flowers!!! TFS and such great tutorial!
ReplyDeleteThank you for the awesome tutorial. Love your card!
ReplyDeletethis is just sooo cute...great tutorial, TFS!!!!
ReplyDeleteWhat a great tutorial! Everything, all the details are so super cute and I love the choices as well for this..its just darling and such a happy project!!!
ReplyDeleteOMG! This is absolutely amazing! Love every single detail! It's been such a cold day again here and this just warmed things up. We are so looking forward to spring! Just love it!
ReplyDeleteHow cute!!! Great tutorial, and I just love that little bunny!
ReplyDeleteGreat tutorial, I knew I wanted to get that cartridge, but now I NEED to get it. Thanks for sharing.
ReplyDeletesyoung at aol dot com
Adorable Easter card, love the flowers and how use twine as the stems!
ReplyDelete