Hey everyone, this is Kimberly and I am so happy to be here to share this card with you! (Thanks Sheila!) Be sure to stop by my My Craft Spot, for more fun projects and vidoes and a new challenge with prizes every Monday!
This was such a fun card to make!
All of the cuts come from the Wrap it Up cartridge - one of my favorites!
I love the cupcake card on the wrap it up cartridge, but I wanted a different candle, so I welded a new candle over the original. The shape card and layers were cut at 5" (height) and the candle I added over the top was cut at 3.35" (height)
I also wanted to add a yellow patterned 'cupcake wrapper' to the front of the card. I scooted the cut off to the side so as not to waste paper and put my patterned paper upside down on the mat. Then I trimmed the edge with my paper cutter. (This is the yellow piece on the front of the cupcake)
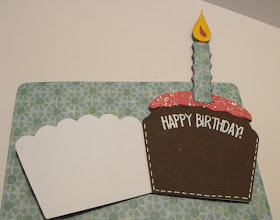
I also wanted chocolate brown on the inside of my cupcake card so I cut it once from white cardstock (right side of gypsy mat) and once from brown (left side of gypsy mat) Then I trimmed the brown on the fold line.
So, here is my cupcake card base. I cut off the candle. :)
Here is the brown for the inside of my card. I stamped the Happy Birthday with embossing ink and then heat embossed the white embossing powder on top. I LOVE that you can curve clear stamps on the acrylic block before you stamp! Click HERE to see all of my new clear stamp sets!
I added a little faux stitching with my white gel pen and adhered it to the inside of my card.
For the pink frosting, I first adhered the red candle and then added glossy accents (smeared with my finger) and then sprinkled Martha Stewart tinsel glitter on top.
I inked the blue patterned paper candle with Bazzinks Splash ink.
For the yellow cupcake wrapper, I first stamped the sentiment and then inked the edges with Ochre Chalk ink and doodled with a white gel pen.
The stamped sentiment comes from Inside & Out Stamp Set #2. This set has sentiments for the outside of your card . . .
. . . and a matching sentiment for the inside!
Time to build our cupcake! First add the frosting and candle base.
Next, I added the blue patterned paper candle.
Then the flame and the cupcake wrapper.
This would make a cute card all by itself, but I wanted to add a little more.
So, I added pop it squares
and adhered it to a standard A2 size card.
Now for the tag! The 'Eat Cake!' sentiment comes from my Inside & Out Stamp Set #2. I stamped it on pink card stock, cut it out by hand, and matted it twice. Then I used Cherry Red Bakers Twine to attach it to the candle.
Come join this weeks challenge at My Craft Spot for a chance to win one of my new stamp sets!


What a yummy card!!! I love how you mounted a shape card on a background!
ReplyDeleteWhat a wonderful card! Love the candle on the cupcake shapecard.... you know how I love shape cards and this one is just awesome! Thanks for sharing with us and for the great tutorial!
ReplyDeleteAdorable little card... great sentiment. TFS
ReplyDeleteSuper cute card! tfs!
ReplyDeleteThis card is simply adorable!! There is just something about cupcakes that makes me smile!! :-) Great tutorial - thanks for sharing!!
ReplyDelete