Hi ya everyone this is Melissa from MelissaMade! Thanks Sheila for letting me share with everyone today!
My sweet Anna is turning 8 this month and wanted a purple monkey cake - so specific for 8! She also wanted monkey (Create A Critter) invites hanging from the number 8! Again specific...she is all about the details! LOL - so I've decided to do a short tutorial on making single layer invites. Instead of a card I wanted to make a flip over card basically because the monkey hanging from the 8 would be a little unsteady unless I placed it directly on a rectangle piece of paper. I also like to use as little paper as possible. I laid each element out on my Gypsy first and then split them up and made multiples.
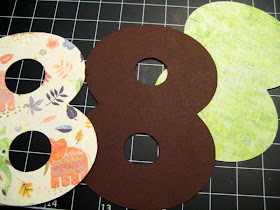
I also cut out an extra 8 with the holes shadowed for the information portion on the back. Here are all the pieces cut and ready for assembly.
I adhered the 8 with my ATG.
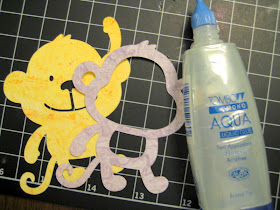
I glued the top layer of the monkey onto the yellow paper and then adhered that to the shadow in brown using the ATG.
I then adhered the monkey to the 8 with glue and ATG. I used both to make sure the two were adhered well together.
Sometimes I would use a bit too much ATG and it would hang over.
This is why I love the ATG I have because even though it's incredibly adhesive it can be rolled off gently. I roll in slightly with my finger and then tear it off and use the glue ball to get any extra off.
Last, I grabbed my $1 Studio G stamp set, Versafine black ink and an acrylic block.
I lined up my stamps on the back of the invite first and then pressed the acrylic block to them. I covered the stamps in black ink and stamped them to the invite!
Thanks for checking out my tutorial! I LOVE Comments and your encouragement is truly appreciated!
My sweet Anna is turning 8 this month and wanted a purple monkey cake - so specific for 8! She also wanted monkey (Create A Critter) invites hanging from the number 8! Again specific...she is all about the details! LOL - so I've decided to do a short tutorial on making single layer invites. Instead of a card I wanted to make a flip over card basically because the monkey hanging from the 8 would be a little unsteady unless I placed it directly on a rectangle piece of paper. I also like to use as little paper as possible. I laid each element out on my Gypsy first and then split them up and made multiples.
Monkey Shadow (Brown Bazzil) and Monkey Front (Purple paper from Basic Grey stack Oh Baby! Girl)
Monkey Middle (Yellow Basic Grey stack Oh Baby! Girl and 8 backing in Green Basic Grey stack Oh Baby! Girl)
Front of 8 in Basic Grey elephant paper from Oh Baby! Girl stack and Brown Bazzil for shadow
I chose the following papers and cut out each card.I also cut out an extra 8 with the holes shadowed for the information portion on the back. Here are all the pieces cut and ready for assembly.
I adhered the 8 with my ATG.
I glued the top layer of the monkey onto the yellow paper and then adhered that to the shadow in brown using the ATG.
I then adhered the monkey to the 8 with glue and ATG. I used both to make sure the two were adhered well together.
Sometimes I would use a bit too much ATG and it would hang over.
This is why I love the ATG I have because even though it's incredibly adhesive it can be rolled off gently. I roll in slightly with my finger and then tear it off and use the glue ball to get any extra off.
Last, I grabbed my $1 Studio G stamp set, Versafine black ink and an acrylic block.
I lined up my stamps on the back of the invite first and then pressed the acrylic block to them. I covered the stamps in black ink and stamped them to the invite!
Thanks for checking out my tutorial! I LOVE Comments and your encouragement is truly appreciated!


How cute! I love those monkeys. Remind me of an old boyfriend. :-)
ReplyDeleteThese little guys are just too cute! Anna has good taste and an eye for detail! Love these little cards you made Melissa and the great tutorial. Thanks for sharing with us today.
ReplyDeleteVery cute..
ReplyDeleteThanks for the idea and tutorial. I would love to make these for my neices invites! She will be 9 in August. Thanks again :)
ReplyDeleteLook at how cute these little fella's are! TFS
ReplyDeletethis is adorable Melissa!!!!!
ReplyDeleteMelissa, these are just cute, cute, cute!!! TFS!!!
ReplyDeleteJust a quick note to let you know that a link to this post will be placed on CraftCrave in the Cutting category today [21 Jun 01:00am GMT]. Thanks, Maria
ReplyDeleteAdorable invites!! Thanks for a great tutorial too! You're a great Mom to do this for your girl! :-)
ReplyDeleteGreat job Melissa!! Your tutorial was wonderful as even I could follow it and I do have trouble with written directions. Honest. So be proud of your creation and I am sure you have one very happy girl. Happy Birthday to your daughter. Eight is such a great age.
ReplyDeletegreat tutorial. These invites are so cute, I hope people realize the time that you put into them. I love makeing cute invites for parties. Your daughters party is going to be great. nenerscreations.blogspot.com
ReplyDeletetoo cute! fabulous idea Melissa!
ReplyDeleteJust a quick note to let you know that a link to this post will be placed on CraftCrave in the Cutting category today [22 Jun 01:00am GMT]. Thanks, Maria
ReplyDelete