Here's a closer look at the card...

With this being a fairly new cartridge, I thought I'd give you a
quick tutorial on assembling the chest...
These are all the pieces in the cut...

Fold all the tabs along the edges...

Assemble the bottom first (that's the easy part :));
then adhere the half circle to the tabs...
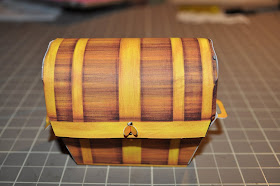
 And voila!! Cute, huh?!
Thanks for stopping by! Comment are always greately appreciated - I LOVE to read them! And fyi, I am fairly new to the world of tutorials, so if it totally doesn't make sense, let me know :)

Wow! Your card and treasure chest are amazing! The pirates are so cute. I love it all. TFS.
ReplyDeleteTami
http://scrappinrabbitdesigns.blogspot.com
Super cute! I love it. I have to get this cart :)
ReplyDeleteHugs
Stacy
Love these Imagine projects! The card is amazing and look at how nice that treasure chest is! Love it. Thanks for sharing this with us today.
ReplyDeleteYo ho ho to you! You did an amazing job and wish I had a boy to make it for. Maybe next time as we will soon have 3 granddaughters.LOL Getting close to an Imagine on rewards. I can't wait after seeing this great project.
ReplyDeleteBeautiful card. Terrific job on the tutorial, too.
ReplyDeleteROTFLOL!!! I don't have any "little" boys but when I saw the chest I had to have the cart!!!
ReplyDeleteI made one too...but how did you get it to stay closed? At first the little pin worked but after that I couldn't get it to stay closed.
Hey SUZANNE- when you get your imagine just lay girly designer cardstock down and have the imagine "CUT ONLY" and then you'll have a GIRLY HOPE CHEST!!!
I love this, now I am going to need this cart, TFS!
ReplyDeleteWow this treasure box and card are really a treasure...get it. ...I love all of it. The colors, the pirate, the treasure all of it. TFS
ReplyDeleteGreat project and tutorial!! I keep telling myself that I don't need that Imagine cartridge but every time I see a project made with it, my resolve weakens! :-)
ReplyDeleteWonderful projects! I'm sure your nephew will really like it, especially the treasure chest with treats in it. This looks so fun -- if only I had an Imagine. TFS!
ReplyDeleteHow cute... I love the treasure chest... such a great idea.
ReplyDeleteAdorable Roberta!!!
ReplyDeleteHugs,
M
This is adorable. I think that Buccaneer is my fave Imagine cartridge so far .. but I love them all! LOL Thanks so showing the tute for putting the chest together!
ReplyDeleteOh my gosh this is such a fun project!LOVE the card and the box to COOL,Amazing job!:)
ReplyDelete