Hi, everyone, it’s Charlotte C. I cannot believe we’re midway through July
already. It’s such a busy time for everyone, and having
my right arm in a sling for nearly a month (like Humpty Dumpty, I had a great fall)
has been one major inconvenience. My
crafting has been rather limited, but my husband has been very helpful in
adhering card stock to my mats and using the paper trimmer for me when
necessary. However, I did want to share
something with all of you that changes those annoying cut tick marks in images
– whether from SVGs or in the Cricut library – easily and quickly. You will need the scoring tool in your
Explore for this.
For this post I’m using an envelope from the Simple Cards
cartridge. I know several images on
various cartridges still have the cut tick marks and they can be converted in
the same manner.
Once you bring your envelope onto your canvas, insert a
score line, size it and place it directly over the tick marks. It’s best to unlock the score line so you
don’t make it wider or narrower as you adjust the size you need. Here I duplicated the vertical score line for
each side of the envelope. Then do the
same thing for the horizontal sides.
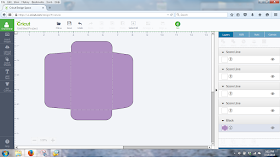
Your image will look like this.
Insert a rectangle and place it on your envelope.
Use your shift key to highlight both the rectangle and the
envelope. Now click Weld and your
envelope will look like this. Don’t
panic – we’ll get those score lines back in a second.
Highlight the envelope, click Arrange and send it to the
back. Voila, there are your score lines.
Final step is to click Attach so that your score lines and
envelope become one. Notice that over in
the layers panel it now says attached set.
Thank you for stopping by today, and thank you, Sheila, for
inviting me here again this month.
Happy summer, happy crafting.


Great tutorial for someone who is new to Design Space! Hope you mend quickly~
ReplyDeleteWhy do you weld the rectangle?? I don't understand that part.
ReplyDeleteI sure hope you start feeling better real soon! Great tutorial. I am using DS envelopes more and more this is helpful. Thanks for sharing.
ReplyDeleteI'm not sure I fully understand the welding part either, Devblev, I just know that that's how it works.
ReplyDeleteThanks Charlotte, for a very useful tip. I have tons of old paper pads that I am using for envelopes and the cut marks often tear when I fold the envelopes. Pinning on my techniques board! Do hope the arm heals soon. : )
ReplyDelete