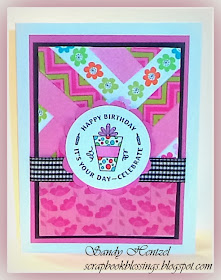
So here it goes....
- First, I placed the tape over the front of my first layer, criss crossing. I didn't do the bottom because I was going to cover it with a pattern paper.
- Next, trim the base layer by cutting off all the extra tape. Below are my card base and layers. I did add black when I put the card together. Black is my new "pop" of color.
- Here is the card with the mats and base adhered together
- Quick Tip: when I am using my markers, I will stamp two images. One is to "test" the colors to see what will match with my papers and in this case, to see which circle punch would fit this image. The second is the image I will put in on my project.
- Finally, I attach my sentiment using popdots/tape.
- And that's it... my first attempt at Washi! Now, I am looking forward to my next one!
♥ Scrapbook Blessings Club DT ♥
♥ Sandy's Paper FunTime ♥


What a bright, cheery card. TFS.
ReplyDeleteVery nice! Thanks for the tutorial images, too!
ReplyDeleteThis is just adorable. Love the technique and the colors are wonderful. Thanks for sharing with us today!
ReplyDeleteWOW Sandy, this is wonderful - what a fabulous idea! TFS
ReplyDelete