October 31, 2010

I Have To Share These Awesome Cards and A Gift I Received In The Mail

Isn't this card Gorgeous! Kate of Sassy and Scrappy sent me a little note in this. I just love it. Look at all the glitter and the little bows are just perfect!  Kate thank you so much you made me feel so blessed when I opened this card.
This is a close up of Kate's card, isn't it beautiful? Look at that cute little lamb! Be sure to go over to Kate's blog and check out more of her wonderful designs.  
And look at this gorgeous card from Bobby and Jill the Cricut Couple. They sent me this wonderful Thank You card and I love it! They are just so talented. I recently saw they're entry for the monthly challenge on the Cricut Circle blog... it was so good, I didn't bother making anything! I sure hope they would consider guest designing here at Shes A Sassy Lady sometime soon, it would be such a treat for us. Be sure to stop by and check out their blog!
Look they even made a matching envelope and the inside of the card was just beautiful too.
Here is a close up of the front of the card. I think they have the Imagine, look at those flowers and how perfect everything matches.

Now you have to check this out look what Audrey made for me!!! It is a necklace with Justin in it! Can you stand it? Audrey is so talented and constantly thinks out of the box and comes up with these amazing projects. Be sure to go over to Cute and Some to see some Awesome projects! Audrey thank you so much for this, Justin loves it too!

Thank you, thank you for these beautiful cards and the necklace! You are so wonderful to think of me and I feel so blessed by you!
signature

October 30, 2010

Gypsy Made Simple - Large Window Cards

Isn't this a great card? I love the glittery look to it and the feel of it as the complete base of the card is so nice and thick. Today you will learn how you can make a large window card with more than one component on the inside. So, go get something to drink, turn your Gypsy on and lets get to work. Don't be afraid to put me on pause and go back and get a step completed so you can go on to the next step. By the time you watch both videos you will have a 5x5 window card completed and ready to cut!

On video one we get the base of the card completed and ready for welding.
This is a close up of my Gypsy screen of the complete base of the card.
This is a close up of the layers separated for cutting.


On video two you will make copies of your components weld your base and complete the card. I also eautiful as can be!want to make note that there were indeed cards made from the last two weeks, I had the linky on there wrong so it didn't show, when I fixed that there they were as can be!
Look at the YUMMY papers I picked out so shiny and glittery! I just wish you could see this card in person as it is much prettier than the photos!
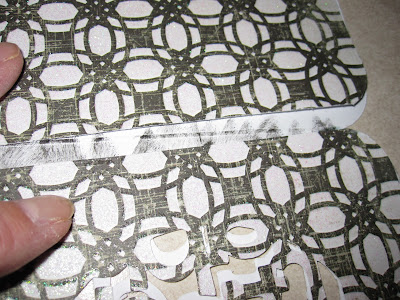
First I scored my card then I trimmed the inside crease off so it would fold perfectly and my cuts would line up. Then I took the front base and just dabbed a little black ink on the crease.
In this photo you can see when I Glue it down you will not be able to notice the crease.
I used glue in the center and my ATG on the outer edges.
I places the mesh over the letters on the mat as it was easier to transport and then line up on the final card.
Here is the inside of the card. Since my base was black and white I did not ink the edges of the sentiments paper.
I used the I-Rock setter to set the gems in. Personally I think I should have used a larger gem but that is all I had.... Oh my I feel a shopping trip coming on! (Note, I did shop and got all kinds of goodies along with plenty of new gems!!!)
Didn't this turn out awesome? I just love the window cards.
That's it for today and I want to thank you for spending time with me, I sure hope you learned something new and enjoyed today's projects.  That wasn't as hard to do as you thought, was it?

Now I CHALLENGE YOU TO MAKE A CARD AND LINK IT UP TO MY BLOG so we can see what you did and how much you are growing with your skills. These skills that you are learning will be your stepping stones for everything you design in the future. Remember if you have any questions be sure to email me at ShesASassyLady@hotmail.com or if there is any area that you want me to cover please do the same as I am using your questions and suggestions for future Gypsy Made Simple features.

Thanks for your continued support and sweet words of encouragement. Your comments are what inspire me to share with you.
signature

October 29, 2010

Cute Little Partial Shape Card

Now isn't he just too handsome? I had so much fun with my partial shape card videos that I made for last weeks Gypsy Made Simple that I just had to put together this little card too. Don't you just love him? Here is the link for Making Partial Shape Cards just in case you missed last weeks instructions so you too can make a card. There are just so easy. I had this card designed in 3 minutes!!!  I doubled it up to in no time at all I had two complete cards!

 Here is what my Gypsy screen looks like. The photo on the left was cut once and on the right twice.

Don't you just love these YUMMY papers? 1 1/2 sheets DCVW and 2 scraps and I have 2 beautiful cards.

After the card was cut I scored it on my score pal.
Oops, I my first cut I made the layers wrong so no problem I just took out the little dots from the purple and glued them on separately. It worked great and has the same look.
These are all the pieces and in a matter of 10 minutes the card was put together.
I stamped the face with my Peachy Keen stamps and colored in the whites with my gel pen.
See how easy the layer fit.
I used glossy accents on the eyes to make them shimmer.... these are still well so they look a little cloudy.
This is the goofed up card, can't hardly tell can you?
Here is the inside of the card. I just kept it simple. You know sometime all we need is a simple little card to show someone we car. The neat thing is our simple cards are better than the best from the store!

I hope you enjoyed today's little project, it was so much fun to make. I figure it took 1 hour to make the two cards, from design, choosing paper, cutting to completion. Now that's the type of card we all need on file on our Gypsy!!! Here is the A2L Dinosaur Gypsy file for you.
MyFreeCopyright.com Registered & Protected

Thanks for your sweet sweet words of encouragement, your comments always inspire me to continue to share with you.
signature

October 28, 2010

Gypsy in the Pumpkin Patch!

I am so very excited to be a part of Sassy’s Design Team! Thank you for this opportunity to share my humble designs on this blog!
Pumpkins make my fall. I eat pumpkin bread, sip pumpkin spice latte and decorate with all shapes and sizes of…pumpkins! Eventually, I knew my craft space would turn into a pumpkin patch. And yours can, too!
What you will need: 


Orange, gold and green paper (I used Recollection Spice Market colors), a spool of floral wire (cloth covered), a wooden skewer (bought 50 at the Dollar store for nothing!) and my Gypsy, Rosie G! I also used the Thanksgiving Cart for leaves, but any broad leaf will do.

The first step is to design the pumpkin in the G! I selected an oval from Gypsy Wanderings:

On the Basic tab, tap on the yellow “chain” (beneath the height and width).

Now the height and the width can be adjusted independently of each otherSet the height to 2.35 and the width to 2.50. To do this: tap on the number and use the slide to set the correct height/width.

With your newly sized oval selected, duplicate it. On the Advanced tab tap on the double pink square.


While the new oval is selected, check the x and the y values on the Basic Tab. Write this down! The x value will move your image right to left and the y will move it top to bottom (of your screen!) My values are X (1.16) and Y (8.18)Select your first oval. Tap on the Y value first. The lower screen will change. move your oval to Y 8.18. Repeat with X; set at 0.35.

Group the two ovals. With oval one selected, tap on”join” on the Basic tab. With the join highlighted, tap on the second oval. Tap on the join to complete the operation.

Now, weld the joined ovals! With the group selected, move to the advanced tab. Tap on Weld.

Tap on the eye (preview)---the red indicates the cutting line!

Tap again to turn off the “preview” Duplicate your pumpkin 8 times!

Send the pumpkins to your Cricut! You should cut a total of 8 flat pumpkins.
Assembly is fun! Score between the two indents on the cut.

Next ink the edges and the score line for depth. Fold along the score line towards the inked side. Do this for all 8 sections and set aside.

Make the stem, next. Cut two lengths of covered wire: 10” and 8”. First, take the 10” wire and fold it in half. Hold it against the wooden skewer (my finger is holding it in place, it is not around the skewer yet!) Now tightly wrap the wire towards the pointed end. Be sure to leave about 2” free. Set it aside.


Using the 8” wire, take one end and wrap from the point 4-5 times. Repeat for the other cut end, creating the tendrils.
Wrap the the tendrils around the base of the stem.

Assemble the pumpkin, using 4 sections at a time. Place adhesive on the back of your first section, keeping it flat. Add the next 3 sections folded, so that you can match the fold with the center on the flat section. Set aside and repeat for the second half. (Ignore my two colors---too many bad photos!)


Open one four piece section of pumpkin. Add adhesive on the entire piece, especially on the fold. Place the end of the stem along the fold.

Open the second half of the pumpkin and add adhesive. Join the two halves along the fold. Arrange the sections to create a rounded pumpkin! 

Add a leaf to the base of the stem!


And thanks to Gypsy, your craft room has blossomed into a pumpkin patch! I hope you enjoy making these as much as I have enjoyed sharing with you!
Jeannie, Nonna's Scraps