February 28, 2011

Easter Home Decor'-Hanging Paper Topiary

Hey y'all! Happy Monday to you! Aymee Gandy from A Scraphappy Southernbelle here with you on this beautiful day to share a bit of home decor' that I created for the upcoming Easter holiday. I hope all of you had a fabulous weekend! Anyone get any scrappin' done? I managed to do a few things, but not too much. I enjoyed spending a lazy weekend with my hubby! Anyways, on to the tutorial. Here is the project I'd like to share with you today. It's a hanging paper topiary made using my Cricut, Gypsy, and crafting supplies. This is such an easy project to do and really can add a festive flair to your home any time of the year!
This project was inspired by a tutorial I found online a couple of years ago. The tutorial was for making paper topiaries. HERE is the link where you can find complete instructions and a template in case you do not own a cutting machine. I have made a standing topiary in an urn using this pattern a few years ago, but I thought it would also make a great hanging topiary. Now, I took pictures during my process so I could share the steps with you.

1. Now, I made a 5" topiary, but you could really make this any size you would like. It all really depends on what size circles you cut. Using the Plantin' Schoolbook Cricut cartridge (or any cartridge with a circle), cut 20-2 3/4" circles. You can cut these in all one color or varying colors/patterns like I have below. For this project, I chose some Easter themed paper from American Crafts and solid cardstock.
2. You are going to score a triangle into each circle as shown below. You can wing it like I did, or use the template provided in the link above. Either way will be fine.
A tip...if you are like me and do not have one of those nifty Scor-Pal's, you can use the groove in your standard paper trimmer and a bone folder.
 
3. After you have all of the circles scored, you will want to fold up the flaps like this:
4. Now we will create the top and bottom of our topiary. You will glue the flaps of 5 triangular pieces  together to form the top and bottom as shown below.
5. With the remaining 10 triangular pieces, we will create the middle band of our topiary.
6. Once you have glued your 10 pieces together for the middle band, attach the first piece to the last piece to form the band as seen below.
7. Then all you have left to do is attach the top and bottom to the middle band...
8. Voila! Add some ribbon and various embellishment and you will have your topiary! How easy is that?!!!
 I secured the ribbon/bow for my hanging mechanism using some Helmar 450 Quick Dry Adhesive. I love this glue because I know I can trust it to hold.
 I attached this cute little chick from the 'Simply Charmed' cartridge to the bottom. I blinged him up with some pearls and glitter glue.
I hope you have enjoyed this project and will give it a try! I promise it is so easy and fun! And best of all...affordable!

Have a fabulous week! Happy Scrappin'!

February 26, 2011

Gypsy Made Simple - Spinner Card

I have such a GREAT card to share with you. I have to admit that I have been admiring it for a long time and finally decided to make it. You see my friend Melissa at Melissa Made created this card with a smiley face and ran it on her blog and Shes A Sassy Lady in November and I just loved it. So I decided to make this awesome card our Gypsy Made Simple project for the day. Melissa be sure to link yours up at the end so everyone can see it!


Just a little short video that will give you instructions for designing this wonderful card.

I started out with these colors, and blew the cut. Let me tell you we are such creatures of habit I placed the paper on the mat not even thinking. I just automatically cut my paper 6 inches wide when ever I cut a card. There I stood with my mouth hanging open in disbelief when the cut ran off the paper.... what was I thinking? I am making a 5x7 inch card. Well I went scurrying as my time was limited and grabbed what Melissa suggested and stayed with the DCWV Sweet stack and just grabbed those papers that matched. It was great. You see ladies I work and only had from 8:45am to 10:00am to get this card cut and put together while taking photos. To add to the stress Pam was on the computer emailing as to what I was up to and Melissa was on chat asking the same. So I emailed Pam and apologized that I couldn't talk and as for Melissa, she gave me step by step directions through this card. If I wasn't living through it I would sear it was a comedy routine.
First I gathered together all my cuts and items I would use. I ran to the computer and Melissa assured me that I it would all be easy as soon as I got my spinner finished so I did that first.
Then I lined up my slider pieces and then used my ATG to put glue on. Next time I am going to use my Zip Dry glue as it allows a little time before drying and you can maneuver into position. I had to run upstairs to get the pink ink as I had white edges. Surely there was a camera on me as I had only 15 minutes left at this point! And I had to run for supplies! Pam is emailing at the same time telling me don't worry sweetie if you don't get done don't pressure yourself. How do you not get it done, all I could think of is she got the post done on my blog when her back was out, I knew I needed to complete this card.
Inked and good to go. Report to Melissa.... we got it, now on to the circle.
I used glue this time and it went together faster. See and I even inked the edges. Circle done.

Now I put the little butterfly together but didn't stickle or add glossy accents until later. I used Zots on the back and centered it on the circle.
Center the .50" pop dot circle in the center of the penny and make a little sandwich out of it.
See how nicely it fits on the rectangle. (Sorry I didn't have time to worry about photo quality too)!
I used plenty of pop dots so that it would be sturdy and the penny would slide easily. Now all I had to do was put the card together. So it was the base of the card, the heading, and the slider on a tilt. I made sure the penny was secure on the slider bar and then added the centered circle on the penny. So all I had left was glue the Happy Birthday on the inside and I was good to go! hard to believe that after my cutting disaster I was able to get this card together in 20 minutes and had never done one before! Wowsers I even took photos for you! I took the card to work and have added stickles now so I will make a little short video so you can see it works too. How fun is that?
I hope you enjoyed today's post. I challenge you to make one of these awesome cards too. Then link it up for all of us to enjoy. Click HERE for the Birthday Spinner Card File.
Thank you for your sweet, sweet word of encouragement. Your comments continue to inspire me to keep coming back!
signature

February 25, 2011

ATC mini album


Hi all,
I'm glad to be designing for Sheila today. I thought I would share with you how I made a mini album for my ATC's. ATC stands for artist trading card. Artist would make mini works of art that were 2 1/2 inches by 3 1/2 inches and swap them with other artists or give them to prospective clients/sponsors. I got involved with making atc's a few years ago and often participate in swaps. At the moment I'm making some atc's on a Tim Holtz theme, we have to have something by Tim Holtz on the ATC. I thought I would make a mini album using Tim's papers etc ready for when I receive my atc's.


Here are the items I used. I used Tim's Lost and Found papers, 4 white paper bags size 3 1/2inches by 6 1/2 inches, some plain card stock, my atg gun and red sticky tape.


First I folder the points of the bottom in. I then stuck this down so the bottom was half it's size.

I then used my red tape and stuck it as above. I then folded it inwards. This gave me a strong spine.
I did all four the same way. I then attached it all together by the spines. Two of the bags I stuck together all along the whole surface, I then stuck the others together to these two on the spines.
This is difficult to photograph without my hands etc getting in the way.

I then cut the pages and pockets. I cut 2 papers 3 1/2 inches by 4 inches, 2 papers that were 3 1/2 inches by 4 1/4 inches. I then cut to make the pockets 2 papers that were 1 3/4 inches by 4 inches and 2 more 1 3/4 inches by 3 1/2 inches. I stuck the main papers on to make the pages, the longer sided paper 4 1/4 inches is used to cover up part of the spine. To make the pockets I put the red tape on three sides and stuck them down. This will leave room for me to add bits, once I've received the atc's.

Here are the inside pages finished. You can see how there's a pocket to the bottom on one page and to the side on another.

To make the spine, I used a paper 2 3/4 inches by 3 9/16 inches. I stuck the tape as above then stuck one side of the spine down. I then turned it over and repeated. I didn't score it as I wanted it to curve like a book spine.

To finish the cover I stuck the tape on as above. I then cut two pieces of card 4 1/4 inches by 3 9/16 inches. I then stuck it down.

Here is the cover Stuck down. I then used my circle punch to cut half circles out of the pages to make it easier to pull the atc's out.

I put ribbon on the front and back to hide where the spine joins the card. I then threaded ribbon through the spine, ready for adding some charms to it. I then stuck atc on the front, using die cut letters.
To finish the atc lettering off I stickled it with distress stickles faded jeans.
Well that's my tutorial. I will add a lot of the finishing touches once I've made my atc's and received my swap. I will be posting pictures of my ATC's over the next couple of days, so please come and take a look on www.kamscraftyplace.blogspot.com . Just a quick thank you to www.paperphenomenon.blogspot.com. Kathy has some great tutorials on paper bag albums and that's where I adapted mine from.
Next time for She's a sassy lady I'm going to try and make a rose necklace. Fingers crossed what is in my head can actually be made.

Kelly x

February 24, 2011

Love My Friend (adding interest to cards)


Hey there everybody! This is Leah from Beeing Creative and Feeling Cherry and I have a cool tutorial to share with you all today. The photo is a bit of a tease for the end result of the card but let me show you how I got to there.


Here is a photo of the virtual cutting mat for the Imagine showing exactly what will print and cut, I chose images from Imagine More Cards.

Now this tutorial is really about building interest for your cards. I know many of us are used to layering and detail in our scrapbook pages but you can indeed add the same to cards. So let me show you step by step some layering...

Here is a basic, but cute card! The image is certainly sweet enough to stand on its own, the blue piece (matted in dark brown to stand out even more) is embossed with hearts and the fibers all add texture to the card.

Now I've added a sentiment to the card and also a layer of the rose, popped for detail.


I have found a great new love, the Sakura Gelly Roll Clear Star, glitter pen. Here I've used it to highlight the sentiment writing, the leaves and bird. I've used this pen a ton of times to write over sentiments or any writing..its just so pretty in person! I've even used the pen to highlight areas on stickers to make them a bit more interesting.


Now the last step is going a little farther for adding detail...this is also such a great chance for you to raid your stash. Go through all those little drawers or divided holders and see what little goodies might go with your project. You'd be surprised what you can add and it's a great way to actually use all the teeny finds you've collected.


I've added the feathers, 2 layered hearts which were printed/cut with the Imagine, 3 small roses and small bird stick pin. Some more inking (to the hearts and directly from ink pad to roses) and some glitter to the larger rose. Here you can also see the embossing on the blue background and all the other parts shining. This card is so full of texture that it makes you want to reach out and touch it!

Thanks for having me today and I hope you get some ideas for taking your cards to the next level! xoxo, Leah

February 23, 2011

Oh Baby!

Hi everyone, Beth here from Thunderbirdlindybydesign.  Since this has been a long bleak winter, and I am getting tired of the grey dark skies, I thought I would make my post today bright and cheery.  Today I am going to show you how to make a star photo album.  This type of album has been around for a long time, and I had always wanted to try one.  If you google it on youtube, you can find videos of it.


I started with cardstock cut to the following sizes:


6 @ 12x4 of one color
6@ 12x4 of a coordinating color to the above
6 @ 10x4
6 @ 10x4 of a coordinating color to the above
6 @ 8 x 4
6 @ 8x4 of a coordinating color to the above


So when you are done cutting cardstock you will have 12 @ 12x4, 12 @ 10x4, and 12 @ 8x4.  Glue all of the above back to back.  So 6 of the 12" long adhered to the other 6.  6 of the 10" long adhered to the other 6, and 6 of the 8" long adhered the other 6.  You will then have 18 sets of cardstock.  Score these in the middle.

Next cut stiff chipboard(I used the back of a note pad that I got from work).  Cut 2 pieces 6.25 x 4.25 

Cover these with cardstock that coordinates with the pages you just made. 
These become the front and back cover of the album.

Glue ribbon on the inside of the  covers on the bare chipboard.  Cut 2 pieces of  cardstock, 6x4 and glue on top of the ribbon.  This is shown as the green cardstock below.  The ribbon holds the album open or closed.

Take the scored pages you created and glue them together layering the longest, the next to the longest and the shortest.  Only glue the outer edges of the album, making the edges even. 


After you have created 6 sets of glued packets, start gluing all of the longest ones together, outside back to outside front, and then glue the front covers on so when you are done it looks like this. 

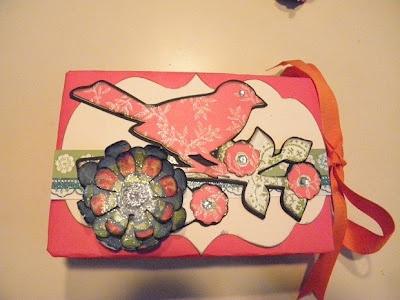
Here is the outside decorated.  I used the carts Bloom, Home Accents, and Picturesque.  I did weld the bird from Picturesque to the branch from Bloom with my Gypsy.  I also created a welded shadow with the bird and the branch.  The flower is from Bloom cut in 3 different sizes.  All cuts were inked and the flower has stickles applied.


The reason I titled this post "Oh Baby" is because I pulled out 12 pictures of my daughter when she was anywhere from 1 to 3 and put them in the album.


Here she is prior to 15 month's old.  I had a cupboard that was full of tupperware lids and she would spend everyday pulling them out and I would spend everyday putting them back in.  She couldn't hurt herself, and she had so much fun, I thought what harm is this. She would crawl so far in that only her diapered butt was sticking out.  10 minutes later she would get bored and move on to something else, leaving me with lids to put away. 

 This pic was on her 2nd birthday.
She had a head of hair from the day she was born. 

Here is the album finished, it can be displayed open on a library shelf or coffee table.

Well, I hope you can understand my garbled directions, and like I said, if you need help with the instructions you can find them on youtube under Star Album.

Thanks Sheila for allowing my to be a guest designer today, it always challenges me.
Beth....