July 24, 2014

Coloring Lined Stamps in Different Ways

Hello! Leah from Paper Blossoms here to share a quick card with you and a tip for coloring your lined stamps in a new way. I know some of us can feel intimidated to color a line image but you don't always have to use markers or watercolors. For my card I used a stamp  to "color" my image. It was quick and easy and gives a very different look.


I used a paint brush stroke image to color my flowers. I first stamped the paint brush strokes after measuring about how much space I needed to fill and did graduated colors that would make sense in coloring a floral image. Once that was done I stamped my flower image on top in black ink and added my sentiment. What do you think? It was a fun way to color this detailed image and give it a new look. Thanks so much for joining me today. I hope you have a great day!
Supplies:
Memento Luxe inks
Friends Forever stamp set by Inspired By Stamping

July 21, 2014

1-2-3 Scrapbooking - Not Quite

Hi, everyone, Charlotte C here with some info on a few challenges I faced when trying to do my latest scrapbook album quickly.  Thank you, Sheila, for allowing me to be with you again.  And I’m thrilled that you’re feeling better and back to sharing your talents with us. 

I am not a true scrap booker – just happy to get photos in an album, a few embellishments, some die cuts – done.  I’ve noticed the trend of using pocket page protectors you can just slip pictures, notes, cards, etc., into (larger versions of Project Life) and I thought, hey, that will be quick and easy. So I’m walking through Target one day and, lo and behold, We R Memory Keepers has a ton of what they call Albums Made Easy items:  Pads of preprinted cards for journaling or matting or whatever you wanted to use them for,  in two sizes, 4 x 6 and 3 x 4, and 12 x 12 page protectors divided in a variety of styles with six to eight slots for pictures on a page.  All of the pages are meant to go into a 3-ring binder (yay) and not the post binders.  I came home loaded down with my goodies.  I already had all my photos printed and ready to go.   

Once I started trying to put pictures in the album in month order I found I needed to consider what was going to be on the back of the page I was working on – the photos all had to be oriented the same way.  That didn’t always work out though.  As a matter of fact, it hardly ever worked out.  So much for quick here.  I used the preprinted cards, stamping and die cuts to fill in where I couldn’t put the proper picture.  Here's an example of one of my pages.

I also had Studio J two-page layouts that I had bought from Close To My Heart and couldn’t cut those up.  It wound up I had to do a regular scrapbook page layout before and after the Studio J’s.  I have two-page layouts now that consist of a pocket page on the left and a non-pocket page on the right, or vice versa.  
Using Studio J pages, regular scrapbook pages and these divided pages, my album has many faces.  Lol.  Our Disney trip with our daughter needed 3 divided pages (I have a hard time limiting which pictures to scrap).  I had to do a regular scrapbook page for what I was scrapping before that trip so I could use the back of that page to create a journaling page of our trip using my Cricut and Gypsy.

I welded Mickey, Minnie, Donald and Pluto to a square mat and cut it in black.  
I then cut the layers for the characters and applied them.  I cut a little bow tie for Mickey and some sort of pink dress for Minnie so they didn’t look like just floating heads.  I sized the white Mickey silhouette head to fit using my Gypsy, cut it, then brought it to my printer to add text using a Disney-type font.
My plan now is to continue the journaling before adhering it permanently to the black mat.
This is how the finished page will look facing the pocket page of 6 horizontals.  
Was this easier, quicker?  Well, it sure did keep me on my toes.  How is it possible to have vertical and horizontal pictures properly oriented back to back in these slots?  It isn’t.   The divided pages can give you more photos on a page, but some 4 x 6 photos can’t be cut down to 3 x 4’s without losing someone’s head.  You’d have to resize them smaller (shrink) before printing either at home or wherever you can print smaller photos.  I’ve just heard that Target prints four different wallet size images on a single sheet.  I’ll have to check that out.

Totally easier, for me anyhow, was using Microsoft Publisher and doing a digital layout. Here’s a layout I created using that program so I didn’t lose any of the characters’ heads while trying to get as many of the pictures on the page. (Again, I admit, I can’t seem to restrain myself when choosing photos – especially of my children and grandchildren). 
 I’d love to hear your thoughts on scrapbooking with pocket pages, and if anyone uses these divided pocket pages, I’m open to your input, suggestions – anything that might keep me going to continue the album in this manner.  I apologize that this is so wordy.  Thanks for stopping by today and I hope you’re enjoying your summer.


July 19, 2014

Meet 11 Year Old Sydney As She Creates Cookie Monster Treat Bags


Don't you just love these little Cookie Monster treat bags, well our little Sydney will show you how to put them together in the following little video. Each time we have a card party every person at the party receives a little gift just to feel special.
 
 
Now wasn't that easy? You can make them in little or no time at all.

 
Meet our beautiful Sydney
 
 
And this is how great our table looks with all the little treat cups and prizes near each place setting. Thank you for joining us today. Be sure to leave a sweet comment for Sydney.

July 18, 2014

Meet 11 Year Old Brianna As She Shows Us How To Make A Smile Card For Our Mini Card Party

 
Hello, I hope all is well with you. Today we are preparing for a mini card party that includes my 2, 11 year old grand daughters and my daughter Jennifer. We had so much fun together making the little card kits. Our party will be a 2:00 this afternoon.
We were to each prepare 2 cards of 4 sets for the party. Brianna chose this little smile  card that I designed 2 years ago. She didn't realize how hard the card was and how many steps it took to make it. She learned many things and had a lot of fun. Here is a copy of the file Smile Card for your Gypsy.


Now wasn't that fun? And really easy to put together.


Here is our Brianna, she really likes making cards.


Brianna learned how to use a score pal and to stickle today.
I sure hope you enjoyed this little visit, be sure to keep watching as we show many adorable and easy card that you too can make. Thank you for your sweet sweet comments for Brianna, I know she will be encouraged by each one of them. Have a blessed week.

A set of 3 x 3 cards with envelopes


Hi Everyone, Lisa from Lisa's Craft Room here for my monthly project. Thank you Sheila for allowing me to be here again. I hope everyone is doing well. For my project, I decided to make a set of 3 3 x 3 note cards with envelopes. I cut 3 pieces of white card stock at 6 x 3 and then folded them in half.

I used a stamp set called For The Birds from Stampin' Up. The images are so sweet. I used a variety of markers to color the images, Stampin' write and the new Blendabilities from Stampin' Up and some Copics.

I also stamped an image on each envelope just to tie them together. I used a blue ink and stamped around the card and the envelope to add a little color.


This is the Envelope punch board from Stampin' Up that I used to make my envelopes. This little gadget is awesome, it makes all kinds of sizes of envelopes, it also makes gift cards.


 Here is the envelope completed. On the other side of the punch board is a slot to round edges. I hope you enjoyed my project. Have a wonderful weekend, see you soon.


July 17, 2014

Simple Greeting Card Using Gelli Prints and Die Cuts

Hello Crafters! 

Thanks Sheila for allowing me to post here today. Hope everyone is having a great summer and able to spend time with family and friends. During the summer months we are keeping it simple as it's a busy time of year for most of us.  I wanted to make a few cards using some die cuts that I really like and some of my favorite embossing folders.  

My card is an A2 size. To get that size, I took an 8.5X11 piece of whisper white card stock and cut it in half.  After scoring it and folding it in half I cut a 1/4 inch off the front right front edge. I added a piece of double sided paper that was cut at 4.25X5.5 inches that I used a border punch from my stash to give it some delicate detail. It's adhered to inside of the front of my card.


Next I cut a piece of white card stock to 4X5.25 inches and embossed it with my Swiss Dots embossing folder. 


I mounted it using foam squares to give it some extra dimension. I love the look.


Ii am learning to make gelli prints using my Gelli Plate and this project is a great way to use some of my favorite prints.  Here are some of the gelli prints I have in my stash.


It's easy to use these prints in your favorite die cutting machine or with your Cricut or Silohouette. 


I love Irises! This is one of my favorite images and I love the way it turned out using one of my first  gelli prints! Next I had to cut my sentiment so off I went to my Silohouette and cut it from the gelli print. I used a font that is on my computer. You can use your Cricut or a die cut that you have.


I used the weld feature to weld my I to the H. 


It cut perfectly from the gelli print. I do make sure to adjust my blade setting with each cut as that helps to avoid wasting paper. Next we are ready to assemble.


My two way glue pen came in handy for the delicate cuts and my silhouette tool was key in getting the sentiment off the mat.


I love the pop of the color on these gelli prints cuts and the Swiss dots embossing is a favorite look of mine.

I hope you enjoyed this simple and elegant card that is great for most occasions. Thanks for coming by She's A Sassy Lady today!


Happy crafting peeps! I'll see you next month.

Donna Lee 

July 11, 2014

Biker Wedding Card

Hello everyone!!!  It's Danita from danitasdesigns.blogspot.com  My DT post this month is a wedding card that I wanted to share with you.

This card took me about a week to make, but it was well worth it because it was for two wonderful people. I wanted to be sure to personalize it so that they could have it to keep as a reminder of their special day. I tried match the colors of the wedding, tiffany blue, yellow and silver. My cousin and her new husband are bikers so I wanted to use that on the card also.

Here's the front: I used the Anna Griffin flower vine die for the silver flowers, and the Ebosser Regency folder on the yellow background and veil. The bride and groom are two different images I got off the web, colored and welded to make one. Then I did a print and cut on my Cameo. The motorcycle also came off the web. I highlighted the bike's chrome accents with a Wink of Stella Silver Glitter pen( the bottom flower is silver also but I could not get a good picture of it)

Here's the inside. I got the idea for the wedding cake off of Pinterest. I made my own template and embellished with ribbon and vinyl to help give it the appearance of cake layers.


Close up
I just love this #Anna Griffin die!

This is a corner die by Spellbinders.
Another close up shot.

It was a beautiful wedding and I enjoyed it very much. I'm so happy that they loved their wedding keepsake, it was made from my heart!

Thanks for looking and have a wonderful day!

July 10, 2014

Quick Graduation card

Hello everyone! Java Jen here from JAVA JEN CREATIONS and it's my turn to share here! Thanks Sheila for another opportunity! My post will be short and sweet today since I'm just sharing a graduation card that I made in a jiffy for our nephew who recently graduated! :-)

This card and the coordinating envelope is on the Wild Card cartridge and I cut it at 4.5". 


 Since I was in a little hurry when I made this card, it took me about 10 minutes from start to finish! 

Thanks for stopping by today and keep enjoying your summer!


July 9, 2014

Sunflower Card

Hello!!  This is Leslie from Scrapn Life Away!!  Today is my day to share here at She's A Sassy Lady and I have a very special card to share with you all!  Thank you Sheila for having me today!!  This card is dedicated to a dear friend of mine who passed away in June.  Her favorite flower is the Sunflower.  So, what better way to honor her memory than to make a sunflower card!


I started out by stamping my sunflower on vellum using espresso dye based ink.  I then stamped my sentiment, from the CTMH Treasure Life stamp set.


I have been experimenting with blending colored pencils!  Just plain old crayola colored pencils!  I used odorless mineral spirits and a paper nib to blend the colors!  You can purchase odorless mineral spirits at Walmart for just a few dollars!


The card base is just plain brown cardstock, as is the yellow.  I cut the yellow card stock down by 1/4 in so that they would layer nicely.  The first yellow layer I put through my cuttlebug to add texture and the second yellow piece was attached to the vellum using my xyron.  That way you can't see any adhesive!!


I used some foam to pop up the top layer of the card!  I don't like to pop things up too high, just enough to bring attention to the stamped vellum!  Then, to finish this card off, I wrapped some twine around the card twice and finished it off with a bow!


I hope that you enjoyed my creation today!!  I really enjoyed making it and I know my dear friend is looking down and smiling!!  Have a great week my friends!!

July 8, 2014

Summer Birthdays

Happy Birthday!
Howdy!  Adrienne Kirkey here from Eagle Canyon Arts.  Thanks to Sheila for having me as guest designer today.

Summer birthdays are always fun.  this year I made cards for the grandchildren using my Cricut machine with "Tinkerbell and Friends" and "Cars" cartridge layers.  I made two of each card so I have a "spare".  Using my Gypsy to lay out the different layers, I was able to get many of them on to one 12"x12" Cricut cutting mat.
Ready to cut Tinkerbell layers!
Oops - can you tell which one is "cross-eyed"?
Love the little Teddy Bear!
The inside sentiment is CTMH "Teddy Bear Birthday" (A1143) Happy summer time to everyone.  Hope you enjoy this project.  If you have any questions, drop me a note.
       
Matthew 7:1-12

July 7, 2014

Baseball Door Decor

Happy July!!!  Lori here from Scrappin' My Stress Away with a fun baseball project today!

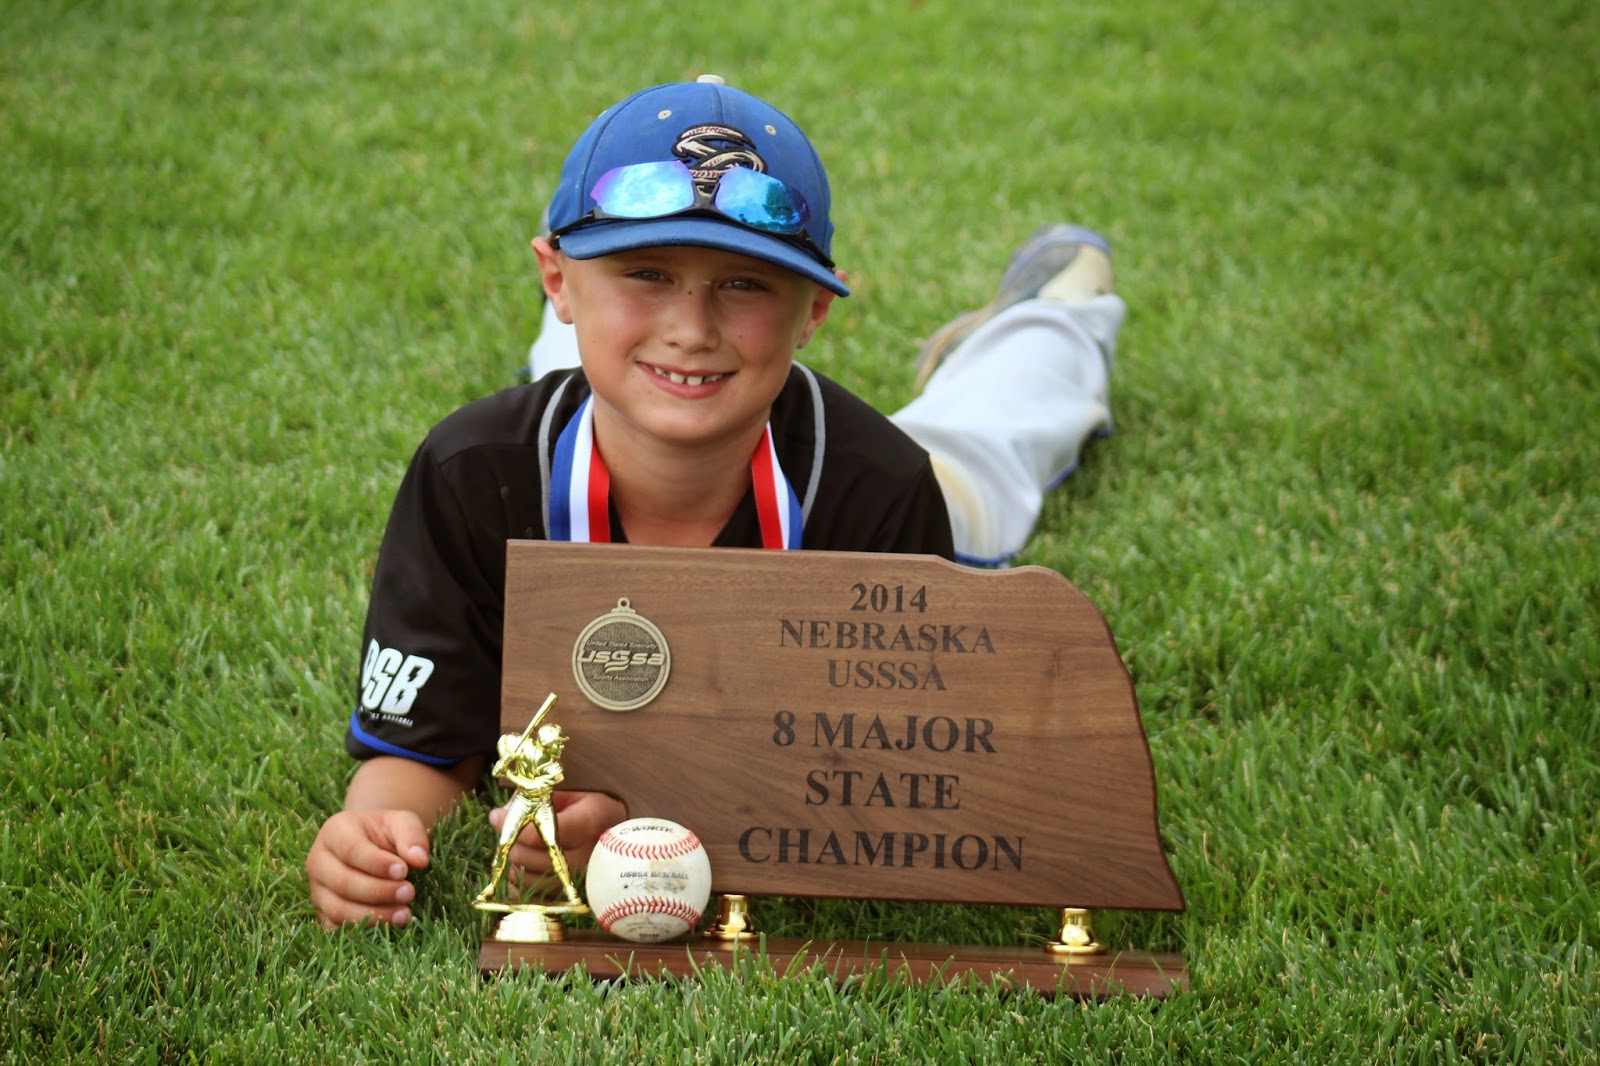
Our 8U Papillion Storm Chaser select baseball team had an amazing season.  Our record was 36 - 3 and we won state last weekend.  We qualified for nationals later this month and I made some door decorations for each team member and coach.
Here is the team photo with Kyle (from SouthPark) our good luck mascot.  Kyle was won in a claw machine in between game 1 and game 2. 
Here is a photo of Tanner with the team plaque and game ball.

I used my cameo to design our door decor.  
I started with a shape of home plate and sized it just under 12" wide.  I want to put this in Tanner's scrap book later.

Our team partners with the Minor League Omaha Storm Chasers (Kansas City Royals) and we use their logo.  I traced the Storm Chaser logo (which is only ok if I don't sell it) and cut it out.  I cut out the black and white layers in cardstock and the red laces in vinyl.

I found this image of a baseball player in Pinterest and traced it.  I cut it out of black cardstock.  I used Freshman font for the boy's name (or nickname) and number.  I cut them out in blue cardstock.  
I lined up and sized each name and number on my cameo mat to fit the home plate shape.  I saved the negative cuts to use as a template in order to get the letters on just perfect!!
Here is Tanner's sign.

I wanted something a little different for the coaches so I cut out a 12" wide baseball cap. 
Because our hats are all blue I just cut out one layer.  I cut out Coach Mike in white vinyl and transferred it to the bill.

Had I known I was going to make the coaches signs different from the rest, I may have made the logo smaller.  I like it anyway!!

Thank you Sheila for having me on your blog today!!!  Go Chasers!!!