July 28, 2016

Another Paper Bag Album - Birthday Gift


Lisa from Lisa's Craft Room here sharing my project for this month. My heart is very heavy and heartbroken at the loss of our dear friend Sheila. This will be my last project as one of her designers. It has been a pleasure being chosen by Sheila and getting to post what I love doing so that others could see. I will continue to try to post projects as I do them on my blog and I will still visit everyone as much as I can to admire their projects and make comments.

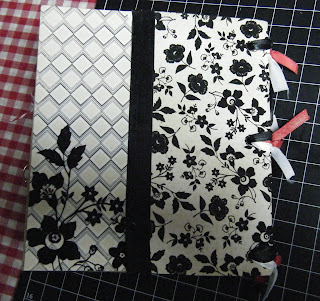
All the paper to cover the pages are from paper stacks called the immortal love from DCWV and La Creme from DCWV. This is the front of the album. I punched holes on the side and added grommets. I tied red, black and white ribbon to each hole. The colors are the recipients favorite colors. I had that flower in my stash, so I added a pearl to the middle of it and adhered it, along with the strip of red ribbon and I also added pearls to that.

The first page, I had these plastic die cuts, so I glued them down. I stamped the sentiment, which is from My Creative Time. I added a rhinestone to the i and added heart stickers from my stash.

The second page I added a tag I die cut and embossed, the tag die is from My Creative Time and the embossing folder is from Stampin' Up. I punched out flowers from black glitter paper with a punch from Stampin' Up and added rhinestones.

The third page I die cut the balloons, which are from My Creative Time and added rhinestones and twine. The cake is a sticker from my stash.

The fourth page, I die cut this awesome shape, the die cut is from My Creative Time. It comes with layers which I layered a pretty scene of trees on the first one and on the second one I stamped a sentiment which is an older stamp from Stampin' Up.

The fifth page, I stamped the sentiment, which is from Stampin' Up, The f is for the recipient's name, it is a chip board letter, I used a red marker to color it and adhered it on top of a strip of DSP which is from Stampin' Up. I added some silver thread, also from Stampin' Up. The bottom sentiment is a sticker from my stash.

The sixth page I stamped all her children's names with Versamark and embossed them with silver embossing powder and my heat gun. The panda stamp was a gift. I added some red stickles to the heart. The hearts and cupcake are stickers that I had in my stash. The bird paper clip is from Stampin' Up.

The seventh page I stamped a wreath which is from My Creative Time and I cut it out using a scallop punch from Stampin' Up. The sentiments and the little flower are stamps, from the same set as the wreath. The flower on the bottom is a die from My Creative Time, I cut it out twice, adhered it together and cut out the middle piece with black glitter paper and adhered it.

This is a gift card holder die from My Creative Time, I embossed it with the same folder from Stampin' Up. I tied a bow with twine and used a glue dot to adhere it to the clip, both are from Stampin' Up. I put a gift card in it for her as another gift.

The eighth page I die cut the frame from My Creative Time, I stamped the first flower and cut out three from a punch from Stampin' Up. I added a red brad to hold them together. On the bottom, I cut a strip of acetate with black flourish design  which I had and stapled it down. I added washi tape from Stampin' Up to hide the staples, then added a glass gem to the middle.

The ninth page I added a strip of white card stock and used the banner punch from Stampin' Up to punch out 4 banners. I glued them to red and white twine and tied a bow. The bottom, I just cut a strip of DSP and adhered it down.

The tenth page I added a doily, some DSP and another banner strip. I used My Creative Time's dies and cut out the crown and the scissors. I figured she would be a Queen for the day and she is a hairdresser. the three embellishments are Jolee's stickers.

The back of the album, I just added a piece of black ribbon to hide the seam of the different DSPs.

Thank you so much for stopping by. Your visits mean a lot. Have a wonderful weekend.

July 15, 2016

Sad news

Hello Readers This is Pam here. I am so sorry to say that today Sheila Mcshea has gone home to be with the Lord. Her family was by her side . Miss you so much my dear dear friend Sheila. May you rest in peace .

July 14, 2016

A Love Story Begins....

Happy Thursday, everyone! This is Java Jen from JAVA JEN CREATIONS here to share a unique wedding album I made last week for a beautiful bride for her shower! Thank you, Sheila for the opportunity to share it here! I began with a blank mixed media Collection Folio from Tim Holtz and took off from there! These books are so fun to work with because you can really let your imagination go crazy! The size of this one is a little larger than 8.5'x11' and is just perfect to tuck all sorts of wonderful things in! 


The front cover.

One of my favorite parts is the little saying I put inside the front flap! :-) 

Pics of the inside - so much to see! :-) 


I attached journaling cards to tags and then adhered them in the folio as pages.


The tickets I used are also Tim Holtz and I simply crumpled them up and flattened them out before adhering them to give them a distressed look. 


The bride loves to use hashtags so I pulled out a hashtag stamp set that I have from Unity stamps and had some fun with the back cover! 

That's it for today! Thanks so much for stopping by!

Java Jen


July 12, 2016

Bouquet Greetings

 Howdy! Adrienne from Eagle Canyon Arts here as guest designer for She's A Sassy Lady.  Thanks to Sheila for her hospitality and grace at allowing so many of us to share her wonderful blog space and be on her great design team!
These cards use the beautiful "A Bunch of Love" Stamps (C1647) and corresponding Thin Cuts metal dies (Z3251) from Close to My Heart.
 Shin Han markers in R11 Carmine (Z2448), R140 Lt Orange (Z2455), YR24 Marigold (Z2457), GY234 Leaf Green (Z2454), G46 Vivid Green (Z2466) and BG61 Peacock Green (Z2461) colored the flowers and leaves.
The May Stamp of the Month "Celebrate With Cake" (retired) provided the sentiment and flowers for the inside of the anniversary card.  Shin Han marker colors used for the flower colors are listed above.
Other CTMH supplies:

White cards and envelopes 5 1/2"x 4 1/4" (X254)
Florentine Paper (retired)
Rose Gold Foil Tape (Z3218)
Watercolor Paints (Z3132) and brushes (Z3188)
Medium Round Waterbrush (Z3225)
Black (Z2105), Ruby (Z2170), Peacock (Z2649) and Ponderosa Pine (retired)
Bitty Sparkles (Z1263
Sparkle Asst, Brown and Tan (retired)

3D foam dots or squares are used to lift the stamps up from the card front for added interest.
As the card says, thanks a bunch for following along on these projects.  They demonstrate how some little changes can make very similar cards useful for a variety of occasions.  I love the look of these cards because they're so bright - just right for spring and summer, as well as cheerful for autumn and winter - any season.

If you have any questions or comments, please let me know - I love to hear from you!
Blessings,

 
Romans 8:38,39

June 30, 2016

Another Card Party


Hi Everyone,

Lisa from Lisa's Craft Room with my monthly project. Thanks Sheila and I hope you are doing well. My thoughts and prayers are with you.

I went to another card party and these are the cards we made. It's fun because a lot of the stamp sets we use, I don't own so it's nice to stamp new things. I haven't had too much time to play in my craft room because I've been busy with appointments and to be honest, it's been too darn hot. I hope you all are doing well and are enjoying each day.

Have a great weekend and Happy Fourth of July to you all.


June 22, 2016

Using the Anna Griffin Fantastic Flip Card Dies

Hi!  It's Christine from iamcocoasmom.blogspot.com sharing all my trials and tribulations using the Anna Griffin Fantastic Flip card dies.  Thank you, Sheila, for inviting me back to share.  I know that all your bloggy friends join me in wishing you a speedy return to health.

Sooooo, I did succumb to the lure of Anna Griffin on HSN and have to admit that I enjoyed putting together the cards in the kit in as many different ways as I could think of.  However, I really, really wanted to try out the dies that came with the kit and when I finally acquired the extended platform plates for my Big Shot, I was ready to go.


Here's what I learned:-

*  Close your eyes, grit your teeth and ignore the cracking and popping of the plates as you crank the Big Shot sandwich through.    I understand that it does the same in the Cuttlebug.

*  Anna does not include a die that will cut a frame for the opening.  I mean, really?  Plan A - Searching Design Space, I could not find a frame of the same proportions, even among Anna's carts.  On to Plan B - I folded a 4 by 6 inch piece of cardstock and inserted it at the frame end of the die before cranking it through.  This is what's left over when the frame cut is removed.


Unfortunately, the frame cut in two parts but when glued around the opening, I found that it presented a perfect opportunity for embellishment.


And using patterned paper worked well too.


*  Using double sided paper gives a variety of interesting results.  The embellishments that come in the kit are printed on one side only and to my mind, look ugly and unfinished on the inside of the card.  Using double sided paper with the small embellishment dies results in a nicer look inside.  And, because the cardstock is generally thicker, there isn't the need to strengthen the outer edge of the flip fold. (Since this is the edge that holds the embellishments, it needs all the strength it can get!)


*  The smaller dies work with the Sizzix magnetic plate and are held firmly in place for the second, embossing pass.

*  The quality of the dies is not what I expected from Anna Griffin and I reverted to my good old Heartfelt Creations dies and stamps to embellish this card.


*  The more cards I made, the more frustrated I became with the fact that they will not fold flat.   I did try running the folded card through the Big Shot before embellishment, but it wasn't much better.

You know, I think I'll put the dies in my next garage sale and continue to use the Flip cards on the Artfully Sent cart.  Sigh!  Here's a couple of You Tube videos I found particularly useful:-

https://www.youtube.com/watch?v=k53icPsCzBM&feature=youtu.be

https://www.youtube.com/watch?v=SJqZice8Kqg


Thank you for visiting with me today.   : )  Christine

June 20, 2016

SHAPED HOUSE CARD


Hi, everyone, this is Charlotte C.  Recently on Design With Sassy on Facebook Sheila challenged us to make a shaped card, and this is what I created to meet that challenge.  I thought for today I would give you details on how I put it all together.  Please come join us on Facebook to see all the wonderful creations our members have posted.

The house itself is from April Showers and it only has two layers.  I brought in five of them on my canvas and ungrouped all, saving only one of the top layers. 

I welded two together at the rooftop to form my card base, which I cut in dark brown.  The base is 11 x 4.12.  For some reason it did not fit in a standard A2 envelope so I needed to make one with my WRMK punch board at 4 ½ x 6. 

I used a lighter brown for the next three:  one is full size and covers the front of the card base; one I sliced to keep just the roof so I could emboss it; and one I shrunk a bit to use for the inside of the card.  The designer paper used for the top layer is from my stash.

The potted trees are from Bloom.  I changed the color, flattened them for print then cut, inked the edges and adhered to the base, as you can see.  The flower boxes are also from Bloom and I flattened them for print then cut and used foam tape to pop them off the front.  A little brad for the doorknob, Wink of Stella on the flowers, and some white gel pen finished off the card.  Since I first posted on FB I decided to add a small pink heart on the door which I also used Wink of Stella on. 

Thank you, Sheila, for inviting me here again, and I wish you a speedy recovery.  I hope you all enjoy this card.