December 30, 2014

Brother Scan N Cut: Orientation and Cutting Patterns-Session 1

Brother Scan N Cut CM 100
I received this electronic cutting machine for Christmas!
I have enjoyed learning to use the features!
 
Today begins a series of blog posts that I am creating to show how to use the machine!  This first session is learning how to turn on, load blade housing, loading mat, and using the pattern feature.  The machine comes with a large variety of images.
 
Happy New Year!
This is Carolyn from
These cards are my first projects!
Close up!
The machine cuts great!  There is very little paper waste, too!
I cut mulitple images to create multiple cards.
The images were attached with double-sided foam to give dimension.
For a photo tutorial for using the Scan N Cut, please visit my blog...
 
Bonus!!
I recently saw a YouTube video using baby bottle nipples as the topper for my liquid glue bottles.  My experience is at the end of the post above!
 
Thank you for visiting 'She's a Sassy Lady' blog!
Have a wonderful New Year and come back soon!


December 26, 2014

A Quick Card For A Friend Made From Scraps And My Wonderful Explore

 
Isn't this card adorable? I have a friend that is fighting breast cancer and is in her final two months of chemo and then starts radiation. I try to send her a card every 2 weeks and this is one of them. I used some Tim Holtz scrap paper for the background and inside of the card. And I used my Explore for the wording and the fish. I played with the colors to make sure I had pink lips on the fish and then adjusted the words to match the fish. I flattened both as I was in a hurry and I wanted those colors to match. The Explore is the perfect tool for any crafter!


This is the inside of the card. I used The Stamps Of Life, special edition breast cancer stamp and it worked perfect!


This is the close up of the card and as you can see it is adorable! Thank you for joining me today and for your sweet-sweet words of encouragement. Your comments continue to inspire me.
Have a blessed day.

December 25, 2014

Merry Christmas


The Birth of Jesus


Luke 2:1 In those days Caesar Augustus issued a decree that a census should be taken of the entire Roman world. 2(This was the first census that took place while Quirinius was governor of Syria.) 3And everyone went to his own town to register.
4So Joseph also went up from the town of Nazareth in Galilee to Judea, to Bethlehem the town of David, because he belonged to the house and line of David. 5He went there to register with Mary, who was pledged to be married to him and was expecting a child. 6While they were there, the time came for the baby to be born, 7and she gave birth to her firstborn, a son. She wrapped him in cloths and placed him in a manger, because there was no room for them in the inn.
The Shepherds and the Angels
8And there were shepherds living out in the fields nearby, keeping watch over their flocks at night. 9An angel of the Lord appeared to them, and the glory of the Lord shone around them, and they were terrified. 10But the angel said to them, "Do not be afraid. I bring you good news of great joy that will be for all the people. 11Today in the town of David a Savior has been born to you; he is Christ the Lord. 12This will be a sign to you: You will find a baby wrapped in cloths and lying in a manger." 13Suddenly a great company of the heavenly host appeared with the angel, praising God and saying, 14"Glory to God in the highest, and on earth peace to men on whom his favor rests."
15When the angels had left them and gone into heaven, the shepherds said to one another, "Let's go to Bethlehem and see this thing that has happened, which the Lord has told us about." 16So they hurried off and found Mary and Joseph, and the baby, who was lying in the manger. 17When they had seen him, they spread the word concerning what had been told them about this child, 18and all who heard it were amazed at what the shepherds said to them. 19But Mary treasured up all these things and pondered them in her heart. 20The shepherds returned, glorifying and praising God for all the things they had heard and seen, which were just as they had been told.

December 24, 2014

Merry Christmas To All From She's A Sassy Lady

I had to share a photo of our tree. My grandchildren Justin-12 and Sydney-11 and Gavin - 5 decorated it for me! Didn't they do good? I added a couple of the glitterornaments and they did the rest! They love helping.


We wish you a Blessed Christmas

filled with love, laughter, friends and family.


May your table be heaped with delicious holiday foods

that thrill and excite your appetite.


May your tree be adorned with lights and ornaments,

Presents abounding beneath its limbs,

surrounded by those you love.


Be blessed this year by the virgin birth

of the babe who came to earth

so many long years ago...


December 19, 2014

Gift Card Bags


Hi Everyone,

Merry Christmas to you all. Wasn't it just Thanksgiving?  I have been so busy trying to get everything done, while working full-time but, I'm sure most of us are in the same boat, right?. I'm sorry I really don't have a blow by blow description of my project. I  am trying to think outside the box when it comes to wrapping certain things, so I thought making these little bags would be cute for gift cards. Of course I always give credit from where I get the ideas, and these cute bags are from Angie at Chic n' Scratch. The paper alone cracks me up, it's from Stampin' Up.

I punched a hole through the top and added curly ribbon. Hopefully, after the holidays, I will get to be more productive.

Sheila, thank you for having me and I'm sorry it wasn't  a fabulous post :)

See you soon.


December 16, 2014

Snow Angel

Hi everyone.  It's Karon here from Karon's Krafty Korner.

Stopping by to wish you all a very Merry Christmas and A Happy New Year.  Thanks Sheila, for letting me come visit.

Today,s creation is another book art sample.  The last time I posted, was my Christmas tree, using the same technique.  However, this time - you turn the book upside down for several of the pages - so that you get wings :-)  A great tutorial for this, can be found here at Five Go Blogging.

I decided to make a bottom for the angel using cork pot stands - so I first coated the cork in Gesso, just one coat would be enough, but I gave it two :-)


Then I gave it a coat of silver acrylic paint.  I am so pleased with how this turned out!


You can see the angel there in the background - looking a little headless LOL!

Anyways, after spraying her with some Perfect Pearls - Perfect Pearl is the colour I used, I also added a little more sparkle with some very fine glitter glue.

Her head is just a Christmas bauble, I kept the silver hanger attached to it, as I thought it made the perfect collar.


I couldn't resist adding some silver ribbon to her head and base.


Of course, as she is a Snow Angel I had to add some lovely silver snowflakes.


I finished off the base of the angel with some wired star garland, after all she is up in the stars and clouds there :-)


I was tempted to add a face to the bauble, but thought that may spoil it.  Less is more, as they say.


I apologise for the overload of photo's I was trying to share the sparkle :-)  Hope you are able to see it.


Maybe you could give it a go, with some old books that you may have.

Thanks for stopping by today.

Happy crafting.

December 15, 2014

Slicing & Die Cutting With Design Space


Hello again.  Thank you, Sheila, for having me here once again.  This month marks two years of being able to share some projects with you and I am revisiting the first post I did here, which was removing card fronts with your Gypsy.  Well, we now have the Explore and Design Space, and it couldn’t be easier to not only remove (slice)  card fronts, but to create die cuts without owning the die or a die cutting machine.  Something like this:
Here’s the how-to using, let’s say, a 4 x 5.25 piece of paper or card stock and a heart image.  Insert an image of a rectangle that size on the virtual mat.  Now insert the heart image   Size the heart image, bring it on top of your paper layer rectangle to where you want it to cut out, hold down the shift key to highlight both the heart and your paper layer and click slice over on the dialogue box.  You will see everything turn one color.  Now just slide the heart  away,  delete it or hide it, hit GO, and you will see that your heart image will be cut out from your paper layer.   Cool, right?  

My favorite way to use the slice feature is to cut a separate layer of the front of a card in designer or specialty paper to adhere to the plain card stock card.  This requires some extra steps, but it’s easy.  I’ll use a side fold card here; just adjust for a top folding card.  First, bring in the card you want to cut and size it in edit (unless it’s a square card, unlock the lock before you put in your height and width).  Next, bring in a rectangle image (or square) and size that in the edit box to the height and half the width of your finished card (you just need the front).  Click on your card, hide the score line and click detach in the layers dialogue box (this is important).  Now, slide the rectangle over the card front (bring it to the front through “arrange”) and it should cover the right half of the card.  Hold down your shift key and click both the rectangle and your card, then click slice in the dialogue box.   Now slide the new card front over (and you can delete what’s left on your mat).  Done!   I resized my new layer a bit so I would have a little margin of the card base around it.   Just FYI, I cut all the card bases first, then I cut the new layer.  


 And two others I sliced, one being a top folded card.
 Here’s the finished cards.  The first one, shiny foil card stock on white, 5 x 7.
 I was very impressed on how well the Explore cut the heavy glitter card stock on this top fold A2 card.
I cut  the last one in white so I could color in the house and trees and cover them with lots of Glossy Accents – don’t you just love that stuff?!!  The sentiment is also embossed, but it doesn't show.  5 x 7
 I feel very blessed to be able to join all of you once a month.  I can't thank Sheila enough for her generosity and inspiration.  I want to wish you the merriest of Christmases and the happiest and healthiest New Year!  God bless.

December 13, 2014

Organizing Scrap Paper & Making Cards From Scraps


Hello, it's been a while since I posted anything. Just like you I have been busy getting ready for Christmas. I made all my Christmas card and even the tags that went on the children's gifts.
In the mean time my scraps have been stacking up. I have had 4 card parties, Halloween cards, a tag swap and the Christmas cards and tags. A little over 4 inches of scrap paper! And I didn't use scraps on hardly any of that!!! I know shame on me.


See how easy this was. The only thing is it was time consuming. I just turned on the TV and watched HGTV while I was trimming and sorting papers.


This is a picture of the small scraps and I am able to just finger through it to see if  have anything I need. This size is great for punches and dies as there are some really small pieces in here.


The top two boxes are for large scraps and I have them placed right in front of me. All I have to do is reach up and use what I need. I am going to concentrate on using these scraps for a while by going to the scraps first to use for my cards.


Now this is what I used  for my two cards that I made. I did the little circles and squares and chose two flowers. See the one on the right, that was the original color of the flower. I changed the colors to match the flowers in the base color of the card. Then I did print and cut and went about putting my card together.


I just love the way they turned out, and will be using them. I can see where this is really going to work our well. The Explore really make it possible with changing the color. I love the print and cut as it allows me to use a finished size that I normally would have never attempted cutting because the layers would have been too small. Now I just flatten. LOVE IT!
I hope you enjoyed today's post and that it really helps you in dealing with your scraps. I would have love file folders but I just don't have the space for it and this WORKS! Thank your for your sweet-sweet words of encouragement. Your comments continue to inspire me.
Have a blessed day.

December 12, 2014

A Variety of Christmas Cards

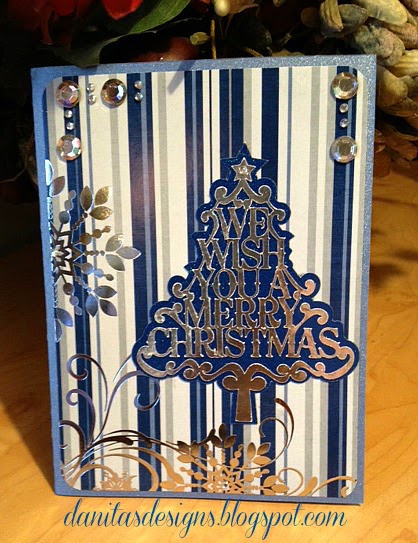
Merry Christmas, Season's Greetings & Happy Holidays everyone! It's Danita from danitasdesigns.blogspot.com

Today I'm sharing a few of the Christmas cards that I have made for this year.  These are not the mass produced ones that I stressed about making (I'll share those later) . Most of these were actually made at a crop I went to back in July.

This is one of my favorites.  I used the Memory Box Clairmont Ornaments die and Teresa Collins Checking it Twice Christmas paper pad.

Inside

 I made this with images from the Silhouette Store. I used the Glitzy Glitter paper pad from DCVW.

Stampin Up Ornament Keepsakes stamp set, dies and ink.
Here's the inside of this one. The tree is from Stampin Up Lovely as a Tree stamp set

The tree from the Silhouette store, Paper stack is Recollections Starry Night paper pad.
Memory Box Merry Christmas to All die and the plaided paper is by American Crafts.
This card was made using my Craftwell Ebrush on the background. The angel is from the Cricut Christmas cartridge, cut in foam from Dollar Tree on my Cricut Explore. (Yes, I have both machines)
Okay, I know this is the ugly "Christmas Card" but I was trying to duplicate a card I saw on Pinterest.
It didn't turn out too well. lol  Oh well, this may go to a distant relative. Bahahaha!

Thanks for stopping by.