Showing posts with label Wrap It Up. Show all posts

February 13, 2012

Make your own clear boxes and pillow boxes!

Hello, my crafty friends!  This is Kimberly (My Craft Spot) and I am so excited that it is my turn to share some fun projects with you!

Scroll down to the bottom for a video showing how I made these boxes!


I cut this box  and lid at at 6 inches from the Sweet Tooth Boxes cartridge and then inked the edges of the lid with brown ink from Studio G.  I tied Milk Chocolate crinkle ribbon around the box to hold the lid on.  The polka dot paper is from My Minds Eye.


The "I love you" stamp is from the Always & Forever stamp set.  I hand cut the tag and then tied the button on with Chocolate traditional bakers twine.


I have seen some of you emboss your clear acetate with cuttlebug embossing folders, so I thought I would give it a try.  I love how the embossing looks!


I cut the pillow box at 5.25 inches from the Wrap it Up cartridge. The red tape from Provo craft works best with the acetate.


The stamped sentiments are from the Build a Valentine and Always & Forever stamp sets.


I used my crop-a-dile to put eyelets in this hand cut tag, then threaded Posy Trendy Twine through and tied it around the pink polka dot sleeve.  The pink paper is from Pebbles.


Here is a video showing how to make these two treat boxes:


Come join the fun at My Craft Spot!  Weekly challenges with prizes and lots of fun projects and videos!

 Have a Happy Valentine's Day tomorrow!

July 11, 2011

Pillow Boxes - Easy and Fun!!

Hello my crafty friends! This is Kimberly from My Craft Spot and I  have something fun, but super simple for you today!  

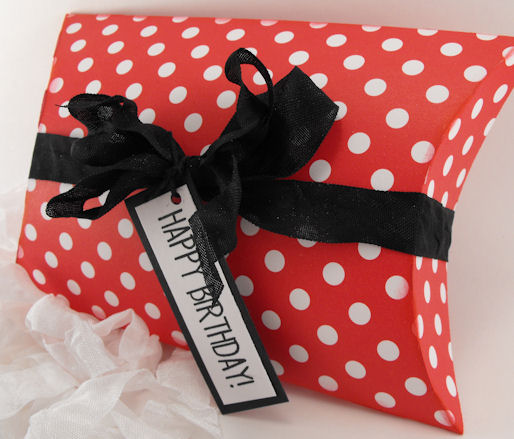
I love the wrap it up cartridge and tried a pillow box for the first time.  I was surprised at how fast it went together.  This would be perfect if you had to make a lot of little bundles of goodness to give away quickly!

Scroll down to the bottom for a video showing how I made these!


I cut the red pillow box at 9 inches.


I used Black Diamond Crinkle Ribbon and tied a double bow (see video).

  
These would be so great for teacher gifts, Halloween, special treats for friends, Christmas  . . .

The blue box was cut at 8 inches and tied with Snow White Crinkle Ribbon.  I tied the tag on with Baby Blue Bakers Twine.


I think I am going to cut a bunch of these from patterned cardstock just to have ready to go when I need a quick treat box to give to someone!  They store flat!


The stamped sentiment is from my Inside & Out stamp set #2.


Here is a video showing how I made these fun boxes!:


Hop on over to My Craft Spot for more videos, projects and weekly challenges with fun prizes!

Have a wonderful day!

June 12, 2011

Father's Day Cards

This year I made a very simple design for some of the men in my life. This is the year that I decided I am no longer buying any cards so I have really been busy making my cards. I am finding it is very difficult to do when you have a full time job away from the home along with the full time job of keeping a home to find the time to keep up. Because of that I am finding that my cards are becoming... shall I say... less ornate!!! LOL
I have 1 son, 2 son in laws, a father and my hubby to make cards for. I still need to make one for hubby but kept it simple for the other four.
I started with this yummy paper stack called the Guys Stack from DCWV. All it took was four sheets of paper and it made 4 5x5 cards with a few strips left over that I can use on another card!
I cut all the pieces and scored each of the cards.

I inked the edges of all the pieces.
I cut the twine to the right length for all four cards and got ready to assemble the cards. I really felt like I had an assembly line going.
I then glued the Sentiment onto the inside of each card as it would allow enough drying time. This glue has a wonderful dauber on one end and it makes it easy to apply. I then assembled the rest of the card.
This is the inside of the card. Wow what an intricate cut! It is from Wrap It Up.
Such a wonderfully simple card that is just perfect for the manly men in our family. All love to boat and fish so I used a boat on the front as last year I used a fish and wanted a different look with their love of all to do with boating and fishing.
Well all done and not to bad on the time either. I started at 8 am and picked out paper, cut, inked and assembled all 4 cards by 9:30 am. Not too shabby! It really makes you feel good when they are done! Now all I have to do is come up with one for my handsome hubby.... maybe I will just take him out to dinner! LOL
I sure hope you like today's post. Thank you for your sweet sweet words of encouragement. Your comments continue to inspire me.
signature

June 4, 2011

Gypsy Made Simple - Wedding Card & Blog Candy

Good morning! It is time for an easy Gypsy Made Simple project that is just in time for the summer wedding season. This year I will be ready and so will you. All you need to do is go grab a cup of coffee turn you gypsy on and let's get to work. We are gong to revisit a card we did months and months ago; the partial shape card. For those that have played along before with it the template on your Gypsy should say A2W. If you haven't click HERE for the original video. Note your template will be a 4.25x11" on one page and the page that you work on will be 4.25x9.5". Easy as can be and that is what you are looking at on this video screen.

This is such an easy card that can be made in a matter of minutes. I have to admit every time I use this style double the card so that I am doing 1 cut with a total of 2 cards. One for the occasion at hand and one for my stash so I am prepared.

Look at these yummy colors I am using. K and Company for the print and then Bassil solids. All cut like butter.
All my cuts are ready to be put together. I did them both at the same time as it was just easier.
Here are the little brides and the inside sentiment ready to go.

This is a quick little video showing how easy it is to assemble this little card. You will all want to make one when you see just how easy it is.

And here you go, both cards are done and ready to be signed. I just love the ease of this card. Ten minutes to design, 10 to cut and 10 to put together, that simple! Sure hope you enjoyed today's post and hope that you play along with today's card challenge.
I challenge you to make a Partial Shape Wedding Card of your own and link it up to my site. All linked cards will be eligible for the random drawing to win this car charger for your Gypsy. One of my favorite necessities on a road trip and for those summer vacations will be given to one lucky Partial Shape Wedding Card entry, all you need to do is link up your card by 8PM June 11th to be eligible. Winner will be announced on Sunday June 12th. Designers are eligible.
Thank you for your sweet sweet words of encouragement. Your comments continue to inspire me to continue sharing with you.
signature

April 6, 2011

Chocolate Easter Bouquet


Hey scrappers, this is Kate from Sassy and Scrappy. I'm happy to be sharing this fun project with you today at She's A Sassy Lady. Wow, haven't the projects around here been amazing! I gotta tell you these ladies are so talented.

Originally when I came up with this idea, I was going to use a tin basket that I found at Target in the dollar section. And then I remembered the picket fence box on the Wrap It Up cartridge and I thought it would be really cute, so that's what I went with.


I sized the box on my Gypsy and basically fit it to page on a 12 x 12 mat. When assembled it makes about a 4 x 4-inch box.


I decided to emboss my fence with the Cuttlebug folder Distressed Stripes. I could have let it be a perfect little white picket fence, but this seemed a little bit more fun and of course adds texture and dimension.


Here's a picture of the box as I sent it through the CB. I basically folded the box and lined up the folder to the edge of the fence and sent it through. It worked perfectly. After embossing I used brown ink around the edges and a light layer over the stripes.


The green layer cuts the grass. If you look closely you'll notice that not all four sides line up correctly. Only 2 of the 4 sides line up. That kind of drives me crazy! Instead of cutting more pieces I decided to just use some green ink around the edges.

A picture of the flowers before I layered and assembled them. As you can see, two of the flowers are cut with pattern paper. I embossed the lilac colored flowers using the Swiss Dots CB folder.


Here are the supplies I used. I found the sticks in the children's art section at Michael's. I applied crackle paint to create a stem. To adhere my flower layers, chocolate candy, and flowers to the stick I used my glue gun. Make sure it doesn't get too warm and melt your chocolate, lol. In order to create added dimension to my flowers I sprayed a little bit of water on the paper. This helps the paper to "move" better which is especially helpful with the thick Papertrey Ink cardstock that I use. Then I just rolled the flower petals around a thin embroidery needle.

Once the fence and flowers were all assembled, I placed some flower foam in the box and created my bouquet. I'm not the best at floral arrangements, so keep that in mind. To finish off my project and add a little more "Easter" to it, I placed some paper grass in the box. I thought it would be fun to put more chocolate in and around the basket as well. I mean, you can't have too much chocolate!


Here is a better look at the fence. I really like the way it turned out.


I love how this picture came out. It just doesn't get much better in my world than flowers and chocolate! Although you can see in this close-up that I probably went a little heavy with the glue gun, but the I wanted that chocolate to stay up there! I really love all the color and layers.


Details:
  • Box-Wrap It Up cut at 11.25-inches with layer
  • Flowers-Mother's Day Bouquet cut at 2, 1.5, 1.25 and 1-inches
  • Pattern Paper-Echo Park Springtime Collection
  • Cardstock-Papertrey Ink New Leaf and Royal Velvet
  • Embossing folders-(Cuttlebug) Distressed Stripes and Swiss Dots
  • Tim Holtz Distress Crackle Paint-Peeled Paint
  • Glue Gun
  • Flower Foam
  • Wood Skewers
  • Egg Shaped Chocolate Candy
  • Easter Grass

Thank you so much for taking the time to look at my project today. I hope it inspired you and perhaps you can create an Easter or Spring home decor projects yourself. I'd love to see what you come up with. Thank you Sheila for allowing me to post today, and as always I enjoy your comments! If you have any questions please let me know. Stop my my blog anytime, I'd love to see you.