Showing posts with label Christmas. Show all posts

December 10, 2015

It's Beginning To Look A lot Like Christmas!

Hello everyone! Java Jen here from JAVA JEN CREATIONS! Sorry I've been MIA but I encountered a personal health crisis at the end of the summer and am just now getting back to doing things I enjoy! So thankful for the provision of the Lord in my life!!   Well, I've been making lots of items to sell and here are a few! Not a lot of instruction in this post but if anyone has any specific questions, feel free to ask! 


Stamped coffee cards


I'm taking special orders for frames like these!


Also taking orders for these! <3


Taking orders for these that display my grandchildren's artwork! :-)


I made lots of Christmas banners!


The Christmas Joy Foldout in Cricut Design Space is very popular and I love how it looks!


Did this sign in vinyl and took the back off the frame to let my wall color show through! 


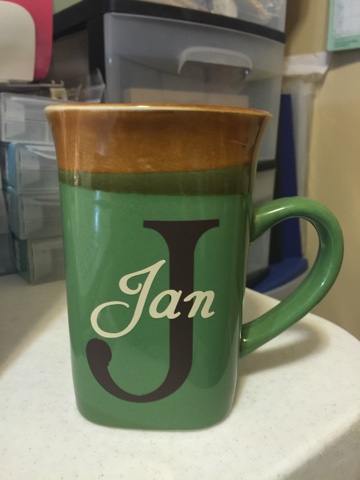
These mugs have been another great seller for me too! 


These monogrammed mugs are my latest project and they are selling like hotcakes! I'm so excited! 

Well, that's all I have for today! Thanks, Sheila for letting me share today! My prayer is for everyone to have a happy, blessed and healthy Christmas !! 


December 8, 2015

A Jolly Holly Christmas - Act Three

Christmas approaches and we may have need for some last minute cards.  Here are the last three cards in the Close To My Heart White Pines collection I began presenting two posts ago.

Supplies used are listed here.
Edges of  some cards and pieces of cardstock used are inked with complimentary color.
Both the card above and the card below use zip strips to accent and add interest.  Using White Pines complements to create the scene is quick and easy!
The Colonial White cardstock shape on this card is cut with the Artistry cartridge -  Real Dial size, 3” Shape <h> Page 26.  Attach the acetate shapes to the card with liquid glass, which will dry clear.
Again, White Pines complements create the scene.  Use Fern Cardstock -4 ½" x 3" (cut Banner into one end) and Colonial White Cardstock –4" x 2 ¾" (cut Banner into one end) for the background to the scene.

I hope you've enjoyed seeing how these cards are put together.  If you have any questions about this project, please contact me.  Best wishes for pleasant holidays.

Blessings,
Isaiah 30:18

November 26, 2015

Holly Jolly Christmas Too

Good morning - Adrienne from Eagle Canyon Arts.  It's always a pleasure to be a part of Sheila's talented Sassy Lady design team.  Thank you, Sheila.
 
As promised, here's the second installment of Christmas greeting cards using the White Pines collection from CTMH.  Supplies used are listed here.

Edges of  some cards and pieces of cardstock used are inked with complimentary color to add interest.  

On this card, use Colonial White Cardstock –3” Shape<z> Page 31 to create background shape.  White Pines complements and red enamel gems create the scene.
This card uses Fern Cardstock –2 ¾ “ Shape <Elegant> page 46 and Colonial White Cardstock – 2 ½ ” Shape<Elegant> Page 46, with White Pines complements and red enamel gems.  Add a twine bow to one of the packages or along the side for more pizzazz!
Most of the shapes on this card are cut by hand, except the ornament - Colonial White Cardstock –1 ¾ Shape <0> page 10.  Adhere the Fern green twine with liquid glass.
The simplicity of this card is accented by the sentiment and White Pines complement flowers.  For the stamp, use Colonial White Cardstock – 2” Shape<6> Page 6.

Note - All cuts use Real Dial size and are from the new Artistry cartridge.

The final three cards will be presented in the next post.  If you have any questions about this project, please contact me.  Best wishes for pleasant holidays.

Blessings, 
 Hebrews 10:24

November 10, 2015

A Holly Jolly Christmas

Good morning - Adrienne from Eagle Canyon Arts.  It's always a pleasure to be a part of Sheila's talented Sassy Lady design team.  Thank you, Sheila. 


My friend Gina is one of the most creative people I know.  She holds workshops all the time and provided the inspiration for these cards.  I'll be presenting 2 or 3 different cards for the next few blog posts.

Close To My Heart Supplies used:
Holly Jolly Christmas Stamp - D1657
White Pines Paper Packet  - Z7200B
White Pines Compliments - Z7200C
Fern Twine - Z3093
Red Enamel Gems - Z3090
Fern Ink - Z2650; Cranberry Ink - Z2116
Liquid Glass - Z679
Colonial White Cards and Envelopes - X1410
Colonial White Cardstock - 1388
Cricut Artistry Cartridge - Z3167
3D Foam Tape -  Z1151

Edges of  some cards and pieces of cardstock used are inked with complimentary color to add interest.  Use your imagination!  In the card above, the liquid glass comes in handy to glue on the clear plastic "holiday cheer" banner without leaving a visible residue after it dries.
This card uses a piece of Fern Cardstock cut at 1 ¼ ” (Real Dial) Shape <c> Page 33 of Artistry handbook.
Colonial White Cardstock is used on this card, Real Dial cut a 5” Shape <Christmas> Page 48 of Artistry handbook.  For added interest, emboss the cut with your favorite embossing folder.  This would also work with any of the large, solid color backgrounds.

Best wishes for pleasant holidays!

Blessings,
Phillippians 1:20-26


December 16, 2014

Snow Angel

Hi everyone.  It's Karon here from Karon's Krafty Korner.

Stopping by to wish you all a very Merry Christmas and A Happy New Year.  Thanks Sheila, for letting me come visit.

Today,s creation is another book art sample.  The last time I posted, was my Christmas tree, using the same technique.  However, this time - you turn the book upside down for several of the pages - so that you get wings :-)  A great tutorial for this, can be found here at Five Go Blogging.

I decided to make a bottom for the angel using cork pot stands - so I first coated the cork in Gesso, just one coat would be enough, but I gave it two :-)


Then I gave it a coat of silver acrylic paint.  I am so pleased with how this turned out!


You can see the angel there in the background - looking a little headless LOL!

Anyways, after spraying her with some Perfect Pearls - Perfect Pearl is the colour I used, I also added a little more sparkle with some very fine glitter glue.

Her head is just a Christmas bauble, I kept the silver hanger attached to it, as I thought it made the perfect collar.


I couldn't resist adding some silver ribbon to her head and base.


Of course, as she is a Snow Angel I had to add some lovely silver snowflakes.


I finished off the base of the angel with some wired star garland, after all she is up in the stars and clouds there :-)


I was tempted to add a face to the bauble, but thought that may spoil it.  Less is more, as they say.


I apologise for the overload of photo's I was trying to share the sparkle :-)  Hope you are able to see it.


Maybe you could give it a go, with some old books that you may have.

Thanks for stopping by today.

Happy crafting.

November 18, 2014

From Trash to Treasure!

Hello everyone.  It's Karon here from Karon's Krafty Korner for my monthly visit here at She's A Sassy Lady.  Thank you so much for letting me come visit and share with you, Sheila.

Today I have something a little different to share with you all. Grab a coffee and stay awhile.

Have you ever wondered what to do with those books you no longer want.


Well, I recently found this great tutorial on You tube to change a book into a holiday tree.

I just couldn't resist doing this and found the folding quite relaxing.  You need to have a book that has 150 pages or more.  Start off folding the pages.  Here's the first few folded.


The first 50 folded :-)


You keep going to at least 150, don't think you will get much more than that but you can try.  Just remove any excess pages and your done.


I then sprayed it with some Tim Holtz Bundled Sage Distress Ink.  Also some Perfect Pearls mist, Heirloom Gold and then I had to add some really fine Glitter glue, to give it a little more sparkle.


Next up, some luxury ribbon, and a lovely star.  The star was from Michaels, there were three and they are called Merry Mini's.  They are meant to be hanging ornaments but I cut off the small link and was able to use it for the top of my tree :-)


Then came the fun part, finishing it off.  I wanted to make it into a table decoration.  I took the lid from a 9" round Christmas gift box and used it as the stand.  I placed the tree on a little lid (just to raise it up a bit) from another small box.  


The tiny little gift boxes, were cut using my Silhouette Cameo and the box from Birds Cards, I sized them in Silhouette Design Studio, so that my finished boxes were 1.5" square, 0.75" square and even as small as 0.5" square. Then added some ribbon to make them look really Christmassy.


Father Christmas was just a little find at the Dollar Store, he is the perfect size for my little centre piece.


I so enjoyed making this and can see me making more, I might even make some for gifts.


And there you have it, from "trashy" novel to a Christmas treasure.  What do you think?


I think I will have to make another one, because I would like to see if I could add some miniature Christmas lights to one :-)

Thanks again.

Happy crafting.

June 5, 2014

June Holiday Card--sweet snowmen!

Hi Everyone....it's Sonya from Sonya's Paper Trail, so you know what that means......it's also time to share my monthly Christmas card!  And do I ever have a dose of cuteness for you today.  

Check it out:

I decided it was time to take a break from red, green and grey that I've enjoyed so much lately and went with non-traditional holiday colors this time.  I started this card by selecting my papers from Echo Park's Winter Wishes 6 by 6 paper pad.  I rounded just two of the corners for a cute effect using my corner rounder that was likely one of the first paper crafting purchases I ever made!  I then sprayed those patterned papers with glimmer mist, so they are nice and shimmery.  

The stamped image is by SP&Company and is called Snow Friends.  I colored it with my Copic markers and added some Stickles for the snowy bits.


I have a little obsession with Stickles....and it's lasted about 10 years.  I'm finally starting to use up bottles that I've had for ages, thank goodness none of them have dried up! This bottle was "distress" Stickles and they made a great accent to the snow.

How are you coming on your Christmas cards?  Anyone working all year long or do you wait for the Fall to begin creating?

Have a super creative day!

January 9, 2014

Christmas Banner

Hello everyone and Happy New Year! This is Java Jen from JAVA JEN CREATIONS, here to share a Christmas banner I made to hang over our fireplace! Thank you, once again Sheila, for allowing me to share here every month! It is truly a privilege! I want to say, right up front, that I apologize for the shortness of this post but in the last month, we moved into our new house and hosted several Christmas gatherings and I just started a new job..... so my crafting has been kind of hit or miss! Here is the banner:


I used Art Deco for the font - 4"-  and Pretty Pennants for the pennant shape - 6". 

This banner was so easy to put together and I just love how it looks over our fireplace! 

I hope you all had a very merry Christmas and I pray you all have a blessed New Year! 

Well, short and sweet but I hope you enjoyed my project! See ya' next month!

JAVA JEN


December 19, 2013

One More Christmas Card! Featuring Joys Of The Season

Hello Crafty Friends! Welcome to She's A Sassy Lady! 

I am Donna Lee from Stampin N Scrapin With Donna Lee. Thank you Sheila for inviting me to share here today!

Today I want to share just one more Christmas card that is easy to make using the Joys Of The Season Cricut cartridge.  I've cut the Rocking Horse card on the page below at 5.37 inches using my Gypsy.

 I set the width of my card to 8.5 inches and the Gypsy set the height for me. Cricut Craft Room will do the same.


Using my Gypsy, I was able to size my rocking horse to fit perfectly over the cut out on the front on my card. My rocking horse and it's layers are all cut at 1.75 inches. I cut the blackout, shadow, and the layers.  On the layers I used the hide contour feature to hide different pieces so that I could cut the tail and mane in a different color. Below is a picture of all my layers.


I use a Scor Pal to score my card base.


I used a piece of DCWV glitter card stock behind the window. This gets covered up on the inside of the card.


Now it's time to adhere the layers of the rocking horse. For these small pieces I prefer to use my glue pen or Tombow Liquid Mono Adhesive.


The brown shadow has dimensional adhesive on it to pop it up just a little bit. I used Stampin Dimensionsals from Stampin Up as it's the perfect height.


His saddle, bridle, mane,tail and the accent piece are next. They are cut from DCWV card stock. I was able to use my scraps for all of this card, except for the card base. 


For my sentiment I went to Close To My Heart Artbooking Cricut Collection. It's cut at 4.25 inches. I did not use real dial size. It's cut using scraps of Recollections Foil paper from Michaels.


A good glue pen is best way to adhere this.


Thank you for stopping by She's A Sassy Lady today! I wish you all a very blessed and Merry Christmas and a safe, healthy, and prosperous New Year.


Blessings and Peace,
Donna Lee