January 6, 2011

IT'S SO DARN TRANSPARENT!

Hello, everyone!!!  It's Audrey again!  Happy New Year and I'm so glad to be back with another project for you!  And, as always, thanks to Sheila for being so gracious as to have me!

This is going to be a quick and easy project, basically because I'd totally forgotten about my project and the schedule!!!  Phew!  Glad I thought of it in time!!!   I only realized yesterday evening and so I had to hurriedly come up with a design and a quick cut.file.  Although I wish this could have been something more detailed, I am still hoping you'll like it -- let's get started!

The focus of this project is the transparent (hence the post title) candy box only, it is my project.  The card and matching envie I did only to compliment the box, give it a good presentation and, hopefully spark your interest and/or inspire.  The box is made from a sheet of 8.50" x 11" clear cardstock (you can also use a transparency sheet).  Here's the set:


Here's a close-up picture of the candy box itself:


The candies in the box are chocolate covered candy sticks and they were the inspiration for this box project.  I found them at a store called Tuesday Mornings that I like to frequent, you may have heard of the store and/or may have one near you.  This is the box of the chocolate covered candy sticks:


Let's begin the box by cutting out the template from the cut.file.  The clear cardstock is size 8.50" by 11":


Here's the cut.file template after it's been cut by the Cricut:


I'm sure you're all familiar with folding a cut.file, so just start folding up the template by using the dart cut-outs along the bottom as a guide to align the folds with the tabs along the top; fold in the side tab and glue your box together however you prefer.   Easy!

Now that the box is put together, fill it with the candy sticks:


All that's left to do now is decorate your box however you like.  On my box I used gold Peel-Offs on each  corner of the box, tied brown sheer ribbon around the box and tied a bow; the label on the front is a sticker that I put white cardstock on the back of and pop-dotted beneath the ribbon bow and, to finish it off, I added a transparent gold colored rhinestone to the bow and  a couple to the label to set off the gold in the label.

The sticker label along with the paper used for the card and envie are all from K&C Company's Jubilee Designer collection.  The template cut.file was done on Cricut Expression using the George cart.

If you're interested in the cut.file it is available at the bottom of the project post for this project on my blog today.  After tomorrow it will be available on my sidebar under "Cut.files".  You can find it under the name "Stick Candy Box".

Thank you so much for stopping by to join me, and I'll see you next month!!!


January 5, 2011

'All I Want for Christmas' Layout


Happy New Year, this is Kate from Sassy and Scrappy! I'm so excited to be back at She's A Sassy Lady to share my layout with you. I hope you all had a wonderful holiday season, I know I did! This layout was inspired by my 5 y.o. nephew Micah, every time he opened a gift he exclaimed, "this is what I always wanted!" He's just too sweet...and cute!

Here's a picture of the layout I designed in my Gypsy. Since I've started posting my projects on a blog I realized how much, and how often, I change my mind. But that's my prerogative, right?! I have to apologize in advance for the lack of picture tutorials, apparently my brain stopped working, but I do have all the cut sizes and other info at the bottom of this post.

I hadn't gotten a chance to use my Jolly Holidays cartridge yet, so I pulled it out. I thought the elf pulling his wagon would be perfect for this layout. And then I remembered the tree from Winter Frolic and decided to stretch it out to place on the opposite page.

Here is a picture of the left page.

And the right page.

Here is a close-up of the title and the tree. You also get a close-up of my nephew eating a crepe, he loves nutella and whip cream!

In this picture you can see the additional stitching and the tag I added to journal.

Details:
  • Elf -'Jolly Holidays' cut with all his layers at 6-inches
To give the elf a little extra dimension I added Martha Stewart flock in 'swan' to his hat. I applied Scotch liquid glue along the border of the elf's hat and the ball and then generously applied the flocking. I repeated this step 3 times until I got the desired height.
  • Gift Boxes-'Christmas Cheer' cut with all layers at 1, 1.5 and 2-inches
I wanted to add a little extra "bling" to the gift boxes so I ran them upside down through my Xyron and added some Martha Stewart glitter. I also attached a couple of Jolee rhinestones.
  • Title-'Winter Frolic' cut with layers and shadow at 2.5-inches
  • Tree-'Winter Frolic' cut with layers at 7.85-inches, sized on my Gypsy
Instead of using the circular shapes the cricut cut for ornaments I decided it would be fun to use buttons instead. I love buttons! I ran the star through my Xyron to add glitter (also Martha Stewart).
  • Border-'Martha Stewart All Occasions Cake Art' cut at 1.5-inches. To create this border I welded pieces together using my Gypsy until the length was 11.28-inches. I ended up cutting them as needed, but certainly you could stretch the border across the width of the page (using your Gypsy of course)
  • Tag-Tags, Bags, Boxes and More cut at 4.25 and 4.5-inches
Buttons, ribbon and solid cardstock-Papertrey Ink
Pattern Paper-Fancy Pants (stripes) and My Mind's Eye
Peachy Keen Stamps-Snow Cuties Face Assortment, 1 3/8-inch stamp

Thank you all for stopping by and looking at my layout. I always enjoy reading your comments and want to thank you in advance for the kind words. I'll see you back here soon or over on my blog Sassy and Scrappy!

January 4, 2011

BRRRRRR

Chicago Snow
Hello everyone, this is Sheila from Shes A Sassy Lady and I just love when I get the opportunity to come and visit and share with all you Tuesday Treat ladies. I always find it a challenge as there are so many talented ladies that share their designs here!
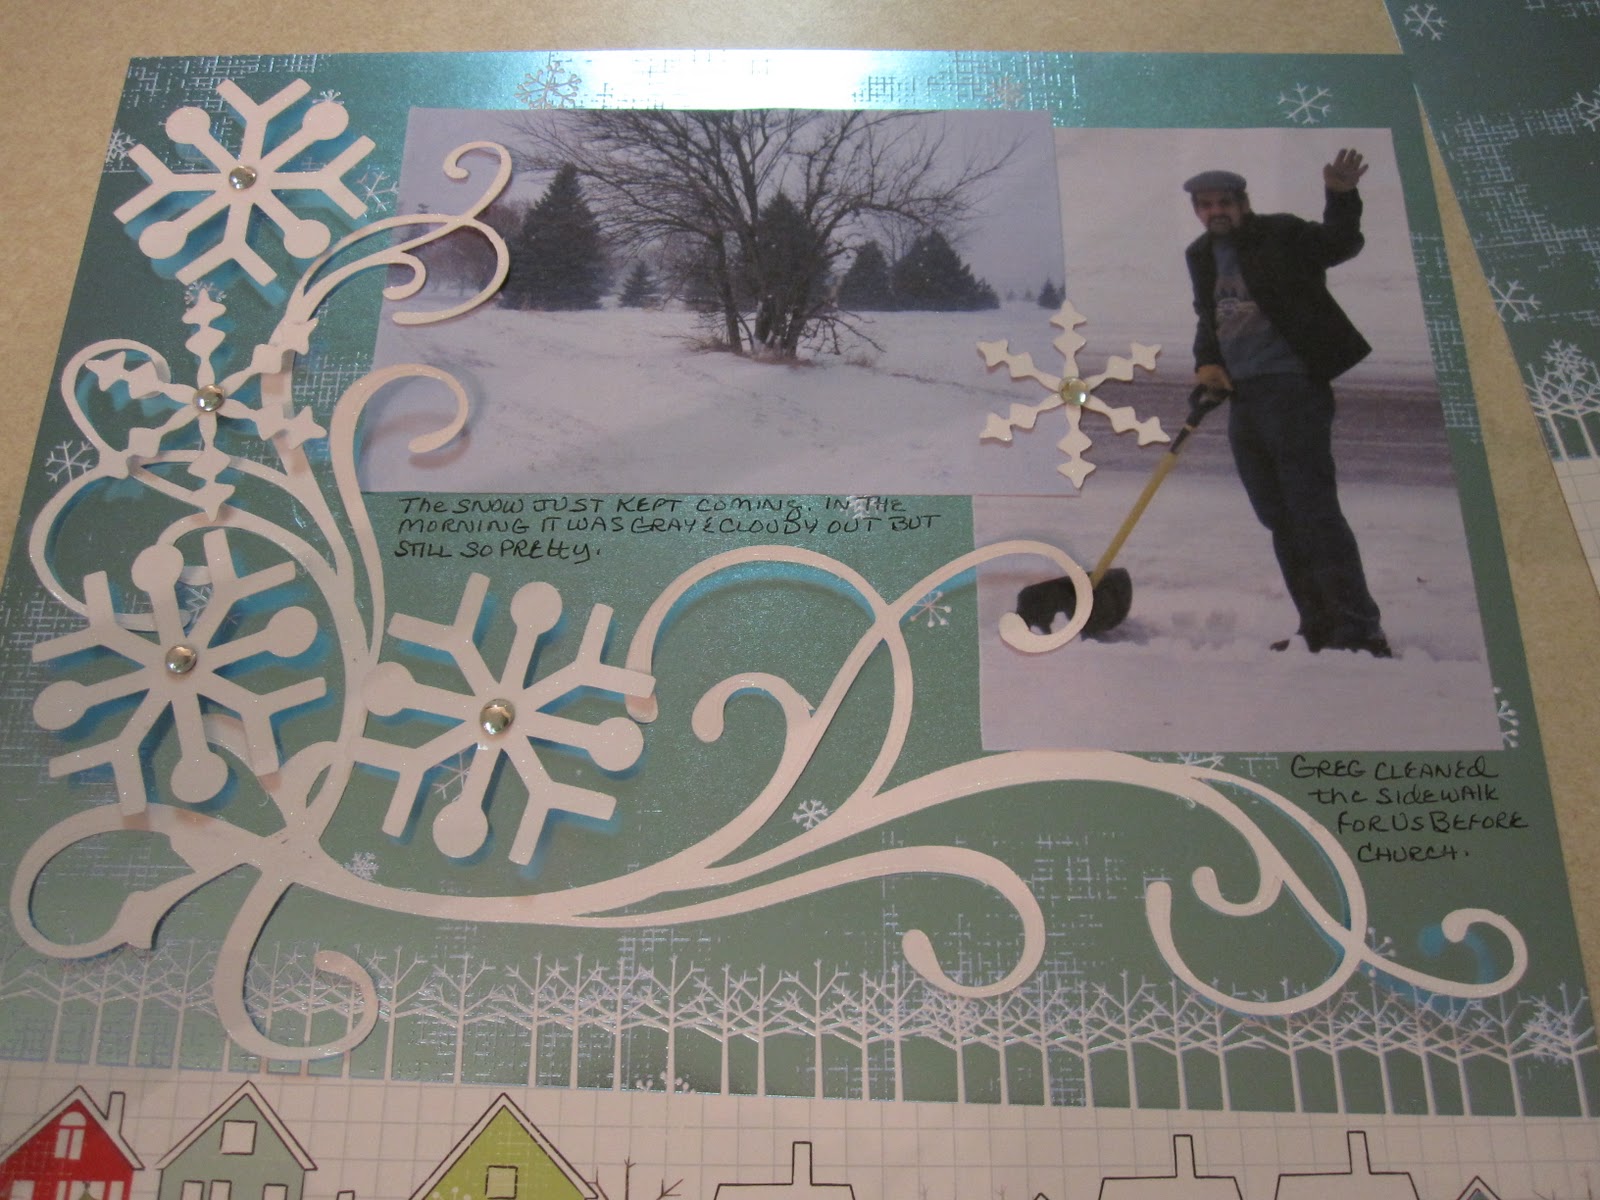
Well here goes... last month we went to Chicago to visit my daughter and of course it snowed in. Being fairly new to the south we took plenty of photos as our new southern friends just don't realize what real snow does and what the folks up north do to get rid of it. A prime example is shoveling.... if it snows in Alabama, you just leave it and as soon as the sun comes out it disappears, so maybe it lasts a couple of hours. Not so up north, as many of you can attest to so we took photos of the tasks that we what to remember so we never get the urge to go back up there!!!! (Sorry Heather). This is my brother in law Greg busy at hand shoveling the walk before church!

And the plow we saw while driving to Heather's house and it was just so amazing as the whole area was so peaceful and serene just like you read about and see in movies... then out of no where one of these huge plows appear just pushing ans scraping the snow away and making so much noise it actually hurts your ears.... Yup that's what my pages are about... the beauty and the beast of a Chicago Snow!

I hope you enjoy this video, I will show you how I took a layout I did and altered it to fit the photos at hand. I went from floral to frosty, to a blistery wind. Hope you learn a few Gypsy tricks.

This is the yummy paper I chose, it is from My Big Ideas 2009 Christmas papers; I was so excited that I finally go to use this stack.


This second video is actually the third I did but you will find a big mistake in the next video and this one goes over what I did wrong so you don't make the same mistake I did. I am a firm believer that we need to learn from our mistakes! And I am not afraid to share that lesson with you.

This is the white paper I used from the DCWV Glitter stack, I set my blade at 6, pressure high, and speed slow and cut it 2 times.


This is a good video but does show you what I did wrong and also show you how to alter a design.
Before I glue down any of my pieces I really like to just position them and take a good look just in case I need to make an alteration. Sure is easier to do now before gluing.
I used my I rock to attach a little stone to each snowflake. They are so pretty.

Doesn't that look pretty? Those swirls just really remind me of those Chicago winds!
Here is a closeup of the paper and you can see just how beautiful and shimmery it actually is... just like snow.
Isn't this paper Gorgeous?

Here is the right side of the two page spread.
And the two pages together make for a wonderful  keepsake in our scrapbook. Thank you so much for joining me today. Here is a copy of Chicago Snow Gypsy File just for you enjoy.... ps I put the flowers back on so you could use them too. I hope you picked up something new that you can use while making your designs.
Thank you for your sweet words of encouragement, your comments continue to inspire me to share with your.
signature

January 3, 2011

Top 10 in 2010

Hi and Happy 2011!!!  I am Lori Apgar from ScrappinMyStressAway and I am so excited to be Sassy today!!  I created this layout to highlight my Top 10 events from 2010.


I started out by putting a rectangle on my mat from George and unlinking the Aspect Ratio Link (the chain between the Width and Height on the Basic Menu). I changed the Width to 0.62 and the Height to 12.00. I copied it and moved each rectangle to either sides of the mat. I copied another rectangle and rotated it 90 degrees. I copied one more and moved one to the top of the mat and the other to the bottom of the mat.

I made another copy and positioned it at X5.74 Y-3.16 to create a border on the bottom of my layout. I grouped and welded the 5 rectangles. ***At this point I save my project as lo.frame.3(I have two similar versions saved already). The next time I want to make a similar layout, I have the basics ready to go.

I used the "ten" border on Graphically Speaking and stretched it to 11.25w x 2.25h. I moved it into the border space and welded it. ***Copy and paste onto Layer 2 so you have a page 2.

Go back to Layer 1 and add the words "Top 10" from Varsity Letter at 1.29w x 1.77h. Move them up into the rectangle a bit and weld.
 
On Layer 2, repeat with the words "In 2010".

I opened up Layer 3 and took the blackout shadow of a basic tag shape from Tags, Bags, Boxes and More and sized it to 2.55w x 3.92h. I made 9 copies.
 
On Layer 4, I added the numbers from Designer Calendar at 1.11w x 1.07h.

I opened a Layer 5 with some words that I highlighted on my tags. I did this later, after I listed my top ten! I used Songbird for my font as it welds no nicely! Each word is a different size so that it fit the tag once welded.

***When you are finished cutting your project, use the SAVE AS option so you still have your basic layout saved. You will need to change your file name a bit (ie lo.frame.3.top10).
 
I cut out my pages in maroon card stock.

I glued them down to a blue dotted paper.

I cut out the tags in a ivory card stock.

I used my scraps to cut out the numbers.

I inked the tags with my Vintage Photo distress ink.

I used ribbon to create a banner of tags.  I used buttons and staples on the tags.

Here is a sample of my journaling with my key words. Note the dot on my i ~ I always lose them in my Xyron so I improvised. I also had a couple of mistakes in my journaling, but I just wrote right over them because that is how I normally write.
 

Here is the "10" border from Graphically Speaking up close.

It is kind of hard to see in this photo, but I used faux stitching around the letters and numbers so they stand out a bit.
 
And here is another look at the two pages together. This layout took me about 4 days to complete ~ I worked it in between work and other projects. I had to walk away several times and come back and almost gave up....glad I stuck it out!!!

Thanks Sheila for having me on your blog today!!

January 2, 2011

We Have A Blog Candy Winner

This was the most interesting post I have done since I started blogging. Each of us bared and challenged ourselves to being a better person in some way in 2011. I hope that each and everyone of you that posted will succeed in reaching you goal. With that said we have a winner....

Denine said...

I have a few goals this year. I had none last year - I didn't want to disappoint myself. :)~
So this year the list is long but very achievable with the right attitude and supportive friends like YOU!!
I plan to lose a total of 30+ pounds this year, 15 by Mid March.. yikes that sounds hard but I have it all planned out. :0) 1st off by getting more active on Sparks People again, they actually have some Craft teams, so excited about that.
My second goal that I will publish is to MAKE AND POST 3 projects a week. I am challenging myself to more than that, but This WILL be my minimum. As I know some weeks will be more hectic than others.
Most of all, I want to LEARN MORE this year!! So I will be spending more time working on developing myself both intellectually and creatively.
I feel like I have learned so much this past year but I have so much more learning to do! Do we ever really stop learning? Anyhow, I think I have taken enough space here.. :)
Big Hugs to you Sheila for the wonderful opportunity to help us all be more SUCCESSFUL!!!
Happy New Year!!

Please email me at shesasassylady@hotmail.com with your complete name and address so that I can mail this wonderful gift out to you! You have 1 week to claim your prize.

January 1, 2011

Happy New Wishes


New Year Wishes


I wish you Health...

So you may enjoy each day in comfort.


I wish you the Love of friends and family...

And Peace within your heart.


I wish you the Beauty of nature...

That you may enjoy the work of God.


I wish you Wisdom to choose priorities...

For those things that really matter in life.


I wish you Generosity so you may share...

All good things that come to you.


I wish you Happiness and Joy...

And Blessings for the New Year.


I wish you the best of everything...

That you so well deserve.


HAPPY NEW YEAR MY FRIEND!

Author Unknown