May 4, 2011

Floral Embellished Picture Frame


Hey Scrappers, another wonderful day at She's A Sassy Lady! This is Kate from Sassy and Scrappy with a fun gift or home decor item. I decided to alter a picture frame for my post today. Since Spring has arrived and we're nearing Mother's Day it seemed like a great time to once again pull out the Mother's Day Bouquet Cricut cartridge. I absolutely love this cartridge and have found many uses for it. If you're interested you can find some of my other projects with this cartridge here and here.

This is the patterned cardstock that I picked for this project. Isn't is great? It's not typical Spring colors, but the oranges remind me of the sun and the plaid is just fun, while the damask brings a sense of elegance.

This is a frame I picked up from Joann's. I think their frames are always on sale, or at least there are coupons available, which is nice. An 8 by 10-inch photo will fit inside.


I used my Lori's Garden cartridge and my Imagine to print the text script on a couple pieces of cardstock. I'm in love with this feature.


I cut out 4 different styles of flowers on my 4 pieces of cardstock. Here they are before being layered and embellished.


I used two different kinds of glue on this project, a liquid glue and my glue gun. I used the glue gun to adhere the flowers to the picture frame. I figured it would give me a little more time to put the flowers where I wanted them and would allow me to move the flower if needed. I also used black, white and yellow buttons, as well and white and black pearls.


To add dimension to my flowers and each layer I used a paintbrush to curl each layer. It adds to the 3-D effect of each project and brings it to life.


A close-up of the top right side of the frame.


Although I twisted the frame around for the picture, this is actually the bottom left.


Another view of the frame on my shelf. Yes, this is me and a sweet little family friend.

Details:
  • Pattern Paper-My Mind's Eye "Ooh La La" Collection
  • Mother's Day Bouquet Cricut Cartridge-flowers cut at 2, 1 1/2 and 1-inches
  • Lori's Garden
  • Buttons-Papertrey Ink
  • Pearls-Recollections
I found completing this project much quicker than I expected. It didn't require a lot of tools and other than the frame, everything used in this project I already owned. I hope this frame will inspire you to create something for yourself or for someone special in your life...perhaps a Mom or Mother-In-Law. I always love to hear your comments and please come visit me at Sassy and Scrappy. Have a great day!

May 3, 2011

A Dozen Cards Kept Me Busy Along With Stampede Make And Takes

Sometimes you just don't have access to your cutting machines or all of your supplies so you need to work with what you have on hand. Recently my mother had surgery and I went to her home to assist her while she was recovering. I spent the weekend and took my handy bag, some markers, colored pencils and some digital stamps and went to work creating in a very quiet setting. My father sat in the dining room with me and we talked while I colored and readied my stamps on the first day while mother slept soundly in another room.

 
Thought you would like to see some of the close ups of the artwork. Look at the little buttons on his jacket I used Glossy Accents on them and the Hi.
The little puppies were just adorable and can be used for just about any sentiment. After printing off my computer I colored him with markers and shaded him with colored pencils. Then I used Glossy Accents on the nose and eyes to make them look wet and then did a fussy cut to be able to just pop dot him on the card.
Yes I spent Friday afternoon coloring and preparing all these little pieces of digital art to make cards on Saturday. The following day she sat at the table with me and did a little sewing while I continued cutting and pasting and using the materials I had on hand. I hope you enjoy the little video showing you the cards I made.


This is a little video of the cards I made on Friday and Saturday afternoon.

These next couple of photos are some closeups of the make and take items while I was working on them.

Isn't this a great little tag to present a photo in? This is one of the make and takes at the Dallas Stampede that I did not have time to complete.
This is also another make and take and is a wonderful bookmark. I didn't do it the way they show as I like my book marker better!!
Don't you just love this flower? It was the first make and take I received and I just love it! Please click on the photo to see an enlargement of the flower.
On Sunday my Mother felt well enough for a little ride to Joann's so she went to the fabric section and I went to the paper section of the store! LOL When I got back from the store I put together this little shaker card I had cut and ready for the Stampede in Dallas but never got put together as we ran out of time. I hope you enjoy this card... I just love shaker cards as they are so cool and really make the recipient feel special.
I sure hope you enjoyed today's post... I know there sure was a lot to look at! A full bakers dozen in cards and 3 make and takes to boot. Don't forget you can click on any photo to enlarge it if you want to see in more detail.
Thank you for your sweet words of encouragement, your comments continue to inspire me!
signature

May 2, 2011

Sassy Graduation Cards

Hi this is Lori from ScrappinMyStressAway!!  Since May brings graduations, I thought this would be a good time to make some cards for the high school seniors in my life.
 
I started out creating a background out of 2011(Doodletype 0.73h) and a graduation cap (Locker Talk 0.73h). I rotated the numbers and cap 90 degrees. I did this because I purposely wanted to stack the layers like bricks and ran the rest of the line off the page. That would have been harder to do (for me anyway) without rotating it.
 
Once I had one 4x6 area completed, I grouped it and copied it three times. This way I can make four cards at once. I also kept one set in a separate layer just in case I need one or two more cards. With a high schooler, you never know!!
 
 Here is the Amy Chomas pen holder that I won in the First Disney Pixar Blog Hop. I took out my blade housing and replaced it with the pen holder and a black gel pen.

Instead of cutting, the cricut will draw your images. 
I trimmed them down to fit on my card front. I did use card blanks from Michaels for my cards and envelopes because I had them already.
I cut coordinating high school colors and glued them to the face of the card.
 
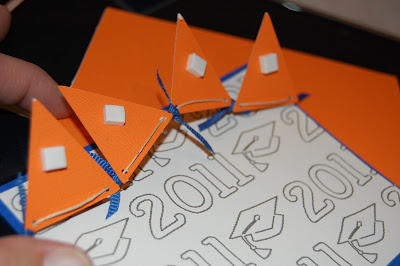
I went back to my Gypsy and found some banners (Mother's Day 2010 sized at 1.35w x 1.47h) and used the same 2001(0.73h).
 
I loaded up my papers and cut out the images. 
At the last minute, I copied and pasted 2011 two more times for the blue and orange cards. 
I left the banner pieces on the mat and glued on the numbers.
 
I used some thin beading twine to string the banner flags together and pop-dotted them to the paper I made. I mounted this paper onto color coordinated papers. 
I tied blue ribbon between the flags, but it was missing something..... 
I glued the blue paper to the orange card, but it was still missing something... 
I grabbed a pack of Jolee's graduation caps and diplomas with gems in it and got a little blingy!
 
Here are the three finished color combinations. This project will be easy to save and change up a little bit for next year too!  Happy Graduation to all of the seniors out there!!

Thank you Sheila for having me on your blog today!!

Lori

May 1, 2011

Organizing Paper

I sure hope you are all having a WONDERFUL day!!! I know I am. I am really excited about sharing this organizational tip with you as paper has always been a problem in my scrap room. From what I hear from others it is a problem with most of us. Well I came up with a simple system that is inexpensive, pleasing to the eye and so easy to do that you will love it.
First I started out with a Cropper Hopper Vertical Ensemble that I picked up at Joann's and with my 50% off coupon it was only $12.50. I purchased 3 over a period of one week as they only allow 1 coupon per day! These are great as they hold 12x12 papers and had individual folders allowing you to file within each box.

Then I got busy making my labels by just running a image search on Google.com and picked out what I wanted. Then I added the words I wanted and printed them on card stock. If you would like to use mine just click on the word and download the copy (MS Excel). Be sure that if you use a Cropper Hopper trim to 2.75" wide.  Solid PaperSpecialty Paper - Printed Paper

After I trimmed the label to fit I placed the clear packing tape over the entire label and then adhered that to the Cropper Hopper. No all I had to do was add the papers.


This is the video showing how I store my paper. I just love how I can now put my fingers on my paper within moments rather than spending hours searching for just the right color.
I hope you enjoyed today's post and come back to see us again tomorrow when we have another great idea to share with you. Thank you for your sweet sweet words of encouragement. You comments continue to inspire me to share with you.
signature