July 26, 2010

Pretty In Pink Card Kit GiveAway

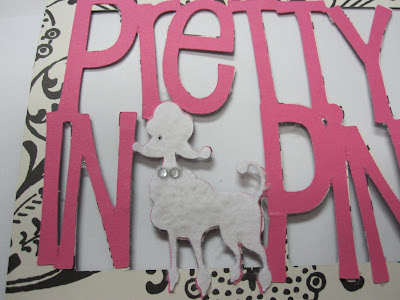
Isn't this just too cute? I designed this little cutie while I was on vacation and this card was made with the first cut. I was off by a 16th of an inch and corrected it for the give away. You get to peek at mine with all its little flaws. Again the card going out and the cut is perfect, I checked it before running this post! This is the first time I used flocking and won't be the last! I had so much fun with this card.
Look at the flocking and the shine on the letters.... Wow the photos just don't do this card justice.
This is the photo of the design before I adjusted it.... I moved the poodles to the lower right so that I didn't have to cut my 12x12 paper as I wanted less waste. I love using all my scraps for designs. Notice it is laid out on a 12x12, but if you don't have that mat size you can easily adjust to a 12x12 and still cut within 1 cut.
See how easily all the paper fits on the mat? 1 easy cut and I have two beautiful cards.
All you need to do is package it up like me and complete at a later time when you can actually sit down and create.
Now this is where I started having fun. I stopped at Michael's on my way to work and spoke with one of the sales gals there as I needed something that would give a furry effect yet I didn't want the person winning the card having to own or go out and buy a heat gun. So, this lovely young lady directed me to the Martha Stewart Flocking material. I purchased and carried it into work. I then realized I forgot to ask what adhesive should I use.... SO it's experiment time!


Don (one of my co-managers) walked in my office and found me trying to read the small print on the back of that bottle.... Didn't happen the print was way to small. Being inquisitive he asked, he tried to read and couldn't so he asked how I was going to put it on.... So I said I will test a few adhesives. The above were what I had in my desk so don stuck around and we started playing with the adhesives and the flocking. You know, thick, spread out, lumpy and flat and then sprinkled the flocking over the adhesives.

Remember we had no idea of how much of that to use either or how long it took to dry so we chatted for a little while and then sprinkled the residue on another sheet of paper.

From there we decided what gave the best effect. We decided on the Zig Pen and that is what I used. The part I liked was that it was blue until it dried and then it was clear so it was almost goof proof.

I used my handy Zip Dry Glue for this but will caution you to move really quick as I ripped a letter as I moved too slow and it started sticking to the paper I was using to protect the desk. You know because of the little tear I will have to do something with the letters. The winner will receive unaltered letters and he/she can do what ever they want with their kit to personalize.

Then I adhered the little poodle.

I then put to little rhinestones on for a collar and put Zig Dry all over the poodle.

While wet I sprinkled a generous amount of flocking on the poodle and left it to dry.

This is how it looked and my little tear was very obvious as it was right by the poodle so I decided to use glossy accents on all the letters for a high gloss effect.

I love the way it looks and it isn't even dry. Notice I placed a plain white sheet of paper in between the card so it wouldn't stain or drip on the sentiment area of the card.
Now isn't this a lovely card? It is dry now and you can see how nicely it turned out. The straight on shot doesn't show the shine but you can see the poodle has fur.
This is a side photo, look at those letters shine. Now don't you want to have a card just like this to send to someone special?
Well I sure hope you enjoyed this little project. Do leave a comment for a chance to get this cute little card kit mailed directly to your home. All you need to do is make a comment by Friday 8PM on 7/30/10 and watch for the announcement on Saturday morning by 6AM on 7/31/10. It's that easy! Everyone is a winner at Shes A Sassy Lady this is your Sassy Pretty In Pink Poodle Gypsy File and your Sassy Pretty In Pink Poodle DS File.
MyFreeCopyright.com Registered & Protected
So be sure to leave a comment and make sure I know how to reach you. I am always encouraged by your sweet - sweet words, they inspire me to keep scrapping and sharing things with you.
signature

Here Kitty Card Kit Winner

This weeks contest winner said:

Carol said...

OMGoodness ... Sheila, this kitty card is soooo fabulous ... and he looks just like my own adorable kitty, Rusty .... Here Rusty, come look at the wonderful card Sheila made for you.

pssssst ... Rusty likes it too!!! =)
Hugz,

♥Carol♥
Please contact Sheila  at Shesasassylady@hotmail.com and leave your full name and address and we will mail your kit out within the next couple of days.

July 25, 2010

Our Sassy Designer Team Is Full!

Shes A Sassy Lady is pleased to announce 1 more Sassy Designer!!! Finally we have a full house of designers!!!  With over 500 followers we continue to grow.  It is so exciting to see the talent on this team each and every day, its amazing. Our  format contains a New Card Kit Give-Away announced each week on Saturday. If there is a special announcement it will appear on Sunday and each day of the week is dedicated to a new design to be enjoyed by you our followers.

Please join us in welcoming in Audrey at Cute And Some. She is amazing with the ideas she comes up in beautiful design form. Audrey's debut will be on August 5th and we can't wait to see what goodie she has in store for you!

You know it wouldn't mean anything without you our followers! We are committed to sharing and teaching our craft to each of you just as we were taught from a fellow crafting sister!!! If there is something in particular that you would like to see or don't understand please email me at ShesASassyLady@hotmail.com and I would be happy to answer your questions or create a design to fit your needs.

Don't forget our original Sassy Designers: Beatriz at Amazing Grace, Becky at My Journey To Creativity, Beth of Thunderbirdlindy By Design, Cheryl at Cheryl’s Window, Elizabeth at 217 Creations, Kimberly at My Craft Spot., Lori of Scrappin’ My Stress Away, Pam of The Bug Bytes and Tuesday Treats, Barb at Crafty Girl, Lisa at Lisa's Craft Room, Debbie at Love Life's Little Pleasures, Angi at Cokie Pop Paper,  Kelly at Kam's Crafty Place  Kristie at Craftin On My Door and Agnes at FlowerDisco Scrap Hut. Wow isn't that a strong line up? And they do 1 project for you each month so their ideas are fresh and creative.

I sure hope you make the opportunity to see for yourself all that these ladies have to offer by visiting their blogs.

I look forward to your sweet words of congratulations to this very talented lady as well as the entire Sassy Team... I am sure they will be greatly encouraged by them.
signature

July 24, 2010

Circle Paper Produces Christmas In July Ornaments

Now isn't this fun! I just love this color of green and it makes the perfect Christmas ornaments, doesn't it? And so easy to do, you will love this little project.
I joined the Cricut Circle and finally received my package.... it was sent to the wrong address. And I just loved the packing and decided to do something fun with it. So.....
I went to Hobby Lobby and used the 40% off coupon making my large glass ball ornaments only $3!
I gently pulled off the lids.
And filled the glass balls right in my office at work!! I didn't want to make a mess so I did everything right out of the box my goodies came in.
You see it is always slow on Saturday mornings at car dealers for finance managers... Just a quick note the fastest time to get out of the finance department at a car dealership is on Saturday morning and the WORST time is late in the day. You could be in line waiting to sign papers for hours.
I used a little highlighter to gently pushed the crumpled paper into the ball. 

See how they are filled but I still had plenty so I kept stuffing.
I left to go and a lot of paper left over.
I learned to grab a bunch of paper with the one had and then stuff with the highlighter, at first I gently pushed a little at a time in.
All of them are packed pretty tightly with the green packing paper in the CRICUT colored paper.
I tied green ribbon that I had purchased on sale for $1 at the beginning of summer. That means these lovely ornaments cost me only $1 a piece and they have sentimental Circle value! Don't they look great? This fun little project took just over a half an hour to do. Amazing how pretty they are!
This is all 4 packed up and ready to go home.... Sorry no fancy photos my office is kind of plain and work worthy. I do hope you enjoyed todays little project, I sure had fun doing this!
MyFreeCopyright.com Registered & Protected
So be sure to leave a comment and make sure I know how to reach you. I am always encouraged by your sweet - sweet words, they inspire me to keep scrapping and sharing things with you.

signature
THANK YOU, Sandy from Sandy From Ukiah for this wonderful award! This is the 2nd time this week I recieved this award and I truly feel blessed by it.  Wow The Cherry On Top Award!!!

Here are the rules for this award:
1. Thank the person who gave this award to you.
2. Copy the award and put it on your blog.
3. List three things which you love about yourself.
4. Post a picture you love.
5. Tag five people you wish to pass this award on to.

Three things that I love about myself:

1. I'm a good Wife, Mother, and wonderful Grandmother!
2. I'm creative and have the ability to share my love of crafting with others.
3. I’m a follower of Christ and find my strength in Him. I love being a Christian and having the support of a Christian family.

Here's a picture I LOVE! Because it is of my handsome hubby and I... he hates his picture taken so there are very few of us together. It is also the only time we had matching shirts!!! It was for a special backyard party.

And here are the 5 People that I am passing this award on to:
Beatriz at Amazing Grace
Beth at Thunderbirdlindy by Design
Barb at Crafty Girl
Audrey at Cute and Some
Kelly at Kam's Creative Place
Now be sure to check out all these blogs as these ladies have some great designs!!! Thanks again Sandy from Sandy From Ukiah for this wonderful blog award.

July 23, 2010

When Life Gives You Lemons...


...throw 'em back and demand Chocolate!!!!  

That's my opinion anyhow.  I'm Cher from Cheryl's Window and this is my post today for She's a Sassy Lady.  It's a simple card, but I can think of so many other ways you might be able to use this file and give someone a smile with a chocolate bar.  Just change the pictures and/or fonts to suit your desire or theme.  The gusseted card file is the perfect size for a standard popular candybar. 

I love lemons in my water, tea, pie, cookies, candy, etc, so I wanted to use the lemon image.  I wanted to make something a little original and my daughter had told me about a Flair button she had read and I loved the little quote.


So, first I created the card file using Preserves cartridge.  I used some of the card shapes and a tag for the part that will fold and hold the candybar.   I wanted this shape, but not the apple, so I just used Gypsy's handy "hide contour" and hid the apple.   You can see it greyed-out.  It will, therefore, not cut.  This file does cut straight, but the images seemed skewed when taking this photo and not all the little rectangles show up at his resolution; just a Gypsy quirk.  This file also happens to be smaller than 8.5 x 11, so you can use your favorite cardstock for making cards.  I used Papertrey Ink's Kraft cardstock.   When using a thicker cardstock, I set my pressure at high, blade at 6, and still may cut twice to ensure a clean cut.   Papertrey Ink and Stampin' Up cardstocks are really strong, but make such a nice fold for a card or box.  

This is how it cut out. 

The second layer is where I added my lemons and sentiment.   I created a shadow for my sentiment and added all the layers for my lemons.  Again, the fonts are hard to see at this resolution and because I made them smaller to fit on card front. 

This is my paper layed out on mat before cutting.  I cut them from Basic Grey Nook & Pantry collection with pressure 3 and blade at 4, multicut 2.   This gave me perfect cuts.  The lemons and sentiment layer were cut from C'ordinations bright yellow.   I had considered embossing the lemons, but this cardstock had such a great texture already, it did not need it.  The lemon base/background was green C'oredinations cardstock.  The green for the leaves and sentiment shadow is BG pp.  This made a slight difference for the leaves to give a little more depth and character. 


The third layer contains a mat for the card front and the remainder of the sentiment for the inside.

 These images were set up and cut with same settings as above with the Basic Grey papers. 

Once all images were cut out, I started putting my card together.  


I did not add score marks.   I do not like cut score marks on my cards and/or boxes.  So, I scored along the center rectangle and then out 1/4". 

Here is a close-up of the 1/4" scoremarks. 


Fold and burnish score lines for crisp edges and apply adhesive of choice to your two tabbed edges.

Fold card up with pocket to inside.


I used Scattered Straw Distress Ink to ink the edges of the card as well as the front mat.  The Scattered Straw was the perfect color for just a little distress inking with a yellow tint.

A little Peeled Paint to my green cut pieces adds just the right amount of 'pop'!

I used E29 Burnt Umber Copic marker for inking around the edge of my Chocolate word.  The markers are great for getting in those edges. 

Copic Y13 added a little hint of shading to my layered lemons. I also slightly creased and curled up edges of leaves. 


I layered the letters for the front and began adhering letters to front and inside of card.  Notice what a good student I am as I'm using Ms. Sheila's famous drywall tape method for lining up my letters!  

I stamped a little chocolate kiss from MFT at the top of the inside and colored it in with the Copic E29.  I then covered both the kiss and the word Chocolate with Glossy accents to give it that melted chocolate look.  Yum!

Now, will the chocolate bar last long enough for me to give it to someone?   Ms. Mya, this one is dedicated to you since you were needing some chocolate Wednesday! 

The finished card as seen above.
If you'd like a copy of this file, please leave a comment on my blog post and then download HERE.  I used Preserves, Gypsy Font, and Alphalicious for my cartridges. 
I have also made a .cut file, but you would have to use a different font as I used Gypsy Font quite a bit.  You could substitute any other font you like.  Click HERE to download CDS .cut file. 

I hope you enjoyed today's card. 

Thanks for stopping by.