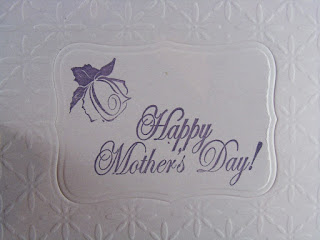
Today I wanted to share with you a "new to me" technique. It's called double embossing and there is a fabulous video tutorial on The Cuttlebug Spot.
I needed to make a Mother's Day card for my MIL, who lives in the UK. The UK Mothers Day is earlier than in Canada/USA and is on the 10th March, so I thought I would be organised this year.
It also needed to be postage friendly, but I still wanted to make it look pretty, so when I saw this technique I had to give it a go.
Here is my finished card.
I will try and explain the technique as best I can, however if you click on the link above, for The Cuttlebug Spot, it will take you to the video tutorial.
Firstly, for my chipboard pieces I just used a Quakers Porridge Oats box! I cut two pieces 5.5" by 4.25" and then ran both of these through my Cuttlebug with a Nestabilities labels 8 die. You will then have one cut piece and the second is slightly embossed.
You can see the slight embossing on the one piece, this helps you position the die so that you cut in the same place. So position your die and then run through the single piece to die cut.
You then have two die cut pieces and two windows.
Now stick these pieces together so that you have a double thickness window and double thickness inner.
I first stamped my image on to a piece of card stock. The stamps are from a See D's stamp set called Springtime Swirls.
For the first pass through the Cuttlebug, I placed the stamped piece inside the embossing folder - this is called Baby's Breath and this folder is placed on the A Plate. Then I positioned the chipboard window on top of the embossing folder and over the stamped image. I found doing it like this, I was able to position it better.
Next you place the C Plate on top and then run this sandwich through the Cuttlebug. When you take your piece of card stock out, you will have a smooth place over the stamped image and just embossing around the edge.
Now to dress this up a bit and to make that centre area pop, you need to do the following. Take your A plate, then a B plate, then one of the tan embossing mats, then your embossed paper and your Nestabilities die with the groves down to the paper.
Next, use your two spare pieces from the chipboard to place over the die - this will help with the embossing.
Finally comes your B plate and then pass this through the Cuttlebug.
When you remove your card stock, you will see that it has now embossed the edge of the die around your stamped image. It will not cut through because of the tan embossing mat.
I then trimmed my piece and inked the edges and placed this on my card.
I added a little ribbon to add a little more detail, but as you can see it is still quite flat - so good for overseas posting.
For the inside I used the same papers and just the little rose for the corners.
I hope you will give this technique a go - it has so many possibilities.
Thanks for stopping by today.
Happy crafting.


8 comments:
Beautiful technique. I almost think I have that Nestabilities die. I can't wait to try this.
Oh how beautiful. I need to start thinking of a mother's day card for my mom! Thanks for the reminder. Love the technique you used. Thanks for sharing with us today.
What a great tutorial! I am certainly going to give this a try! Your card is beautiful and I'm sure your MIL will love it!!
Very clever technique! Thanks for sharing the details!
Thanks so much:-) Let me know if you try it.
A very BEAUTIFUL card!!
Have a wonderful day,
Migdalia
I actually bought thick cardboard pieces that work this was at an expo years ago. Thanks for the idea to make some more of my own design.
What a great technique!! Pretty card too!
Post a Comment