April 24, 2011

The Empty Egg


Jeremy was born with a twisted body and a slow mind. At the age of 12 he was still in second grade, seemingly unable to learn.

His teacher, Doris Miller, often became exasperated with him. He would squirm in his seat, drool, and make grunting noises. At other times, he spoke clearly and distinctly, as if a spot of light had penetrated the darkness of his brain. Most of the time, however, Jeremy just irritated his teacher.

One day she called his parents and asked them to come in for a consultation.

As the Forresters entered the empty classroom, Doris said to them, "Jeremy really belongs in a special school. It isn't fair to him to be with younger children who don't have learning problems. Why, there is a five year gap between his age and that of the other students."

Mrs. Forrester cried softly into a tissue, while her husband spoke. "Miss Miller," he said, "there is no school of that kind nearby. It would be a terrible shock for Jeremy if we had to take him out of this school. We know he really likes it here."

Doris sat for a long time after they had left, Staring at the snow outside the window. Its coldness seemed to seep into her soul. She wanted to sympathize with the Forresters. After all, their only child had a terminal illness. But it wasn't fair to keep him in her class. She had 18 other youngsters to teach, and Jeremy was a distraction. Furthermore, he would never learn to read and write. Why waste any more time trying?

As she pondered the situation, guilt washed over her. Here I am complaining when my problems are nothing compared to that poor family, she thought. Lord, please help me to be more patient with Jeremy. From that day on, she tried hard to ignore Jeremy's noises and his blank stares.

Then one day, he limped to her desk, dragging his bad leg behind him.

"I love you, Miss Miller," he exclaimed, loud enough for the whole class to hear. The other students snickered, and Doris ' face turned red. She stammered, "Wh-why that's very nice, Jeremy. N-now please take your seat."

Spring came, and the children talked excitedly about the coming of Easter. Doris told them the story of Jesus, and then to emphasize the idea of new life springing forth, she gave each of the children a large plastic egg. "Now," she said to them, "I want you to take this home and bring it back tomorrow with something inside that shows new life. Do you understand?"

"Yes, Miss Miller," the children responded enthusiastically- all except for Jeremy.

He listened intently; his eyes never left her face. He did not even make his usual noises. Had he understood what she had said about Jesus' death and resurrection? Did he understand the assignment? Perhaps she should call his parents and explain the project to them.

That evening, Doris ' kitchen sink stopped up. She called the landlord and waited an hour for him to come by and unclog it. After that, she still had to shop for groceries, iron a blouse, and prepare a vocabulary test for the next day. She completely forgot about phoning Jeremy's parents.

The next morning, 19 children came to school, laughing and talking as they placed their eggs in the large wicker basket on Miss Miller's desk.

After they completed their math lesson, it was time to open the eggs.

In the first egg, Doris found a flower. "Oh yes, a flower is certainly a sign of new life," she said. "When plants peek through the ground, we know that spring is here." A small girl in the first row waved her arm. "That's my egg, Miss Miller," she called out.

The next egg contained a plastic butterfly, which looked very real. Doris held it up. "We all know that a caterpillar changes and grows into a beautiful butterfly. Yes, that's new life, too." Little

Judy smiled proudly and said, "Miss Miller, that one is mine."

Next, Doris found a rock with moss on it. She explained that moss, too, showed life. Billy spoke up from the back of the classroom, "My daddy helped me," he beamed.

Then Doris opened the fourth egg. She gasped. The egg was empty. Surely it must be Jeremy's she thought, and of course, he did not understand her instructions. If only she had not forgotten to phone his parents. Because she did not want to embarrass him, she quietly set the egg aside and reached for another.

Suddenly, Jeremy spoke up. "Miss Miller, aren't you going to talk about my egg?"

Flustered, Doris replied, "But Jeremy, your egg is empty." He looked into her eyes and said softly, "Yes, but Jesus' tomb was empty, too."

Time stopped. When she could speak again, Doris asked him, "Do you know why the tomb was empty?" "Oh, yes," Jeremy said, "Jesus was killed and put in there. Then His Father raised Him up."
The recess bell rang. While the children excitedly ran out to the school yard, Doris cried. The cold inside her melted completely away.

Three months later, Jeremy died. Those who paid their respects at the mortuary were surprised to see 19 eggs on top of his casket, all of them empty.
If this blesses you, share it with others.
Happy Easter!
-- Author Unknown--
signature

April 23, 2011

Making Envelopes With Your Martha Stewart Score Board

Now wouldn't you just love to get a card in this beautiful envelope? I started making these wonderful 5x7" cards and didn't have any envelopes to put it in. So I figured since I had one of the Marth Stewart Score Boards and never knew how to use that I better learn. I went looking saw it on someones YouTube video and thought if I don't know how to make many of you probably don't either so I did a couple minute video just to walk you through a real simple envelope.

Now I want you to know I did this for the first time on the video at the Dallas Stampede and it worked the very first time. EASY! So I made 2 of them one for each of my Monkey Slider Cards.
I hope this helped you and you enjoyed today's post. Thank you for your sweet - sweet words of encouragement. You coments continue to inspire me to share with you.
signature

April 22, 2011

Card Box


Hi all,
Hope you're having a lovely Easter holiday. Today I thought I would share with you a card box that I made. It doesn't have to be just for cards, but as I'm also a card maker I thought I'd focus on that. I just want to say thank you to Sheila for having me back again. This box will have enough room for cards that are 5 inches by 5 inches. well let's get started.So all you need is 3 12x12 pieces of plain card stock, 3 12 x 12 pieces of decorative paper or card stock, wet glue, a dry adhesive, ribbon, paperclips, flowers, hook and loop and a sakura clear stardust pen or glitter glue.


First cut two of the card stock to 9 1/2 inches x 9 1/2 inches

Score each of those card sheets on all sides at 2 inches. This will leave a square in the middle measuring 5 1/2 inches.

This is how each of those sheets should look.
Let's make the flaps for the box. Now you need to cut on all four sides on both sheets. I cut on the line to where the two creases meet. I then cut to the right of the line to the point. This will ensure that when you fold the sides in glue they won't get caught on the bottom.

This is what both card sheets should look like.
I used a wet adhesive for fixing the two boxes together, as I wanted them to be strong. Once glued to the side I then used paper clips to keep the side together whilst the glue dried.

Here they are fixed together. I used Tim Holtz's glossy accents. It dries quickly and is very strong.

You now need to cut a piece of card 5 9/16 inches by 4 inches. Fold it at two inches so each half will be 5 9/16 by 2. Glue on one side. Stick this to one side of one of the boxes.fold it down and glue the other side and stick this to the side of the other box.

It will look like this. You've made a hinge for the box so it can open and shut but still be attached.
You now need to use your decorative paper. You need 8 pieces 1 3/4 inches by 5 1/4 inches and 2 pieces 5 1/4 inches by 5 1/4 inches. These you'll stick around the edges of your box and the top and bottom. I used my tape gun to stick them on.
Here is the box with all of the papers on it.

Now inside I wanted to use some ribbon to hold the cards in place on bothe sides. The ribbon was 27 1/2 inches long and you need 2 pieces of ribbon this length. I then put a line of tape in the bottom of the box and stuck the ribbon down. It doesn't matter if a bit of tape is still showing as we will be covering that later. To cover this you need two pieces of decorative papers 5 1/2 inches by 5 1/2 inces. You then stick these down. Make sure the ends of the ribbon are hanging over the sides so you don't glue the ends down under the paper.

Right now we need to cover the inside of the boxes on the sides. We want to cover the flaps. So you need 7 pieces of cardstock 5 1/2 inches by 1 7/8 inches. Then you need one that is 5 1/2 by 2 1/2 inches. This one is longer as it will act as wedge, so the box shuts correctly. I rounded to of the corners. This needs to be stuck on one of the boxes on the side opposite where we stuck the outside hinge.


Once you've done that, we now need to think of the closure. I cut a piece of card 1 1/2 inches by 3 inches. I then stuck the hook and loop on one end. I then used wet glue to stick it on the outside of the box.

As you can see the hook and loop sticks to the box quite well.

Now to finish the outside, I used some flowers I had made (It's one of my earlier tutorials).
I also used my sakura clear pen to add some glitter to the box. I used this pen as it dries quickly and I have control over where I put it. You could use glitter glue instead.
So here is the inside of the box. I tied the ribbon so you can see where the cards etc will go. I haven't made the cards yet that's another project.

Here's another view with the closure which I put a flower on.
I hope you enjoyed this tutorial. This box could be used to house a mini album or have a mini album on one side and some keepsakes on the other. I'm sorry it's picture heavy, I must look into having a video camera.
See you next time.
Kelly x

April 21, 2011

Easel Card with a twist

Hi! this is Gaby happy to be here with a tutorial on how to make the “cake” card I made and posted on my blog and at FankyCards.blogspot.com on Monday the 11th for Madison’s Sweet 16th B-day celebration.
Several people asked me to show them the “How-to”.
I will start by mentioning that there are a few ways or sizes that this card can be made, but I will show you one size and tips on other sizes.

Note: This is not my original design (card base or concept- Cricut cuts are my design). I saw this card several months ago but they did not offer a tutorial. I wish at the time I could remember the site, so I could ask for instructions or a tutorial. So when I wanted to make something special for Madison, I had to think back and try to figure it out myself by what I remembered. Again, it was an easel card with space provided to fit the cake and box of candles. So, with a bit of math background or calculations, I figured it out.

Card size preference.
a-Decide what height your cake is going to be. I decided to go with 1 in.
b- Card. The card is basically an easel card.
c- Decide how wide your card will be. I decided to make it 5 ¾” wide.
You end up with a wider card= 5 ¾” w x 5 ½” h --Tip- cut at 5 ½ “ for a smaller card. If you want yet a smaller card make sure you also cut the length unless you want it taller.

CARD
1- Cut a 12” piece of cardstock to 5 ¾” w.
2- Score at 5 ½ “ and at 6 ½ “ (this gives you the 1” space in the middle of your card) and at 9 ¼ “ (this becomes the fold on the front of the easel card (note that this is half of your 5 ½ “ you have to either side).
3- Decorate panels and inside to taste. I measured my panels and cut each minus ¼ “. i.e. for the inside I used brown cardstock and cut at 5 ½” w x 5 ¼” h and the pattern paper at 5 ¼” w x 5” h I proceeded by stitching around with a sewing machine. Do the same with your front panels. Tip- you might just want to use one layer of patterned paper and skip the stitching.
Note: if you want to use ribbon to tie the card, stitch the ribbon pieces or adhere the ribbon between your panel and the card base before adhering to your card base

Cake size preference.
a-Decide how wide or the circumference of your cake. For the width of my card I could fit up to a 3” diameter circle or cake.
b-OK, a bit of math. If you cut a 3” circle (diameter) with a punch or your Cricut, you need to find out your circumference in order to be able to cut the strip (or what gives your cake the height). Instead of boring you with the Pi () formula, I’ll just inform you that for a 3” cake you cut a 9.42477796076938 or 9 ½” long (you just cut a little at the end by rounding it up) and for a 2 ¾ “ you cut a 9” (rounding up) long; and for a 2 ½” you cut a 8” (rounding up) strip of paper long by 1.5” h.
CAKE
1- I cut a 3” circle and a 9 ½” w x 1.5” h strip of paper brown paper (chocolate cake!).
2- Place your strip of 9 ½’ w x 1.5”h vertically and score at ¼” and at 1 ¼”
3- Cut zigzag (pinking) cuts on your ¼” parts of your 9 ½” w x 1.5” h strip of cardstock and fold (this is were you will add glue and adhere to your circle working around. Once that is dry, you can add glue to the bottom part and adhere to your card), but first you want to cut the holes on your circle for the candles to go in.
4- Decide how many candles and what size. For the standard candles sold at most stores, punch holes that are ¼” with a hole puncher. I decided I could fit 8. Do not make too many holes on your circle/cake topper or it will become weak.
5- Decorate cake a desired. I used puffy paint, a ¼” inch scallop strip that I cut with an EK punch at 9 ½” and finished with a stamped circle and a tiny butterfly.
For the candle box - alternate-- you can have one chunkier candle and only punch a hole in the middle of your cake instead of several candles around the cake.
I measured my candles and new that I needed a box that was at least 3/8" high (remember I can go up to 1") and 2 1/2" long to fit the 8 candles.  I failed to take pictures of how I cut and scored the box, but here are the measurements. You need a 3 1/4" x 4 1/4" piece of cardstock that you can decorate to match your card like I did.  Score at 1/2", 7/8", 2 3/8" and 2 3/4" on your 3 1/4" inch side of your paper.  Turn and scorea at 1/2", 7/8" 3 3/38" and 3 3/4".  Cut all corners and fold.   I decorated and cut with a Spellbinder die in the
center of my box and placed a piece of recycled acetate under.  As an added decoration, you can place your candle box on top of your decorative paper (not base of card) and cut some slits right at both edges and run a ribbon under and passing it through before you adhere the PP or design panel to your card base or you can just adhere your box with adhesive. Your preference.

I cut all front of the card embellishments using my Cricut Expression. You may decorate to taste.

Thank you so much for enduring this long post and I hope I did not confuse any of you!
If you need clarification or more detail info, please drop me a comment!

April 20, 2011

Birthday Cake

Hello Crafty Friends!!!!
Sherri here from Sherri's Crafty Place I am so happy to be here and share a project with you today.....
My project today is a Birthday Cake I made for my BFF, it was her Birthday this past Friday, I do have the Cricut Cake, but I really didn't have the time to roll out the fondant and really get too fancy with it, so instead I used my Cricut Expression, no I did not put food stuffs in to it, I used it to cut a piece of paper, ok I know this is sounding weird now, but stay with me and I'll show you what I did....
So what I did was bake a cake, after the cake was cooled I wrapped in plastic wrap and placed in freezer, it should be in freezer for a good 5 or 6 hours, even over night would be good. Then I measured my cake pan, it was 6x10. So now I get out my Gypsy and make a rectangle using those measurements, then on a new page I found a Butterfly shape, ( she loves Butterflies)
The image I used was from the Stamping Solutions cart, I used the Blackout Feature, size is 9.01 x 5.86
next I cut my Butterfly shape out, using my Expression and computer copy paper, then I took my cake out of the freezer, placed my image on top of my cake and using a serrated knife I started cutting away cake....


I choose this Butterfly because it did not have antenas, Now I did not put a filling in this cake, if you wanted to I would but it back in the freezer, for an hour or 2 then slice it in half and put in filling.
Here I am icing the cake, she loves pink....
and I love purple....Unfortunatly it was a very rainy day, so I am so sorry the pic is soo dark, I had some batter left some I used it up by making cupcakes....I wish I had more time to spend on the cake, I would have liked to add more colour, next time, I just Love using my Expression, and I Love that I can use it to make a shape and then make a shape cake with it......
I hope you all enjoyed my post for today, a different way of using your Expression. I would love to see any cakes you make, Easter is coming, I think I may try a Bunny shape cake for this weekend....

and here is a quick card I made for her, using her favourite cart, Paper Lace, I used PL to cut out the butterfly lace background, the I used my Maya Mist to give it a little shimmer, The stamp is a Smirk Stamp, and I used ProMarkers to colour my images....
Thanks so much for stopping by today.....I hope you all have a Crafty week.....

April 19, 2011

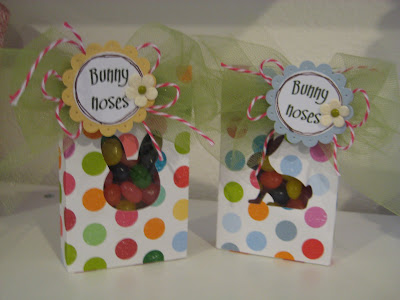
Bunny noses!

Hi everyone! This is Kristy from craftin-on-my-door and I want to thank Sheila for allowing my to be her guest designer again today! I look forward to my monthly She's a Sassy Lady posts! Here's a cute and quick little project for Easter:
I used my trusty Gypsy and the Love Struck cartridge for the heart boxes and sized them at 6" each. Then I used the hide contour button to hide the hearts. Next, I placed a bunny head from Doodlecharms, and a rabbit from Celebrate with a Flourish over the hidden hearts. The bunny head was sized at 1.71" and the rabbit at 1.98".
I choose some "spring like" paper (from Me & My Big Ideas) and pushed cut. *FYI, I found that when I welded the rabbits onto the boxes, the Cricut didn't cut the score marks for some reason. 
 I just rolled with it, and scored where I needed to fold.
Before you glued the cute little box together you want to put something over the bunnies so that the jelly beans I mean Bunny noses don't fall out! I use pieces of packaging that I have in my stash. This piece was from a set of Halloween pins.
Just cut a square a little bigger then needed and add adhesive to the edges.
Now it's time to glue the little box together.
Once I scored and glued the boxes together I filled them with jelly beans I mean Bunny noses.
I used MS Word to make the tags, changed the font color to brown, and then printed onto white card stock.
Next, I used my faithful SU punches to punch out the saying, and a scalloped circle from card stock to add to the tag. (Yes, I first printed the saying in green, but then decided that I liked them in brown better).
In order to add a little something to the tags I decided to pierce each of the scallops. (The foam piece that I am piercing on top of is from a set of brads that I bought ages ago. It works perfectly for piercing!)
I also used a brown marker to doodle around the saying and then glued the pieces together.
I tied green tulle around the boxes and tied a knot.
Then, I folded the tulle over itself, tied some twine around it (to make it into a bow), added some more twine loops, and then added the final knot.
I also added a tiny Prima flower with a brad and attached the tag with a 3D glue dot.
I have to admit that I had a hard time not eating all of the "Bunny noses!" I almost had to take a picture of empty boxes! :) A big thanks to the hubbie for running out and picking up some more!
Thanks for stopping by! I hope you all have an amazing Easter and get to spend time with the ones you love! <3 Kristy