December 19, 2011

A Simple Felt Flower Tutorial

Hi ya everyone!  This is Melissa from Melissa Made and today I'm sharing with you one of my favorite products and a tutorial on how to make these simple felt flowers.  Thanks Sheila for letting me share today this easy tutorial.
I hope you enjoyed this simple tutorial.  I'll be sharing more of my favorite projects with the Spellbinder Nestables.  Please visit Melissa Made for more fun projects!  Don't forget to leave a comment - I love to hear from you and if you have any questions - ask away!

December 17, 2011

CHRISTMAS MEMORIES MINI ALBUM

Happy Saturday, everyone! Are we all ready for Christmas?! I'm gettin' there! :-) Java Jen here from Java Jen Creations !  Once again, I am so honored to be here and share my simple project with you all! Thanks, Sheila!

Back in October,  I made a mini album based on Heidi Swapp's tutorial on My Craft Channel. For her tutorial click HERE ! This time, I'm using what I think is the easiest version of her albums. Basically, you just pick papers and adhere them back to back until you have as many pages in your album that you want.

Here is a pic of my completed mini album:
I used a retired paper pack from Creative Memories called Candy Cane. All of the Cricut cuts are from the Creative Memories Cheerful Seasons cartridge. I also used the Creative Memories tag punch and corner rounder. 
For the cover, cut an 8.5"x12" piece of solid card stock. This makes the album size 8.5"x6".  The inside pages are printed papers from the kit and are cut to 8"x11.5" so that when the book is closed the pages don't hang over the edge.  
Here are pics of how I embellished the pages with photo mats made from paper in the Candy Cane kit. There were also card stock stickers in this kit. 
The Cricut cuts dimensions are as follows:
"memories" ticket and layers: 2.29"
present and layers: 1.59"
snowflake and layers: 1.59"
snowman and layers: 2.65"
tree and layers: 2.65"


See - told you it was a simple project! :-) Hope you are inspired to make some precious memories this Christmas season! 
Sheila here, didn't you just love Jen's Mini Album? Today I challenge you to share a Christmas Project with us... ANY thing Christmas, just link it up. This week I will be giving away another stamp set to one lucky person. I will use random.org to pick a winner from one of our link up entries. Now you can link up a new project each day if you want for more chances to win! I just love these link ups don't you? You can see so many wonderful projects and I have started following some awesome blogs too. Now be sure to link up!

December 16, 2011

We Have TWO Winners!

We Have 2 Winners from last week’s challenge…. I took all the names and the links and made a drawing from it and used Random.org. There were 38 comments and 24 linked projects to choose from. First I drew for the cart….. using the greatest of the numbers which was the comments. There were 38 entries at time of closing and Random.org picked #28..... so this is our winner of the Winter Frolic cart is:
Granny said...  28
This is such a wonderful way to share a little note and love with a friend. Adorable this card is adorable.

Then our second winner get a wonderful stamp set from My Creative Time (one of my favs) for her entry into this weeks challenge.... our winner is #7 Penguin Fun:


The creator is Suzanne from Cricut Craftin Grammy with her wonderful mini album entry. I hope you get a chance to go over to her blog and check out some of her wonderful designs. You will be delighted that you did. Now ladies please contact me by hitting the contact button on the top of my blog and send me your full name and address and I will get your package out to you. Thanks everyone for your wonderful entries and be sure to come back in the morning for another weekly challenge and a chance to win a prize.

Teacher Gift Bags

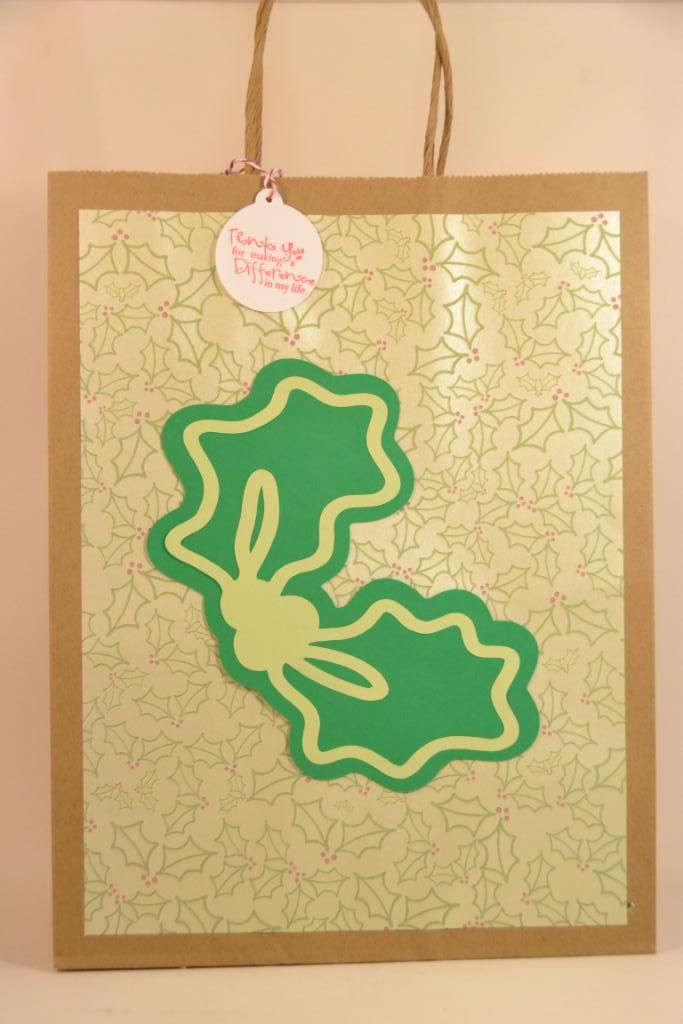
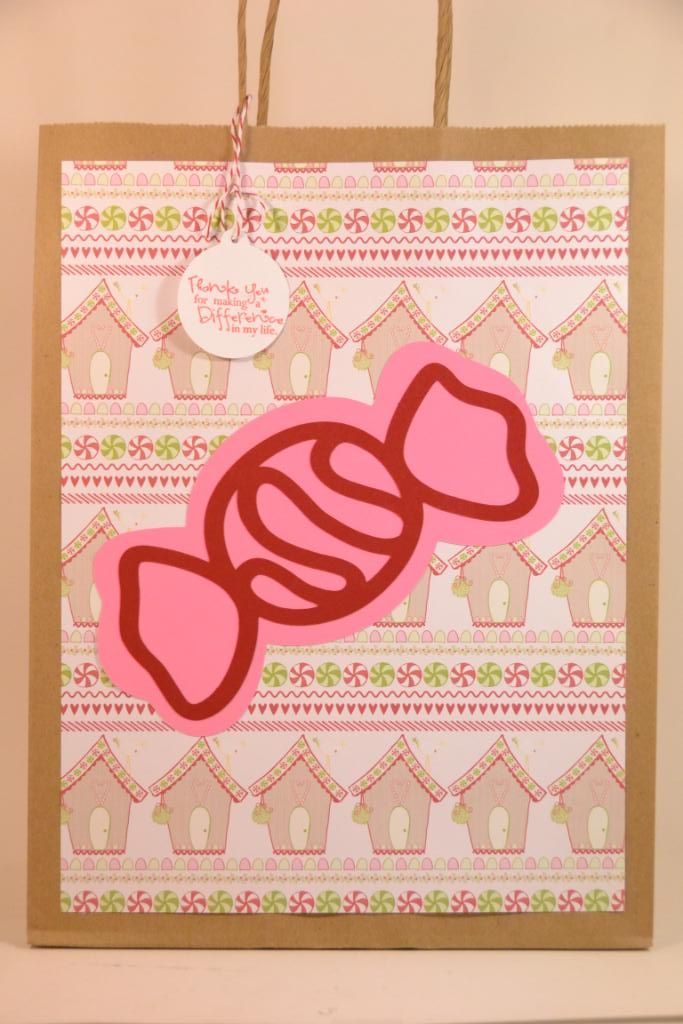
Hi everyone! This is Elizabeth from 217 Creations. At my oldest son's school, the teachers have wish lists for classroom supplies.  I grabbed a few tags for each teacher. I decided to go with a good rule of thumb K*I*S*S- "Keep It Simple Silly".  My natural inclination is to do a detailed project but this is not always possible.
I realized I needed a bag of some kind to put the items in. I found these unfinished bags at Joann's.  They came in a 6 pack for $4.99.  I then used a 40% off which made this a very affordable gift wrap option. Plus I could make these bags very quick (added bonus!).  I started by cutting a 12 by 12 sheet to 9 by 12 inches. This left a nice border on the edges.
I then cut my images from Gingerbread.  I bought this cartridge last year in a bundle.  I had not used it and I have to say this is an easy cartridge to cut and layer.  I am going to do some cuts for the boys to play with next week during winter vacation. Here is my sizing (real size off):
Candy 4 inches
Gingerbread Girls 6.0 inches
Holly 5 inches
Next I cut these tags from Art Philosophy at  2.0 inches.  I stamped this sentiment from Pink By Design "Gratitude" set.  I added some twine to the top of the tags to tie to the bags.
Finally I assembled the bags.
 
Here are my other designs.  I made a total of 5 in about an hour. 

  I hope you like this super simple project. As always thank you for taking the time to follow or subscribe to us at She's A Sassy Lady and on my personal blog at 217 Creations.


December 15, 2011

Honeycomb Ornament

Today I am sharing a tutorial on how I made a Honeycomb Ornament using my Cricut E2 and the Paper Trimmings cartridge (but you can use any cartridge that has a similar ornament).

This is Gaby and am thrilled to have remembered that the 15th is the third Thursday in December and not the second.... long story.... Sheila knows... :)  -- On to my project!
There are several tutorials on how to make a honeycomb out of paper in the WWW.  Actually, I knew the basics of making a honeycomb such as pretending there is a clock face and place glue at 3, 6, 9 and 12 when creating a honeycomb circle (or similar such as a pumpkin, apple, etc.). Next layer you place glue at 1:30, 4:30, 7:30 and 10:30. Following layer, you go back to 3, 6. 9 and 12....alternating until you are done. You usually use/cut 18 pieces when creating a ball or half of that when you want to create a honeycomb design inside a card that does not have to go all the way around.  And the most common paper to use is tissue paper.  But for my project today I was inspired by Becca Feeken over at Splitcoaststampers.  Becca created a honeycomb ornament using a Spellbinders die and I, my Cricut E2.

Step One - Cut 18 of the same design. Since the paper was thin, I selected the thin paper option, but it suggested I set my blade to 5.  I chose to set my blade at 4 and it worked perfectly!
Step Two -
Fold the 18 pieces in half.

I used the thinnest paper I had.
I could not find text paper or
thinner paper at my local
craft store and was a bit hesitant to
cut text/book paper on my E2.
The thinner the
paper, the better results
you will get.

Step Three - Use one of the negative spaces to mark ones and twos, alternating the numbers.  This will be your template so that you don't forget/get lost placing the adhesive.  How did I decide where each number was placed?  This is almost identical to Becca's but she did  not explain the logic.  Mine is that at each curb I had to have one of each, so I started with my biggest curb on the design and marked a one.... from there I just alternated the one and two.
Closer look at the numbers.

Step Four -  Adhere strong adhesive at each point (you can start with the ones or the twos, I started with the ones such as Becca).
The picture is kind of dark but it was the best way to show the dubs of adhesive.


Step Five - Add adhesive to the number twos.... alternating on all 18 pieces....
Step Six - After you have your "sandwich" or all adhered together, you will have two green sides like mine (or the color of your paper).  At this point if you are going to add a piece of trim, ribbon or? in the middle of your ornament, you need this step, otherwise you can skip.

I run out of 1/2" tacky tape...
on my way to craft store...

I added tacky tape to the middle
and run a piece of ribbon so that
I could hang the ornament.

I additionally wanted a place to
hang my embellishment at the 
bottom.
I simply tied a piece of gold ribbon, 
adhered it to the middle with tacky tape
letting a tiny bit at the bottom and enough 
to hang on top.

Step Seven - Time to bring it all together.  I added adhesive to one of my green sides and carefully brought it together by unfolding it.  (I decided to ink the edges with distress ink before bringing it all together - the white was too white.... next time I will make sure I find prettier double sided paper).
You can see the ribbon sticking out at the top.

Last step is to embellished as desired.
I almost cut the upper part of the design because I did not think I needed it, but am glad I left it alone. I like how that extra top part looks in the ornament. 

I just added a bow and some sugared berries.

Thanks for visiting and leaving a comment! ~ GABY


December 14, 2011

Bonfire

Good morning. I sure hope you enjoy my layout. I love the fall colors.
Hubby just got a firepit and so we burnt some logs in it and our grand children called it a Bonfire!  Jim purchased some skewers as we live in a new subdivision so there are no branches from trees laying around. Goodness the trees are barely bigger than a branch. LOL We then sat around after dinner and roasted marshmallows and had a wonderful evening.
The funny thing is the children could have cared less about our little fire they were too busy running around the yard and playing in the sandbox. Let me tell you we adults had a great time solving the worlds problems with our roasted marshmallows! hee hee
This is my first digital where I built the page layering it 1 piece at a time. I love the way it turned out, don't you?
Lately I have been dabbling in digital scrapbooking as it enables me to get a lot done in a short amount of time.  I figure the first 40 years traditional scrapbooking and this year I am doing digital just to be able to keep up with current and I will keep on goning for the years that have gone by.
My Memories has allowed me to offer a $10 discount to anyone who would like to purchase their program.
My Memories Suite is allowing me to offer you $10.00 off on the purchase of this wonderful program!!!
So with this special code (STMMMS32096) you pay only $29.95 for this fabulous software. Regular price $39.95 minus $10.00 using the Promo Code makes it only $29.95!! This software is so worth it! Just click HERE to get your software. Be sure to use this code during check out and you're all set. After you pay, the download will begin and you will be using this awesome digital software in no time flat!
PROMO CODE: ☛ STMMMS32096 ☚
Remember your software will only be $29.95 with this special code.
Well I hope you liked today's project. Thank you for your sweet sweet words of encouragement. Your coments continue to inspire me to keep sharing with you.