December 31, 2011

Happy New Year


New Year Wishes


I wish you Health...

So you may enjoy each day in comfort.


I wish you the Love of friends and family...

And Peace within your heart.


I wish you the Beauty of nature...

That you may enjoy the work of God.


I wish you Wisdom to choose priorities...

For those things that really matter in life.


I wish you Generosity so you may share...

All good things that come to you.


I wish you Happiness and Joy...

And Blessings for the New Year.


I wish you the best of everything...

That you so well deserve.

HAPPY NEW YEAR MY FRIEND!

Author Unknown

Weekly Challenge - Thank You Cards

Well Christmas is over and the New Year celebrations will be tonight. We have all been touched by so many wonderful people with gifts, parties, dinners and all types of hospitality over the past two weeks. And you know what that means... it's time to get out the thank you cards. We all need to write them and let those we love know just how much we appreciate the caring and generosity. What better way than to send them on a hand made card!
This weeks challenge is THANK YOU cards! I know I need to send you quite a few so I thought I would keep my card simple. So I got out my Gypsy and just did a very simple design.


I picked out some wonderful paper from My Minds Eye and let my Cricut do the work. Oh I mentioned in the video about a funny story and caught my self in an error and forgot to tell you, so....
Hubby and I stopped at CVS to pick up some hairspray. The lady in line in front of me was picking out a Birthday card for someone in your family and when the cashier rang it up the total came to $8.08 and the lady says in a very loud voice "you have got to be kidding! This of course got our attention, I turned to my husband and said aren't you happy that I make all our cards? He replies "that's what I keep you around for!" Can you believe $8 for a card! I send out over 200 cards every year so that is a big savings in our household even if were only $1 per! Okay, I guess I have bored you enough with my silly stories and get back to the business these simple thank you cards. We need to have plenty of them in our stash to let others know how much we appreciate them.
So this week I challenge you to make Thank You Cards! Then Link them up. I can't wait to see what you come up with as I too am always looking for some fresh ideas.
Thank you for your sweet sweet words of encouragement. Your comments always continue to inspire me to share with you.

December 30, 2011

Weekly Challenge Winner From 12/24

How exciting to have 12 entries curing Christmas week! I am so happy so many people played along with so many beautiful entries! This weeks winner is Cathy of Cathy's Creations, she made these lovely gift card holders. I was peeking at her blog and discovered that she is a fairly new blogger, so be sure to check out her blog and click that follower button and maybe we can give her a strong start too! Cathy please email me your full name and address so I can send you your stamp set.
Be sure to come back in the morning as we will have a new challenge up and running just in time for the new year.

Hot Cocoa Slider Card


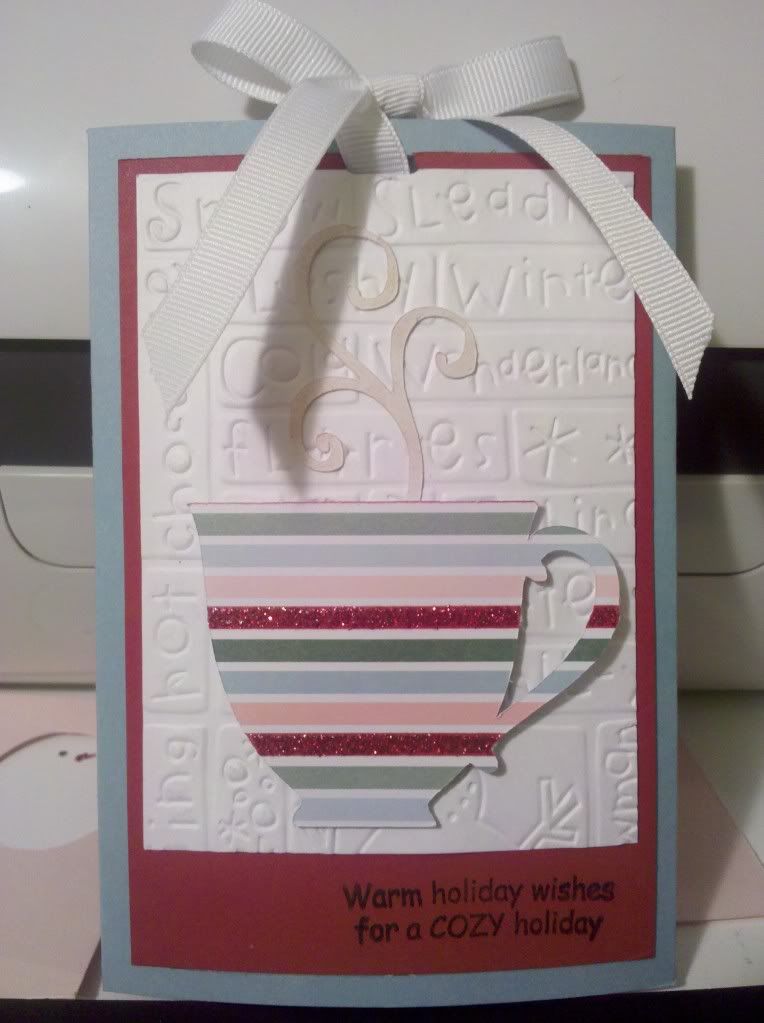
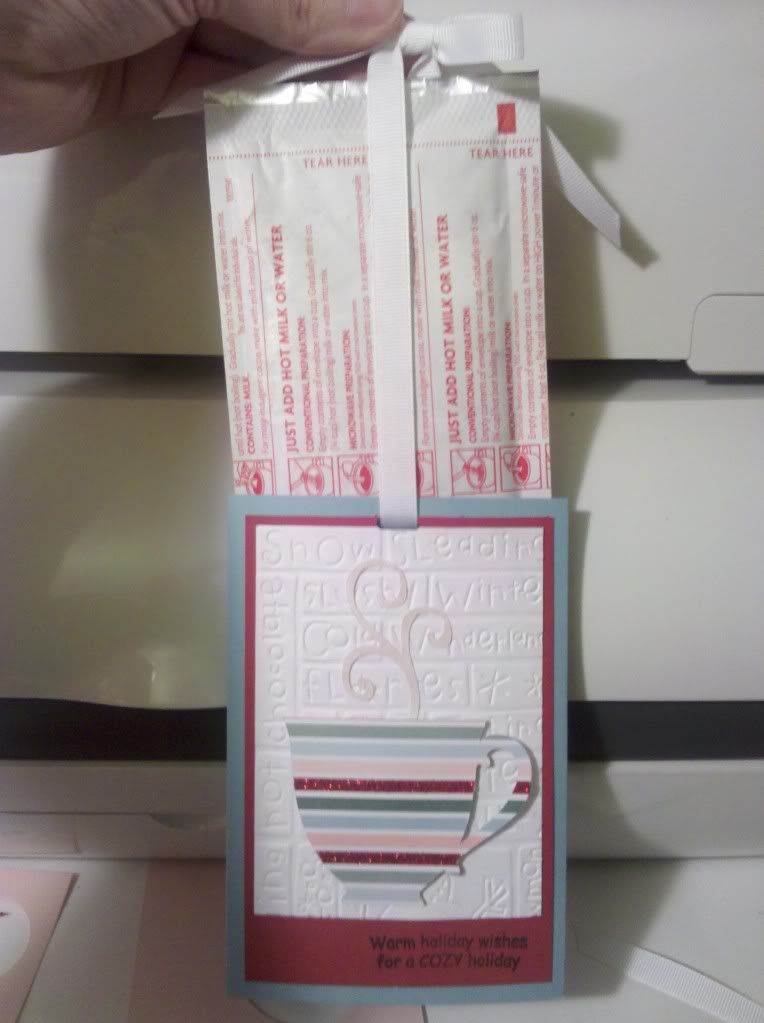
Hey Ya'll!  This is Leah from My Craft and Chat Cafe.  Today's project is quick and fun!  It's a card with a treat.  The idea is so "lifted." I got my inspiration from MPS's video

Uploaded from the Photobucket Android App


It measures 3 3/4 x 5 1/2 - base is SU Baja Breeze.
The red layer measures 3 1/4 x 5 1/8 - SU Real Red.
The white layer measures 3 x 4 1/4 and was embossed using a        Cuttlebug folder(sorry, don't remember the name.)
The sentiment is from Pink by Design's "Christmas Wishes" set.
I used white ribbon from Michaels for slider bow.

Uploaded from the Photobucket Android App

The cup and steam is from Cricut Joy of the Seasons.  I used SU designer paper cut at 2 inches.  The steam is white, but inked w/SU ink.  Click on MPS video link above and watch the video on YouTube to see a step by step on how to make your own slider card!  Until next time...

Crafty hugs,
Leah

December 29, 2011

Quick and Easy Valentines!

It is time to think about Valentines!  Do you need several of these wonderful little cards and you don't have a lot of time?  Well, here is a quick and easy way to mass produce Valentines!
My name is Carolyn from Carolyn's Creative Corner http://cccscraproom.blogspot.com/ and I am honored to be the guest designer today.  I will be using the Cricut hand-held design studio, the Gypsy, a 24x12 mat, the Cricut Cartridges "Sweethearts" and "Wild Card".
This adorable little purse is from the Cricut Cartridge "Wild Card" can hold 6-8 of these small cards and the envelopes!  The purse is cut on a 12x12 mat and fit to page.  Add a ribbon and a stamped sentiment for a simple decoration or decorate to your heart's content!
The card image from the Cricut Cartridge "Sweethearts" is used.  It measures 8 inches by 4 inches.  The decorative images are from the same cartridge.  The images are placed on the front cover of the card.  The image will be cut away and the negative space will be used.
**Please note...you can save space on the mat by making the cards smaller.  This is a 24x12 mat.  There is left over paper, but I will use it for later projects.
This is a second set of cards using a different set of images.  Again, I am using the 24x12 mat.
This is a close-up of one of the cards folded and completed.  I used a set of Valentine stamps for a sentiment on the front.  I used a glitter pen to trim the edges of the card.  The negative space has red plastic attached to show off the image.
Inside of card...a stamped sentiment and the translucent plastic is attached with clear tape.  I like the way the inside image looks!  I thought about covering it up, but changed my mind!
These are some of the cards that I made using the "Sweetheart" cartridge.

But wait...I am not finished...
Look at all the wonderful images that are left behind!  They are just waiting for red card fronts!  So, you get even more Valentines!
Please visit my blog to see what I have done with the leftovers!
Thank you for visiting Sassy's blog today!  I have enjoyed my time with you!

Please visit me at
Carolyn's Creative Corner!

December 28, 2011

No Shirt, No Shoes, No Ink, No Colored Cardstock, No Foam, and Out of Ideas

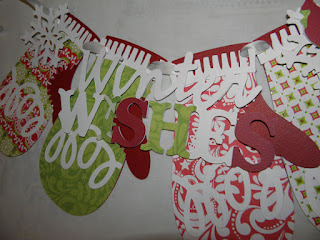
Hi everyone, Beth here from thunderbirdlindybydesign.  This quick banner was not made in my craft room.  We are traveling for the Holidays, and I had the bright idea that I would have time to make something while I was gone.  I packed my Cricut, Gypsy, White, and red cardstock and a paper pad from GCD studios called Home for the Holidays.  I also packed my ATG, and nothing else.  What was I thinking?  And with the help of my inlaws, they provided a hole punch and some double sided foam tape that you use for putting down carpeting, and white ribbon, this is what I came up with.


I used Tis the Season for the Mittens and Cardinal, Jolly Holiday's for Winter Wishes, and Christmas for the Snowflakes.  The Mittens were cut with their layers at 6.11 tall using the Gypsy.  Winter Wishes was cut at 3.12 tall along with it's layers, the cardinal was cut at 2.29 tall along with it's layers, and the snowflakes were cut at 2.5 tall.

It sure is hard making something without all of your supplies at your finger tips.  It needs ink and glitter, and my craftroom!

I hope everyone had a wonderful Christmas, Thanks Sheila for allowing me to be a guest designer, until next time,  Beth.

December 27, 2011

A Christmas Story

Hi everyone
~Happy Day To You~
This is Stacy from Love That Bug. I am so honored to back over at Sheila's today to share a super quick and easy gift idea with all of you. This is a recycled jar that I turned into the cutest little gift for someone. It is full of M & M's and seems appropriate for this time of year. It is a little story about the birth of Jesus Christ seen from candy!
To decorate the jar, I just wrapped a piece of card stock around it, and punched out a scallop shape for the front. I used the computer to print the "To and From". For the tag, again, I just printed the story and tied it to the jar with ribbon, then filled the jar with the M & M candies.


Here is the story: (click pic for better view)

Super easy, super cute and super meaningful! I hope you all enjoy and had a very Merry Christmas and a Blessed New Year,
Many hugs,
Stacy

December 26, 2011

Opps Late At Announcing The Winner As I Was Busy Christmas Eve

I hope you don't mind. We had so many entries this week and I was busy getting ready for Christmas and totally forgot to pick a winner for last week's challenge. So sorry. Well we had 36 entries and I want to tell you they were awesome. I just Love everyone linking up as I get to see so much more than I do. Each week I join more and more blogs as I am getting to meet new people each week with our Weekly Challenge entries.
Our winner this week does not have a blog of her own. She is using my blog as the link address and that is okay to do that and since it asks for your name when you link I was lucky enough that she did fill that in. So Charlotte C. you are this weeks winner. All you need to do is send me an email (just hit the contact button above) and I will get a stamp set sent right our to you.
Now be sure to enter this week's challenge because you too could be a winner!

Happy New Year

Hey y'all! Good Morning! Aymee Gandy of 'A Scraphappy Southernbelle' here with you today to share a crafty project. I hope you are having a grand day so far! So tell me...how was your Christmas?!!! I hope all of you had a wonderful time with your family and friends. Did you get lots of goodies?! My family and I had a wonderful time! I really enjoyed getting to see everyone and spend time together. I think that is my favorite part of the holidays!

Now that Christmas is over, I figured we better start thinking about the next holiday...New Years!!! 2012 is right around the corner! I have a feeling it's gonna be a great year! In celebration of the New Year, I made a little card to send out to a friend. This was a very simple card to make and came together in about 30 minutes, so you can't beat that.

"Happy New Year"

Supplies Used
Cardstock: The Paper Studio, Bazzill Basics Paper
Patterned Paper: The Paper Studio
Rhinestones, Pearls: Michaels
Thread: Coats & Clark
Electronic Cutter: Cricut Expression (Provo Craft)
Cartridges Used: Wild Card, Celebrate With Flourish
Software: Gypsy (Provo Craft)
Adhesive: Helmar
Other: sewing machine

I cut this card base out using the 'Wild Card' cartridge. I then cut my New Years embellishments using the 'Celebrate With Flourish' Cartridge. For the card front, I added a bit of stitching to bring out some texture. I also used pop dots to pop up my hat/clock cut. Last, I added some pearls and rhinestones for a bit of sparkle.
 Here is a view so you can see how my pop dots helped to raise the image on the card front.
 The inside is very simple and I used all my negative cardstock pieces I had leftover from cutting the card front.
I hope you have enjoyed this card and that it will inspire you to get crafty! Have a Happy New Year!

Happy Scrappin'!
Aymee

December 24, 2011

Merry Christmas From All At She's A Sassy Lady

I had to share a photo of our tree. My grandchildren Justin-7 and Sydney-6
 decorated it for me! Didn't they do good? I added a couple of the glitter
ornaments and they did the rest! They love helping.


We wish you a Blessed Christmas

filled with love, laughter, friends and family.


May your table be heaped with delicious holiday foods

that thrill and excite your appetite.


May your tree be adorned with lights and ornaments,

Presents abounding beneath its limbs,

surrounded by those you love.


Be blessed this year by the virgin birth

of the babe who came to earth

so many long years ago...


Advent Calendar


Hi Everyone. This is Chris from Get Inspired with ChatterScene. I wanted to thank Sheila for allowing me to share my project with you. I had a bit of Internet trouble and she patiently waited till my issue was fixed. Thanks Shelia!
I had step by step pics but when I got my laptop back they were deleted from my desktop.

For this project I used my new Cinch. I have never used a binding system before so I messed up the one edge but think it still looks okay.

I used the Cricut Craft Room to create the numbers. Using the craft room basics cartridge. The words were cut out with the basics too. The bow is the 3d bows digital cartridge from the craft room. And Santa and his sleigh is from Joys Of The Season.

I do have it glittered up but the glitter didn't show up in the photo.

I hope everyone has a great Holiday and A Happy New Year.

Sheila here, don't you just love Chris' project? Just adorable, and a great lead to this weeks challenge.
This week I challenge you to make something using red, white or green! It can be anything. Just make sure you link it up by 4:00 pm on 12/30 and you could win a stamp set! Have fun and let's see what you can come up with.

Now be sure to leave Chris a little blog love! Merry Christmas Everyone!

December 23, 2011

My Son's Birthday Card.

Morning all,
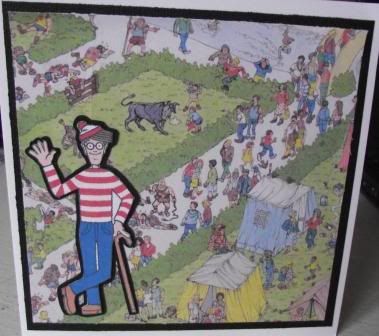
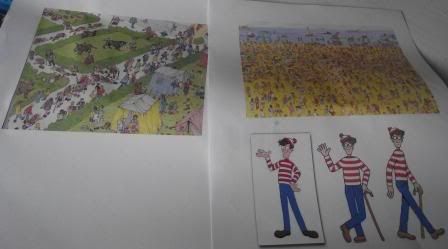
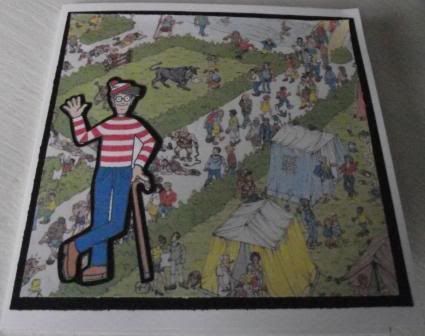
Today is my Son's birthday, so I thought I'd share with you the card I made for him. He is Where's Wally mad. We have all of the books, mugs, calendar and I have a duvet cover for him too. He loves him, which meant I thought I'd make him a card with Wally on it.


I copied some pages from his book to have as backgrounds and some wally's.


Here's the finished card. I just mat and layered the background and Wally. I didn't want to add anything else as I know my son will be looking for Wally, so I made sure I hadn't covered him up.
I hope you like the card. Thanks to Sheila for having my today.

Have a wonderful Christmas and I'll see you in the New Year.

Kelly x

December 22, 2011

Fun with Pictures and a Craft Room Tip...

Hey Ya'll,
Merry Christmas To Ya!!!  Well, today is Sassy Dude Day.  I don't have anything ultra spectacular to share with you today, but it is pretty cool.  The first things I wanted to share with you today are a couple of fun cards I made using pictures I found on a Google Search.  They are VERY simple to make... you just need a couple of label shapes, a rounded corner punch and a little ribbon.  Super easy!
 This is a card I made for my boss.  He has two beagles and I thought this picture was so much fun!  I simply printed it on our 4x6 printer, trimmed off the extra and used a rounded corner punch on it.  I three label shapes (one with the side slats) using the CTMH Art Philosophy Cartridge.  I stamped the smallest label with Merry Christmas from the Merry Christmas stamp set by My Craft Spot.  I ran ribbon through the slats and behind the second label shape and then stuck the picture to the top.  I then tied a simple bow and added it as well.  The card base is a half card and the red mat is 5 1/4 x 8 1/4.  I used a large rounded corner punch on the red mat and then a smaller rounded corner on the green card base.  I used the same mats on the inside for the sentiment.
 The next one was made for my Aunt.  I just thought this picture of the boxer is TOO funny!  I did the same thing minus the ribbon for the front.  On the inside, it says... "He just found out that Santa KNOWS!"  She got it yesterday and got a good chuckle out of it.  Everything on both cards was inked with a chocolate ink.  These are very different for me, but thought they were cute enough to share.  There are so many funny pics on the web, so if you need a quick card, give it a try!  BTW, I printed the pictures on glossy photo paper.  We have one of those little Selphy Printers by Canon, so this was just the photo paper that comes in the kits for it.  Now, we are starting to redesign the craft room.  It's been great so far, but we added so many machines over the last couple of years that we are going to have to rethink things so that I can work efficiently in there again.  Hee! Hee!  Below are a couple of things I came up with that have really saved on space that I thought you might enjoy.
 First of all, I went to Michaels and found these great wedding favor containers.  The have a clear front on them and I thought they would really be a great size.
 I simply took adhesive magnet material (from a roll) and cut it to fit the back.  I did clean the backs of them with alcohol first to make sure that the adhesive would stick well.  It did fine for me, but I had some super glue sitting on the side just in case.  Hee! Hee!
 Once they all had magnetic backs, I filled them with all of our different glitters, flocking powders and micro-beads.  They hold an entire jar of glitter from any set that Martha Stewart has.  I also have some from Recollections that fit well too.  We are even thinking of doing this with our embossing powders.  I have tried all kinds of glitter trays, funnels and everything else out there, but a simple folded piece of paper remains my favorite thing to use with glittering, so the wide mouth openings on these little jars are just wonderful!
 This is a magnetic bulletin board and it's holding about 3/4 of the glitter stuff that we have.  Oops... Guess I will have to think this one again to get it all to fit.  Hee! Hee!  We are going to do a counter across one wall in the craft room and my Dad has the equipment to so metal work, so he is thinking up a sort of back splash for me so that I can put this across the wall behind.  They work perfectly and I was so excited to see how well!  The final thing I have to share with you today is kind of a lucky find...
These are the newer Martha Stewart Glitter Glues.  I just love these!  We also have tons of stickles too.  These are all sitting in a Lipstick Display.  Jill came across a store (in the mall she works in) that was changing out a bunch of fixtures.  They gave her a BUNCH of stuff!  In this bundle of loot were these great little lipstick displays.  You can prop them against the wall, on a shelf or you can lay them flat and they will fit in the drawers of the JetMax cubes!  How cool is that?!?  So... if you know anyone or frequent a place that sells cosmetics... stop by and see if they have any old fixtures they are getting rid of.  Usually, they will just give them to you so they don't have to carry them to the trash.  Hee! Hee!  Besides that, it's great recycling!!!  There were also a bunch of other things that are perfect for all of our little embellishments and tools that I will be sharing as we do the build out on our craft room.

I am really excited to get to share this with you because I have decided to be really, really... really cheap with this redesign, so it's really not going to cost much of anything to do except for a little bit of plywood and the things we already have, so hopefully soon, I can start sharing some before and after pics with ya'll.

Well, I have to run and get the rest of the house in order.  We are up to 16 now for Christmas Dinner.  YIKES!!!  Lots to do.  Merry Christmas everyone!  I would love to hear what ya'll think about all this!  If you want to see what else we have been up to for Christmas, hop on over to Cricut Couple and see more!

December 21, 2011

Monogram Frames

Hello everyone,
and Merry Christmas!!!!!!!
Sherri here from Sherri's Crafty Place
I can't believe how fast this year has gone by, I am so honored to be part of Sheila's Sassy Designers.....I can't believe that I am part of this Amazing group.....
Thank you so much Sheila for letting me share with your friends today...
Today is an Idea I saw on the Cricut Message Board, I am So sorry  that I can not remember who it was, I will look for it, and try to post it, because she did an amazing job and deserves the credit.....

Now onto my project...
A Monogram Frame


using this Diploma Frame, I purchased at Wal-Mart for $3.00
 I Cut the back off using my Exacto Knife,
 then using my glue gun, I glued the glass to the frame....
here is the frame with the glass glued to it, I didn't want my frame to have a back...
 and here is the finished frame, I used my Gypsy to weld the lines to the G then I had to use my exacto knife to cut the middle of the G,
the font I am using is from Martha Stewart Seasonal Cake Art Cartridge, and the & is from, Gypsy Font .....
I used Cricut Vinyl, and put it on the Front of my Frames, these were pretty easy to make, but you DEFINITELY want to used transfer tape or my Cheaper version....... drywall mesh tape, it works GREAT and I have used the same pieces of Drywall tape to make 6 of the frames so far...not to bad for dollar store tape...there are so many possibilities for these frames, I hope you will give it a try, and be sure to let me know if you make some I would LOVE to see them,
 I am making 9 of these for gifts this year , and I just LOVE how they turned out, I hope you do too.....
I would like to wish you all a very Merry Christmas !!!!!

❀Sherri❀

December 20, 2011

Name Signs...

Hi everyone! This is Kristy from craftin-on-my-door and I want to thank Sheila for allowing my to be her guest designer again today! I look forward to my monthly She's a Sassy Lady posts!

This month I thought I would show you all a quick and fabulous Christmas gift. A friend of mine needed the help of me and my trusty Cricut to put together some gifts for her family and friends, and I through together a couple too! She started at Home Depot bought some baseboards and had them cut them down for her. Then she painted them and waited for my Cricut's arrival! We cut out each person's last name and "established" with the date they were married. Here's what we came up with...
 We love how they turned out! We made 10 of these to give out as gifts. For the last name I used Plantin Schoolbook and for the established I used the Calligraphy cartridge. Using my Gypsy, E2, vinyl, and a 12 x 24 mat these came together very quickly!

My friend also had some smaller baseboards that she had painted in different colors, so we decided to decorate some of these for teacher and friend gifts.
 For this one I used the Feeling Groovy and Calligraphy cartridges.
 On this sign I used Feeling Groovy and replaced the dot on the i with an asterisk.
 For this sign I used the Something to Celebrate and Calligraphy carts.
Thanks for stopping by today! ♥Kristy