April 30, 2012

Post it Note Holders with matching pen

Hi everybody, it's Shakey from Crafty Pink Butterfly. Today I am sharing I project that is super easy to make. First I would like to apologize because I wanted to make it with a 4x6 frame but realized to late that I only had 3.5x5 frames but it works great whatever size you choose to use.

For the first note holder I decorated it with a Spring theme and will change it for every season or holiday.
With the second I used the same paper because I love it and it has pink butterflies and made a year long calendar to go one it.
To make these you will need
- a 3.5 by 5 piece of cardstock
- a 4x6 or 3.5 by 5 acrylic picture frame (I got mine from the Christmas Tree Shop bit they have them at Walmart, when you buy the 3.5 frame, the elevated part should be on the short side and with the 4x6 it should be on the long side )
- a monthly calendar print out calendar from the web (search 2012 monthly calendar and print the one you like the best)
- a 2.5 by 2.5 square of cardstock to attach to the calendar
- a 1 by 3 1/4 inch piece of matching cardstock for the pen
- a regular size post it note and
- a embellishment for your season/holiday holder

First you put the cardstock in the frame.
For the pen, you twist the end on the pen off and remove the pen and put it on top of the paper and roll in tightly around the pen then insert it back in the pen.


Then you add your embellishments and your all done.

I hope you like my project and hope you will try it out.

The pens are R.S.V.P pens, they can be found in a 2 or 3 pack at the dollar store, a 5 pack at Staples and a 12 pack on Amazon.com.

April 29, 2012

Lake Geneva Wisconsin

Well I had a great time in Chicago on Saturday. We went to a dinner and a play with my brother and sister in law. Now if you no Chicago you know they have these little restaurants that are called Baker's Square where they make the best pie you have ever eaten.... well let me tell you I had to stop there and we took a French Silk pie home that evening to enjoy.... just the 4 of us! Ummm ummm umm, so good.
On Sunday morning we went to church and with my daughter and got to see all our old friends and it was so nice to catch up and we had a great little visit before leaving for lunch. This was like the perfect lazy Sunday because after lunch we went back to Heather's house and had  a great time with our grandchildren as well as sneaking in a little nap! I had to help Aiden fall asleep! teehee Then we drove to Lake Geneva, Wisconsin and had dinner at one of our favorite little restaurants; Popeye's on Lake Geneva
We had so many goodies that we decided to take a little walk with the children afterwards and hopefully settle our full tummies! It was brisk but the children really enjoyed walking along the lake and seeing all the different docked boats. Boy it sure brought back a lot of fond memories. You see Jim & I used to live about 20 minutes away from this little restaurant. Every Sunday evening as all the tourists would leave to go back home we would drive into town and have dinner with the locals. Yes good times with family is meant to be savored and cherished. These photos are of my daughter Heather and her family; Brianna, Carissa, Aiden and her hubby Dan. I miss them so much and it was great to spend the day enjoying each other's company.
I put together these 2 pages in about a half hour and they were ready to be printed. I have them saved on the Studio J site at Close To My Heart. I love how I was just able to choose my photos, pick the paper and layout and then journal a little and the page is ready.


On the last two pages I posted I was asked how I liked this program opposed to others and I have to tell you with everything there is pros and cons. The thing I like the most with the Studio J site is it's portability. I can access it anywhere and that is so important if you are like me and can have access to a computer during your lunch hour at work as it will save you a ton of time! I also like the ease of the program, there was no learning curve I was able to get on and immediately start my page, the program prompted me as to what I should do. The other thing I liked was the quality and affordability. I now have my first prints in hand as it was delivered right to my door and they are AWESOME! Affordability, consider, no paper, glue, embellishments, no gas to the store to pick up and the page protector is delivered right with the page! 10 pages for $55, they call it a 5 pack. I have a purchased program that if I process the only place I can go for a 12x12 is Costco and that is $3 per page, I have to have a membership paid in advance and I have to drive 15 miles away to get as well as purchase the protector to put my pages into.... so I figure it breaks out around the same. Yup, I decided to go with Studio J on these knowing I could do it right at my workplace or home in just a few minutes time. Will I ever use the other program, yes, as it also is a great program that I would highly recommend, but that one must be installed on your computer and I can't do that at work.
I hope I helped you a little today and that you enjoyed my digital page. I have hundreds and hundreds of actual photos that I need to scrapbook but unfortunately I must work for a living so it will all be in due time. In the mean time I will scrap my current photos on Studio J to keep me up to date and intermingle them with the regular pages that I have done.
Thank you for joining us today and for your sweet sweet words of encouragement. Your comments inspire me to continue sharing with you.

We Have 2 Winners

I am giving away 2 prizes this week as I just love these designs and had to thank our entries in a nice way. Thank you so much for playing along. I just love your cards and hope that eveyone takes a minute and visits Jan at Scrap'n Surprise and Sea Swan Creations.
Thank you ladies for playing along. Please email me your address so I can get a stamp set out to you right away.

April 27, 2012

Easter Tags.

Good Morning ,
We've had a lot of rain over the past week. So plenty of time to craft.
Today I thought I'd share with you some tags I made for a swap. The theme was Easter, pastel colours and we had to incorporate a egg. Here are mine. One's for my partner and one's for the host. They will also have some extra goodies in with the tags too.

I like this Rabbit. He has a bit of a fed up look, but I think it's just because he's been busy delivering eggs.

Here is a close up. I've tried to introduce the light and shade in the colouring.


Here are the copics I used. I've been re organising my pens and they have a new home, but I'll share that another day with my copic book. I made one, but like everything I do I change my mind and come up with a different idea to do.

Thanks Sheila for having me today.
I've got lots of cards to make this weekend and a playday with some crafting buddies that I'm getting more excited about the closer it gets.


April 26, 2012

It's a Pool Party!


Hey Ya'll,
Sassy Dude here, from Cricut Couple!  I have something very fun to share with you.  I had a friend at work that wanted some special invitations for her nephew's birthday party.
 Can you tell what kind of party is it?  Hee! Hee!  I wanted to do something different than just a standard card, so I decided to make a pocket style card with the invitation itself on a tag.  First of all, I did the pockets for the card.  This was a little over the top to make 20 of them, but once I started, there was no way I was going to stop.  Hee! Hee!
 The card base is an 8 1/2 x 11 piece of craft card stock cut in half.  I then used a rounded corner punch on all corners.  I then took a piece of the patterned stock and cut it 6" x 3".  I then scored it at 1/4" on the sides and bottom and folded everything.  Then used the rounded corner punch on the bottom corners.  I took 1/4" ATG tape and fastened the pocket to the bottom.  The waves (2.00), beach ball (1.50), sunglasses (1.00) and sunblock (1.25) were all cut from the Pack Your Bags Cartridge.  The It's a party! is from the CTMH Art Philosophy Cartridge stamp set.  I just cut a rectangle of the patterned paper and stamped it on the tan side and then rolled it back and forth on a pen to get the wavy shape.  The white under the sunglasses is a piece of felt to represent the towel.   On the sunglasses, I used Liquid Glass on the lenses.  I also dotted the beach ball to look wet.
 I covered the personal information on the invitation.  On the right, the tag shape (7.50) is from CTMH Art Philosophy.  The little swimmer (3.50) is from Pack Your Bags also.  The goggles are covered with Liquid Glass.  I also used a little bit on the bottom under the boy to look like he has been dripping water on the floor.  I typeset everything for the party information on the computer and then printed it out, cut the rectangle and then used the rounded corner punch as well.  I also made sure to leave enough space for the boy.
This had so many fun layers, but if I had to do it again, I would try to simplify things a little bit as it took a long time to put them all together.  I would probably print the boy on the imagine as each of those little layers were glued.  Hee! Hee!

Well, I hope you enjoyed my project today!  We would love for you to visit over at Cricut Couple for letting me play today!  I would love to know what you think about the invitation and hope you will try some soon.  She was thrilled and very excited about her nephew's up and coming party!

April 25, 2012

Pocket fold Mini Album page

Hi everyone, Beth from Thunderbirdlindybydesign.  I wanted to share with you a mini album I made using a single piece of double sided paper for each page.  The pages have pockets on both the front and the back.  I started with a piece of double sided paper.  For this pic I used Graphic 45 Little Darlings.  I cut the 12x12 down to 10x10. 


 I scored down the middle at 5", and across the bottom at 3 inches.


  At this point you can use a decorative punch across the bottom below the 3 inch score.


Fold the paper in half, so you end up with a 5 x 10 piece of paper, open the paper up, and fold the 3 inch bottom up, then fold it in half again.

here is the fold down the middle, but you can hardly see it.

When you are done you should have a 5 inch wide by 7 inch tall double page with pockets on both sides.


This is the edge you will bind, the one opposite of the fold.

At this point it is ready to decorate.  Make as many as you need for each page. 

Here is an album I did for the Graphic 45 design team call.
These albums are so quick to make, I didn't need my cricut, but I did use it to cut the tags, see pic below.


I love making these albums, and I hope you will too.

Beth.

April 24, 2012

Talladega Racing

Talladega Racing was a blast. Hubby took me and we had such a great time... I can't tell you who won or even who raced but I can attest to the fact that it was exciting! I just can't get over how fast those cars go around the track touching each other the whole way, they call it drafting. I thought it was insane! The noise level was something that you just had to experience. When the cars went by the core of your body just shook. 
Well I finally took the time to scrap these pages and I used the CTMH digital Studio J program as it is free to use, you only pay to process the photos, and I like that. Love the papers I chose too they are from the Cruisin' paper package just in case you prefer using paper. I love doing both and my books are filled with both paper and digital scrapping.
The first page I did is just hubby and I kind of relaxing and enjoying looking around in the stands. The bottom photos is of us on the campgrounds after breakfast in the morning. I was showing off my 1st Talladega ticket.
For the second page I just used online photos as you really can't get close enough to take shots like this unless you have the right zoom lens and the skill to do it. So know the quality of the photos isn't up to normal but will do fine for our personal albums. What a wonderful collage of what we experienced on the track. I can still feel the sound and smell the burning rubber of the tires. Awesome experience that we will always remember.

Close To My Heart makes it so easy to put these pages together, I hope you too take the time to play and maybe make a few pages of your own. This page only took an hour to do from beginning to end.  I purchased a 5 Pack, that's where you buy 5- 2 page layouts complete with page protectors and free shipping so all I do is type in my code and they ship it out to me. I did 2 pages last week, these 2 today and have 3 more sets to go, then I will place the order for them to ship out. It's great that they will come right to my door. And, I love that I can do them right at my desk on my lunch hour! How nice is that? Now for those of you that order a Studio J 5 pack know that you qualify for the Dotty For You special paper pack for only $5 at time of purchase. The papers are just awesome, so bright and cheery they are just perfect for spring and summer. I have mine and can't wait to get working on some projects. Don't forget that you also would qualify for the stamp of the month too, and these are both a limited time offer. So hurry and get yours today.
Thank you for joining me today. I sure hope you liked today's project. Thank you for your sweet sweet words of encouragement. your comments inspire me to continue sharing.

April 23, 2012

His & Her's

Hey y'all! Happy Monday! Aymee Gandy of 'A Scraphappy Southernbelle' here with you on this rainy day...well it is rainy here in PA. We have had rain all weekend and it has gotten a little chilly! Brrr! But, the rain provided the perfect excuse for me to stay in and work at my scrapbooking desk. I was able to create 2 cards during the rain that I would like to share with you today. I created cards for 'him' and for 'her.' I am always needing a mix of cards for both women and men in my card stash, so I am glad I got these finished.

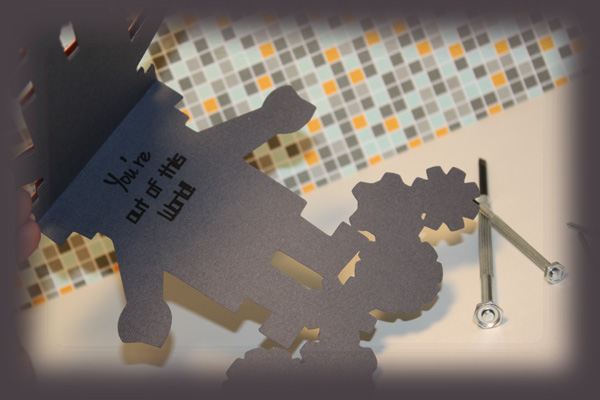
First up, I have a masculine card. I thought I would give this to my husband one day for a 'just because' sort of thing. I like to leave cards around for him for no special reason. I sometimes sneak them in his lunchbox before he heads to work, in his truck, on his pillow before bed, etc. It's just a little something sweet I like to do to always remind him that I love him. He seems to enjoy it too. Tee hee!

"You're Out Of This World"

Supplies Used
Cardstock: The Paper Studio, Core'dinations, The Paper Company
Patterned Paper: Studio Calico
Rhinestones: Michael's
Glitter Glue: Stickles (Ranger Industries)
Stamp: My Craft Spot
Ink: Stampin' Up!
Electronic Cutter: Cricut Expression (Provo Craft)
Software: Cricut Gypsy
Cartridge Used: Birthday Cakes
Adhesive: Helmar, Beacon Adhesives

I found this cute robot and the gears on the Cricut Birthday Cake cartridge. I used my Gypsy to weld the shadow of each shape together to create a shaped card.
 I added rhinestones for dimension and a bit of glitter glue to a few of the gears. Also, I used pop dots to pop up the top layer of the robot just for that extra layering effect.
 I used a stamp from My Craft Spot for the inside of the card.
 After finishing  the card for 'him,' I got to work on a card for 'her.' I thought I might send this to my Dad so that he will have a card for my Mom sometime. I thought it would be a nice everyday card or for anniversary/Valentine's Day.

"Sweetheart, My Heart Belongs To You"

Supplies Used
Cardstock: The Paper Studio, Core'dinations
Patterned Paper: Urban Lily, Jillibean Soup, Momenta
Rhinestones: Michael's
Pearls: Queen & Co.
Pin: Jenni Bowlin Studio
Stamps, Crinkle Ribbon, Twine: My Craft Spot
Ink: Stampin' Up!
Marker: Sharpie
Electronic Cutter: Cricut Expression (Provo Craft)
Software: Cricut Gypsy
Cartridges Used: Wild Card, Accent Essentials, Celebrate With Flourish
Adhesive: Helmar, Scotch

This shaped card is from the Wild Card cartridge. It is one of my favorite Cricut shapes!
 I wanted to mention too that this card is a scraplifted idea...sort of. LOL. I was on Pinterest the other day looking up pink/zebra print things. As many of you know, I have a daughter (a Yorkshire Terrier named Katie Scarlett) that I love to pamper. I am already planning her first birthday party and it will be in a pink/zebra print theme. I came across this awesome chocolate dipped strawberry. Doesn't this look yummy? I adore the colors, the patterns, everything!
 My strawberry is from the Create With Flourish Cricut cartridge.
 I added a twine bow and some rhinestones to the strawberry.
 I used crinkle ribbon to tie a bow on the edge. I then added a pin for a little extra detail.
 I popped up the strawberry using pop dots.
 For the inside, I added more patterned paper and stamps from My Craft Spot.
I hope you have enjoyed these 2 cards and that they will inspire you to create!

Happy Scrappin'!!!

April 22, 2012

Another Easter Layout


I am so excited that I am catching up on my scrap books I can't even express it fully. These photos are from Easter 2010! Can you believe it? The children will really love them. I was amazed at how much they have grown and how warm the weather was 2 years ago. We had a little blow up pool in the back yard for them to play in and we ate our Easter dinner outside!
As you can tell I am really behind in my scrapping so I was thrilled to find these Studio J 5 packs at Close To My Heart. Incredible only $55 and I can use the digital software FREE and it pays for 5 double page layouts or a total of 10 pages processed, placed in quality album sheets and even shipped directly to my home! I am thrilled and it was so easy. I did 10 pages all together, all at work on my lunch/break time and all I had to do was bring my little jump drive from home that I store my photos on.
I got to pick from their paper packs, decide how many photos I was using, brads, buttons, ribbons and it was so EASY anyone could do it.

 Here is the second page. Sorry about the little marks on the top corners of the page they are there for editing purposes and I didn't get them cropped all the way out when I did a clip of the pages for my blog so I could share with you. Don't you just love how you can zoom right in to those photos? Yes, it was a great day and now we finally have this memory on paper as I sent the order out today! 
And this is a copy of of the pages side by side, won't they look great in my album? I love how you can make your photos large or small... the pool photo cracks me up. And hubby will be thrilled to see just how much weight he has lost over the last year! Oh, the little dinosaur was a gift for me from my grandson, he wanted to make sure grandma got a present for Easter too!
Close To My Heart makes it so easy to put these pages together, I hope you too take the time to play and maybe make a few pages of your own. This page only took an hour to do from beginning to end.  I purchased a 5 Pack, that's where you buy 5- 2 page layouts complete with page protectors and free shipping so all I do is type in my code and they ship it out to me. I did 2 pages last week, these 2 today and have 3 more sets to go, then I will place the order for them to ship out. It's great that they will come right to my door. And, I love that I can do them right at my desk on my lunch hour! How nice is that? Now for those of you that order a Studio J 5 pack know that you qualify for the Dotty For You special paper pack for only $5 at time of purchase. The papers are just awesome, so bright and cheery they are just perfect for spring and summer. I have mine and can't wait to get working on some projects. Don't forget that you also would qualify for the stamp of the month too, and these are both a limited time offer. So hurry and get yours today.
Thank you for joining me today. I sure hope you liked today's project. Thank you for your sweet sweet words of encouragement. your comments inspire me to continue sharing.