Showing posts with label George. Show all posts

July 24, 2013

Gypsy Made Simple - Shape Cards

Don't you just love fun cards.... those that bring out the child in your nature? I do. This card was so easy to make and so, so simple that it is must have in your card making arsenal. As long as you have the base of the card stored on your Gypsy as a template you can add any artwork you want to fit the occasion.


See how easy that was. Make your self a template and name it as such and when you need a fast card this little one will do the trick.... even if it is just adding words to the bottom.


These cards went together so fast and all I used is 1 1/2 sheets of 12x12 paper and 7 inches of trim that I picked up at Hobby Lobby.

Now doesn't this look cute? I must say the picture doesn't do it justice as it is so cute. The pattern paper are from Close To Heart, the Dotty collection, Coordination's for the gray and I used scraps for the white sentiment area.

I inked the edges with Cotton Candy ink and I love how it brings the pink to the inside of the card.

In less than a 1/2 hour these 2 cards were designed, cut and put together. Love that as I have such a busy schedule and often times I just need a card now! You know what I mean? This little card will do the trick.
Thank you for joining us today, I hope you enjoyed this little project and it helps you with your Gypsy. Thanks for your sweet sweet words of encouragement. Your comments inspire me to continue to share with you. Have a blessed week.

January 9, 2013

Hugs & Kisses

Hi Crafty Friends :)
Today I get to share my project with you here and at Adele's Creations

I decided to male a Valentine Card, my oldest Grandaughter asked for one, so here is what I came up with


I started with an oblong from CCR basic shapes sized at 9.264W x 4.625H
I added a rounded corner square to the inside right of the oblong sized at 3.889W
This created my aperture card base.

I then added a heart shape from the Created With Flourish cartridge sized at 4 .014W x 3.819H
This formed the base of my card


The top layered heart was proportionate to the base heart and the Happy Valentine's Day was from the  Phrases cart sized at 3.806W x 1.849H with proportionate layer

Here is the inside with a few rhinestones for embellishment (from my Secret Santa Sheila :))


The stamp I used for the Hugs & Kisses is from CTMH Artiste Word bubbles, using Barn Door distress ink
If you would like the file for this card you can get it from the links below

CCR link HERE 
Gypsy link HERE 
(You may need to change CCR basic to George or similar in the Gypsy file??)


Thank you Sheila for letting me share on your Blog, I look forward to next month :)

Happy Crafting everyone

Hugs

Adele

August 25, 2012

Gypsy Made Simple - Creating A Box

Good Day. Well it is back to school time. I can't believe that this summer went so fast. I hope you all had a great time, maybe took a little vacation and went someplace special. I actually was blessed and got to spend a week on the beach as well as a short trip to Chicago to see my family! There is nothing better than spending time with family, is there?
Well today we are going to make a box.... not from TBBM but from any cart that you have a square on it. I used George, you can use what ever you have on your Gypsy. I have received a couple of requests on making boxes in this fashion as once you learn how to maneuver this yo can make just about anything on your Gypsy! So let's get to work. Turn your Gypsy on and grab a cup of coffee...


I know this is a lot to take in, but hang in there you will get it. If you got lost in the tape, rewind and start back where you got lost. It is important to just take this step by step. ONE ADJUSTMENT PLEASE! When you get to making your lid use a measurement of 3.12 instead of the 3.2 that I used. My lid is a little looser than I like it and I think you will enjoy your box more if it is a little secure... not tight, just secure is how you want it.


I enjoyed putting this box together. I must say I spent a lot more time on the lid but I just love how it turned out. Now you can leave yours plain of course or decorate it. Make the box to your taste. Also if you are unsure of how you did, cut it on paper you don't really like for a test and put together. If it fits and looks just the way you want it, then do your final cut on beautiful card stock.
This week I challenge you to make a box and link it up. You can leave it plain or decorated, acetate window or no window. Just make the box and link it up.


Here is a close up of the lid I decorated. Don't you love it? It is so feminine and just sparkles, yet you can still see in the inside of the box.


Now I just used a one sided paper, but for added contrast do a double sided paper. You will love the dramatic effect especially if your paper is a coordinating paper rather than just one color.


See what I mean about the lid.... I really think that I should have made it just a little smaller so it would have a secure fit to it.

Here is another close up of the box, as you can see it came out just perfect. Always remember to score those edges so that you have nice crisp folds like this has.

I hope you enjoyed today's post and will take a little time to watch the videos and make a box of your own. Making a box will give you the skills you need to make just about anything with your Gypsy. So please take the time to make a box of your own. Then don't forget to link is up.
Thank you for joining us today, I hope I have helped you a little along the way. Thank you for your sweet sweet words of encouragement. Your comments inspire me to continue sharing with you! Have a blessed week.

August 11, 2012

Gypsy Made Simple - Window Card


Don't you just love window cards? They are so different from anything you can buy in the store and you can make them to fit any occasion. Sprinkle a little glitter on it and you can't take your eyes off it. Well today we are going to do a window card from design to finish and you will just love how easy it is to design your own cards. so go get a cup of coffee, turn on your Gypsy and let's get to work.


Now wasn't that easy. I used a card from the Art Philosophy cartridge, making the overall design as easy as can be. Just follow the step by step instructions and you to will have 2 cards designed in just minutes. Be sure to pick your phrase before you start to make it easier to follow along.


So easy to put together too, don't you love it. Be sure to use an adhesive that give you enough time to maneuver your phrases and art into the right position on the card.

This is what our finished card looks like. Isn't it pretty? I used a two sided card stack from K and Company and the glitter paper is from Joann's. I used some old brads I had in my stash  and I love that with 1 and 1/2 sheet of paper I have two beautiful cards.


Here is a closeup of the inside of the card, the little matching flower on the inside of the cards was the perfect touch to bring the inside a little life.

Notice how well the card stands too. It has just the right strength to it with the addition of the flower in the top corner. Be sure to think of that when you are creating. You want your cards sturdy and ready to be passed around!

And of course I make my cards two up so that I can used one and have a spare for future use. This time I am using both of them the same weekend! Guess I should make another set for future use! LOL
This week I challenge you to make a window card and link it up. Any kind of window card that your Cricut machine can cut. Let's see what your cards look like.
Thank you for joining us today. I hope you like today's project. Thank you for your sweet sweet words of encouragement. Your comments inspire me to continue sharing with you.

July 15, 2012

A Christmas Card and First design post

Hi everyone, I'm Karon, from Karons Krafty Korner and this is my first posting as a She's a Sassy Lady member of the design team.  I would like to sincerely thank Sheila for giving me this opportunity.

I hope you will like the card that I have made for you today.

I decided to get a start on my Christmas cards and was trying to think a little out of the box.  This is a gate fold card with a window.  Here is how it can be designed in Cricut Craft Room.


I used the George and Basic shapes cartridge, the rectangle is sized at 5.5" wide by 8.5" height.
The circles are sized at 2.5".  (Your card base will end up being 4.25" by 5.5").

I found it easier to place the rectangle centred as it then makes it easier to place the circles centrally at either end. Do not weld the circles as you want to finish with a rectangle that has half circles cut out of each end as below.


You will need to score the card at 2 1/8" and 6 3/8" , I have shown this on white card above (doesn't it look like a football field LOL). 

Here is my card base, with the edges embossed using my Cuttlebug and the folder Snow Flakes.


You will notice I have also put in 4 eyelets one on each edge of the card above and below the window.  You will see what these are for in a moment.

Here are the elements I am adding to the inside of my card.  


The holly paper layer is cut at 4" by 5.25".

The scollop circles (Art Philosophy Cartridge page 41, Circle 3) were cut at 2.5" and 2.25" and embossed with the Snow Flakes folder.  The stocking was cut at 1.75" (Art Philosophy page 67).  

I layered the first scallop flat to the inside layer and then used pop dots for the second scallop and the stocking to add depth.

Here's the inside of my card.


To finish of I tied some sparkly ribbon to tie the gates together.  And there you go - one Christmas card complete.


 And to the side a little.


So there you are - I have finally made a start on my Christmas cards for this year - do you think I'm mad?!

Happy Crafting everyone.

Karon

July 7, 2012

Gypsy Made Simple - 3 Fold Coyote Card


Good morning! Sure hoping you are having a great summer, enjoying the warm weather and all that comes with it. This week I am revisiting the Tri-fold card with a new design. I made this card for a dear lady that you probably know; Audrey from Cute And Some. She has been busy taking care of an ill family member for the last couple of months and has been away from crafting and blogging. All that know Audrey, know that she is a special lady that always has a sweet word of encouragement to those around her. So I had to come up with something special for her.
I absolutely love the Tri-fold design on a card as it is so unique, almost like a shape card on steroids so I had to do another! This design is similar to Amy at The Stamping Tree, I scraplifted a card that she made from my Gone Fishin' Shark Card. Amy did a wonderful design and I have been wanting to give it a try ever since I saw it.
So grab a cup of coffee, turn on your Gypsy and let's get to work.


Now see with this easy template it is very each to make a card of your very own. Click HERE to down load the Tri-Fold template.


I wanted you to see the steps I take on some of these cards to make them stand out, expecially those with the old cuts with no layers.

This is what the coyote looks like before and after it has a little inking. Dont you love the difference? I used some Tim Holtz distress inks and a black marker.


See how nicely this card comes together. I ready all the little pieces first and then assemble it. I used a lot of different ink from Close To My Heart. I reuse the daubers but keep them in there own little case that is labled thanks to Ian over at A Newbie Crafter. Ian designed the lable with all the Close To My Heart Ink names for the dauber case and I love it.
Here are just a couple of photos showing what it looks like as you open this card. As you can see there is plenty of space to stamp a sentiment of write a little note.

I just love the inside of this card. I had plenty of room to write a little note to Audrey and I sure hope this card put a smile on her face.

Here is a close up of my Saguaro Cactus. I couldn't remember the name of it if my life depended on it while making that video! Don't you just love the effect of the sponge on it? It looks like litle needles all over it.


With this close up you can see the little Micro Beads on the moon, isn't it awesome?


Don't you just love how that little coyote just peeks out and howls at the moon? Click HERE if you would like this card file too. Don't forget I made the card two up so you will have two cards when you complete it.
Here is what my finished cards look like. You can see I added a couple of hand drawn stars with a gel pen on the one on the right and I really like that. I hope you like today's post. I sure had fun making and designing this card and I am sure Audrey will love it, don't you? I hope you have a great week. I challenge you to make a card of your own this week and link it up. Click HERE for the template and HERE for the Coyote Card file and be sure to link up your card!
Thank you for your sweet sweet words of encouragement. Your comments inspire me to continue sharing with you. Have a blessed week.

June 30, 2012

Gypsy Made Simple - 3 Fold Card - Puppy

Good day! Time to join me for Gypsy Made Simple where we learn to make all types of projects. This is such a fun little card to make and is sure to put a smile on the recipients face. I used my 3 Fold template and then added the artwork from Create A Critter. Now if you don't have that cart just use any cart you like to make a card. Now grab a cup of coffee, turn on your Gypsy, download this TEMPLATE, and let's get to work. Note the template is made from George. If you don't have that cart you will need to make your own base by making your own from a cart you have.


Now follow along as I take you step by step in the process of designing this card. Remember work with the page that says Empty and that you are looking at the INSIDE of the card. That is important as you will flip your art used on the base only and you will place your paper on the mat accordingly (front down, inside up).


Now that you have your card cut you can easily see how it gets put together. Make sure you score where the sections meet, and take the time to make all your pieces are inked and accentuated before you lay them down. Also make sure you do not use pop dots or foam tape on the inside section as you want your card to lay flat.

Look at the little heart in the word smile, I used a white gel pen and then added glitter so the card would have a little bling on it.

Again I used the gel pen to ad a little motion to my puppy... isn't he just too cute?

I used my Close To My Heart Olive ink pad on the roof line and around the edges of my sentiment area. Then I just added a few dots on the house to make it pop.

This is how the card looks when it is standing.... isn't it just too cute.


Here is a photo of both of the cards together. I was amazed at how fast they actually came together.
I how you enjoyed today's post, I sure enjoyed my time with you. This week I challenge you to make one of these cards and link it up. HERE is the template you just add you favorite items from any cart of your choice on the page marked Empty. Then link up your card so we can see what you did.
Thank your form your sweet sweet words of encouragement. You comments inspire me to continue to share with you.

May 5, 2012

Gypsy Made Simple - Wide Partial Sape Cards And Multiples

I just love making fun little shape cards, don't you? You can use them for just about anything and they always seem to put a smile on your face. Today we are visiting the Side partial shape card and you will love just how easy it is to design and put together. And we are going to make this in multiples.... remember I am getting ready for my card party, so I need 8 of these little owl cards! So go get your Gypsy, turn it on, grab some coffee and let's get to work.


Don't you just love how easy this card was to design. And remember I am making 8 of them! I actually cut them out while I was watching TV so they were done in no time at all. As I was making so many multiples I made a quick run to Joann's and bought enough single sheets of Bazzill to make the them.


The cards were really easy to put together. The hardest part was getting the talons and beak on as they were so small. I did use scrap white paper for the sentiment area and inked them with Cream Brulee ink. Love that color. In just minutes the card was together.

Thought you might like to see a little close up of today's card. I can't wait to see what you do.


This week I challenge you to make an A2Wide shape card and link it up. I love seeing what you do. I too learn from you and I love all the wonderful ideas I get from you, so please link up your project. 1 lucky winner will receive the little stamp set shown on the left, just my way of saying thank you for playing along. You must have your entry in by 4 PM on May 18th to qualify and the winner will be announced Saturday morning early.
I hope you enjoyed today's project. Thank you for your sweet sweet words of encouragement. Your comments inspire me to continue sharing with me.

April 15, 2012

Easel Drawer Box & Card


Hi Crafty Friends, Adele here
Today is my turn to guest design here at She's A Sassy Lady
Thanks Sheila :)

Today's project is an Easel Drawer Box, I made this design in CCR & on the Gypsy so for anyone that would like these files, I shall put them at the end of this post.
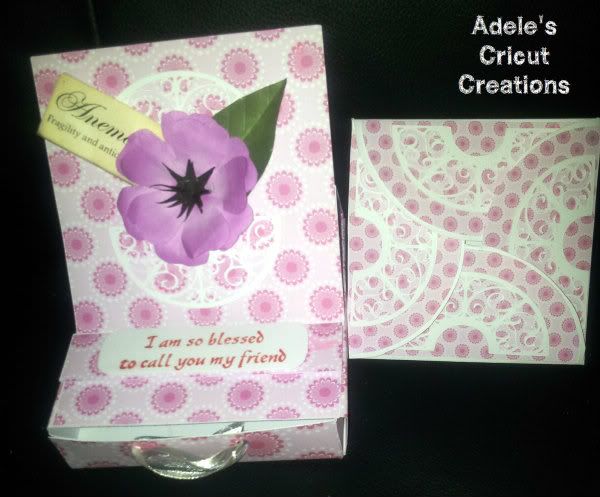
So, here is the Easel Drawer Box


This includes a 4x4 square folded card to fit inside the drawer.
You will need the following card stock

Drawer Box
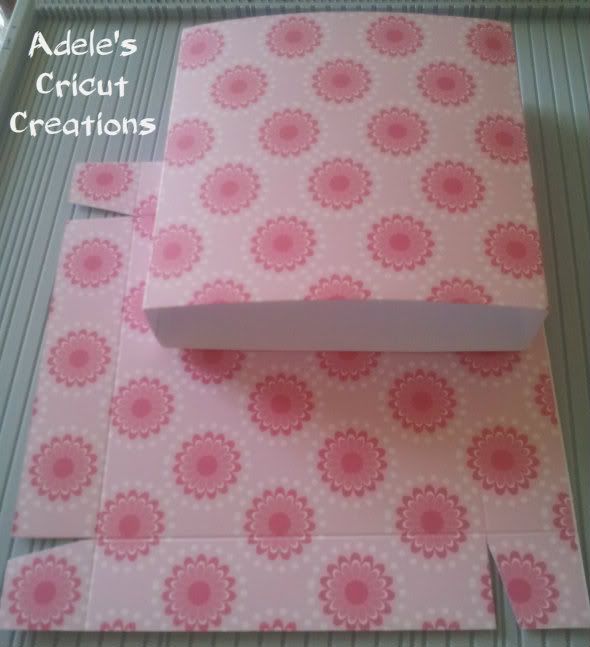
6.5" x 6.5"  for the drawer
4.5" x 12"  for the wrap of the drawer

Score the drawer 6.5" square card at 1" around all 4 sides, 
cut a small triangle into 4 edges to form the tabs, glue together.

Score the wrap 12" at the top, at the following marks on a score board
1.1/8", 5.5/8", 6.3/4", 11.2/8" 

(If using a Crafters Companion Ultimate, then use the "box base" side to score the following)

Score at 1", fold then push this fold to the right edge and score again at 4.5", fold and push this fold to the right edge and score again at 1", fold push to right edge and score at 4.5", fold, push to right edge and score at 1"
This forms the wrap for around your drawer base


Now on to the Easel Card, for this card you will need the following card stock


Easel Card

4.5" x 9" for the card, score at 2.25" & 4.5"
4.5" x4.5" for the front panel
4.5" x 1" for the stopper bar.

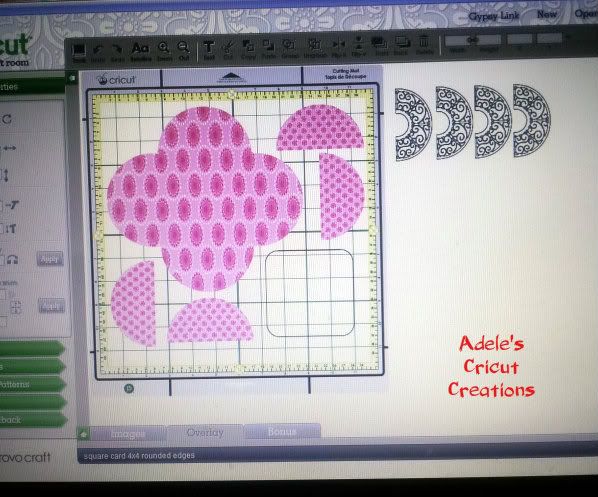
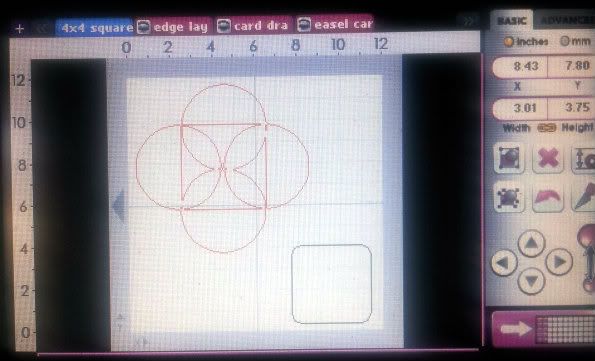
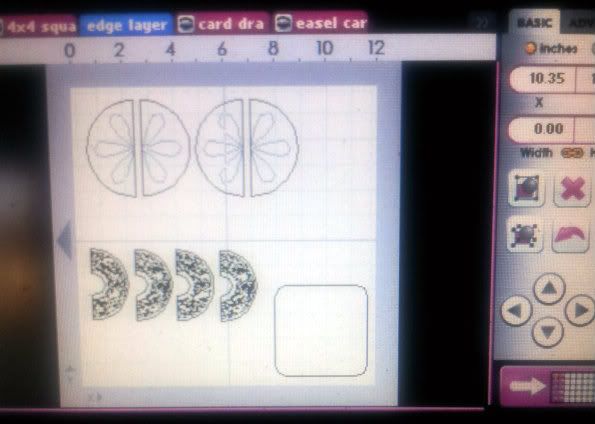
I used Gypsy Wanderings, Ornamental Iron, George & All wrapped up for decoration and the semi circle panel pieces ( using the hide contour feature on Gypsy wanderings grapefruit)


Here is the Gypsy view


This is how the 4" x 4" card should look after adding the semi circle panels and the Ornamental Iron decorate pieces to the underside of the card.


And this is how it should look when folded


Now, on to assembling the Easel Card to the drawer box
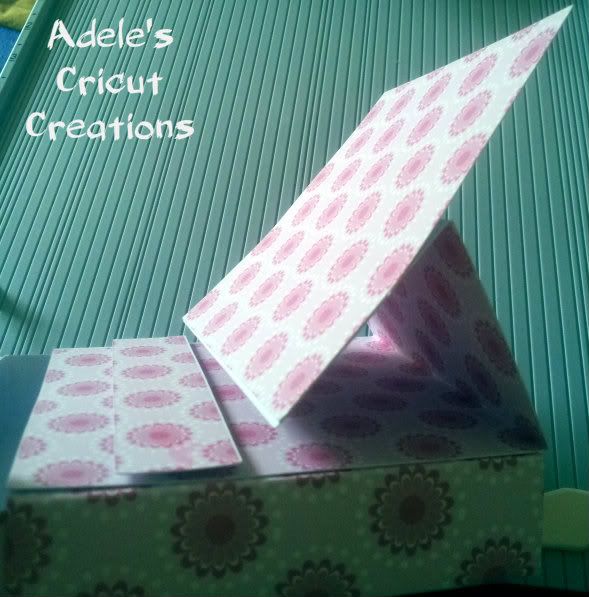
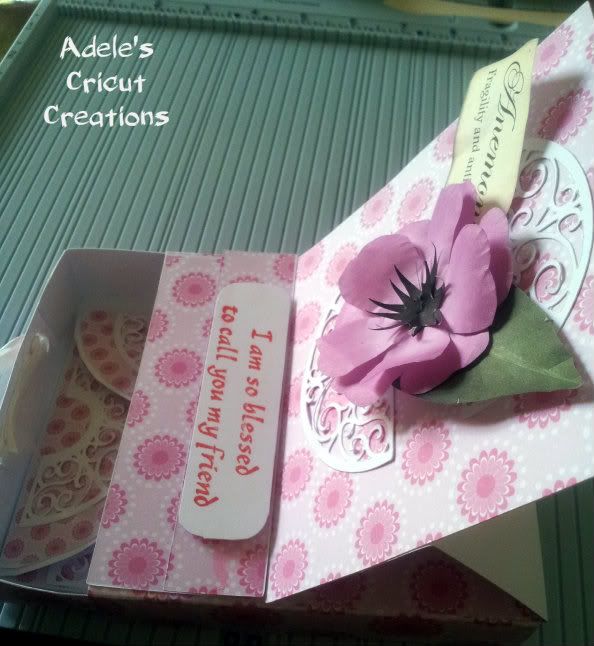
 With the 4.5" x 9" card attach it to the top of the drawer wrap and fold the easel part so you can attach the front easel panel, add the stopper bar too, as shown below.


Now it's ready to decorate :)


I have made several of these in various sizes, they are so handy for so many occasions, here is a few I have made recently, using Heartfelt Creation die's as well as my cricut.


Sorry for such a long post but I thought the detail would help others recreate these.
Here are the links to my files


Thank you so much for having me again Sheila.

I hope you enjoyed this project, I certainly had fun creating them :)

Happy Crafting

Hugs