January 30, 2010

Positioning Papers On Layout With Ease

You will love this nifty little shortcut!!! This is one of Jen's little tricks of the trade she shared with me that I pass along to you. I use it all the time. All you need is some drywall joint tape. Only $4.79 at Walmart and I can't even imagine how long it will last as Jen gave me 2 -11" strips that I have been using now for 3 months. One is starting to look a little tacky, I think thats only because I used a lot of glitter on this last project.

The joint tape is tacky on one side and perfect for positioning letters or small pieces on your layouts or cards. Just keep a strip cut to the size you would normally use for your projects. I store mine right where Jen put it, on that clear protective sheet on my cricut mat.
All you do is place your letters, cuts or pieces of art where ever you want them and then gently (so you don't move the little pieces) place your strip of joint tape on them. Press so the tape adheres to your work. Above I was preparing to go to a crop so after positioning my letters and placing the tape on it I just placed it on the plastic bag that carried all my cuts. So I was ready to hit the table running.

I would like to say this can be a real life saver. On this same project I cut my letters incorrectly. I had kerned, and positioned them just perfectly on my screen overlapping them just so, but I forgot to weld them together. So my letters were cut wrong and I didn't have another sheet of glitter paper to re-cut. I positioned each letter perfectly so my LO would still look nice. If I hadn't had the tape you would have seen excess glue all over on my page just from attempting to position properly before the glue dried.

With the tape positoned on my letters all I had to do is flip over apply my glue, then turn over and position on my page where I wanted it, and gently lift the tape off using my little spatula to make sure I didn't lift the letters. See, you never knew I had a potential disaster!
The tape is also great when working with children, as they can positon their work where they want it. I am here to attest they are opinionated as to where their work sits on the page, just ask Justin if you don't believe me! Then once again gently add the tape, lift, flip over, apply glue and place on the page. How easy is that? Even a seven year old can work this trick!
Thank You Justin!
MyFreeCopyright.com Registered & Protected
Thank you for your comments, I appreciate them and you always encourage me with them.

January 29, 2010

Friendship Blog Award!

I can’t believe this, I have received this award twice this month... This time it is from a new blogging friend Barb Craft, we know her as Crafty Girl. She is a very talented lady that is growing her blog with wonderful layouts, cards and even a wordbook (I haven’t attempted one yet). I am so totally flattered! Barb... thank you so much for this Friendship Blog Award! I have enjoyed getting to know you through our blogs and think you are a very talented person! She has three teenage children and a hubby and still finds time to share her talent with others! So be sure to go check out her blog! Thank you Barb the honor of this award!
Now, I am to list 10 things that knock my socks off and pass this to 3 blogs that do the same. The three blogs I've chosen to pass to are all super talented ladies that always go the extra mile to be friendly and helpful. Their sheer talent and complete and total desire to share that talent is why I chose them. They are an inspiration to all. I want to tell them how happy I am how blessed I feel to have them in my life....

the Ladies at  StuckOnUSketches
Barb From SnowmanLover Paperie
Rozette From SeeFluffyScrap

Ladies you are now to do the same, pass the Friendship Award and list 10 things that knock your socks off!
10 things that knock my socks off....and this list has not changed in two weeks time.
  1. God...because no matter what life has in store He is the reason for celebration and He gives me the strength to face each and everyday with delight.
  2. My Husband...this year we will celebrate 40 years of marriage; he is my friend, my love, and my soul mate.
  3. My Children, especially My Grandchildren … because being a mom and a grandmother is the greatest blessing God has given me. I’ve become closer to God realizing just as I am effected by my children; be it good or bad, He is by me. Just as I love my children His love is to me! Even greater and that knocks my socks off.
  4. Friends and that includes YOU....because you are a part of my life, the part that brings me joy and happiness each day.
  5. Scrapping....I love, love, love it! And I am challenged beyonde belief by it!
  6. Blogging....not just my blog but the family of bloggers! Each day I am challenged, inspired, encouraged, and oh how I love the friendships that are growing!
  7. Vacations – A time of rest and recharging my system. I love going places and enjoying time with my handsome hubby and sometimes we are even joined by our children and grandchildren.
  8. Special Days with Grandchildren...be it a breakfast, a movie, a night over or time to create a craft; it the bestest (as they would say) because mommies and daddies are not allowed and we can just be silly without them!
  9. Memories...all no matter what. I cherish every moment of my life! I think that’s why I love scrapping to put on paper just a tiny tiny portion of what is in your heart and mind! Every moment, every friendship, love, abundance or hardship adds up to me.
  10. My Dynamic Duo… My Cricut and side kick The Infamous Gypsy Woman! ... there is no stopping me now, I just sit back and watch them strut their stuff.
Thank you for leaving a comment! I do appreciate them and am encouraged by them!

Love You Valentine


Send a little romance on Valentines Day with this card made from the new Paisley Cart and Gypsy Wanderings from Provo Craft. If you do not have a gypsy, many various hearts are available, just choose your favorite!

Look at the yummy paper that arrived from Snowman Lover’s Paperie. Barb put together this wonderful package of valentine paper from the latest selections by Stampin’Up. Be sure to visit her site, she has a great selection of papers and stamps and all kinds of embelishments.
Barb thought it would be fun to run cards from her customers on her site so all week she has been featuring their creations. How fun to see all the beautiful cards.
Below is a close up of my little frog…. She is Sassy, don’t you think? I stickled her crown and of course the heart! For the inside of the card I used outlined hearts up the side with the same paper from the frogs little belly and used the insides of those hearts for the envelope. I really like a coordinated look, don’t you?
Sure hope you have a GREAT VALENTINES DAY.  Here is the Gypsy file for FROG LOVE.
MyFreeCopyright.com Registered & Protected
Thank you for leaving a comment! I do appreciate them and am encouraged by them!

January 24, 2010

Birthday Sweets My SOUS LO


I just love this layout. It is my take on the Stuck On U Sketches January 15th challenge. Is a design by Liz Qualman. You can visit her at http://lizqualman.blogspot.com/. I am still using my Creative Memory books and scrapping in chronilogical order so I needed a right hand page and had to flip the design as shown below:
This is how the layout looks from different angles:

This is the layout I made ad the Riverside Swarm. After designing it on my Gypsy Woman I knew I need to be 100% prepared or I would not have completed this LO. I used Celebrations for hats, blowers, and cupcakes; Home Decor for swirls, George for circles, Plantin school book fro squares and scallop edge, A Childs Year for the letters, and Gypsy Wanderings for the cherries. It was 6 pages of cuts on my Gypsy and that took 4 hours just to cut. I used a thick paper so many cuts went through my cricut twice at a slow speed.
Paper and embelishment selection:
The pattern paper was a DCWS stack and the pink glitter sheet was purchased at Hobby Lobby in the designer paper section.
I placed all my items within about 3 of the pockets shown above. Small cuts were in little plastic bags within the envelope. I then started cutting and as you can see below many of the cuts were intricate so you had to carefully remove from the mat.

Yet as careful as I was sometimes the paper would pull apart. Be sure to carefully trim this away as it will show on the front of your cut.
Because I was preparing everthing to take, I laid it on the paper just to make sure everything fit properly. Can you imagine what a disaster it would be it I hadn't and a the cut would not fit and I had left my paper home for this project!
The little hats, and cupcakes were in three pieces. I bagged each item seperately to prevent ripping and ease of finding exactly what I wanted and without the loss of a piece.
My scrap bags are packed. I placed these items in my messenger bags as my tool bag was too full to take a chance of harming my work.
Now at the crop I started placing all the items on the page. When I placed the pink swirl circle above down (note I made this in 1 piece), I only adhered the circle as I wanted my swirls to have that loose look like the sketch has.
As you can see even my title was positioned, all I need to do was glue it down.
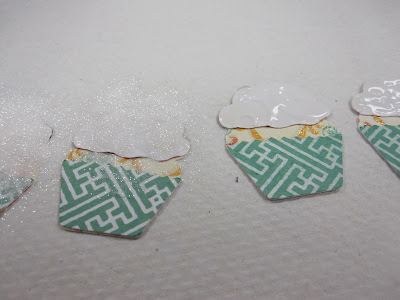
I had used the cuttlebug for the frosting on my cupcakes and planned on just using stickles but, you could tell tight here it wouldn't be enough. The beauty of a swarm is when you leave something behind, another person probably has it! Jen had white glitter!
So I used my Stampin Up crystal effects and her Martha Stewart crystal fine glitter and made frosting.
I set it aside while it was drying and put worked on chalking the little cherries. I had to use a green marker to make the stems look right, Jennifer had the right shade.  I place rhinestones on the pink hats and cherries.
I then positioned everything and adhered it to the page.

Walla, it is done. I hope you like this page, it was a challenge and a lot of fun. What is your favorite part of this layout? Download File Here.
MyFreeCopyright.com Registered & Protected
Thank you for leaving a comment! I do appreciate and am encouraged by them!

January 23, 2010

Swarm Layouts 16 Total


I walked around the room and took shots of the many layouts of the evening. Above is an elegant layout completed by Jen.  I hope you enjoy the various layouts that the ladies created. We all had sooo much fun. Maybe next time you too can join us.

By the time I had a chance to walk around and take photos, many pages were already completed. you will however see many in progress. I need to go back and check how she did the map above. I love it.
This is in the process but before I finish photos it will be completed.
We scrapped 2 at a table.
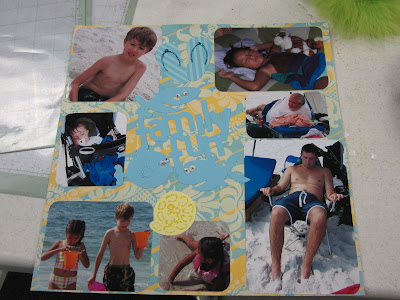
Above was done by my Jennifer, those are my grandchildren!
I had to take a second picture here as I love this photo of Sydney with the sand in her hair.
Beautiful family!
TaDa, see it is finished and doesn't it look great? She used cursive 101 for the lettering.
Hope you enjoyed the layouts. Tomorrow I will post mine.... I only did one.

MyFreeCopyright.com Registered & Protected


Thank you for leaving a comment! I do appreciate and am encouraged by them!