Showing posts with label Artbooking. Show all posts

June 14, 2016

Father's Day Cards

Adrienne, here from Eagle Canyon Arts.  Thanks to Sheila for inviting me to contribute again this month.  It's always such a pleasure to be part of the talented Sassy Lady Design Team!


Although summer is still a couple of weeks away, Father's Day and grilling season is already upon us.  The clean lines and spots of color on this card are sure to please any man.

Close To My Heart Supplies

Artbooking Cartridge (Z3169) p. 64 Overlay "Freedom"
Artistry Cartridge (Z3167) p. 32 "Away We Go" (1.75"h x 2.45"w)
Daisy White Cardstock (1385)
White Cards and Envelopes (X254)
Enamel and Glitter Duos - Blue Dots (Z3122)
Kaleidoscope Papers (X7202B)
"Framed" SOTM 1508 (retired)
Smoothie (Z2196), Peacock (Z2649) Inks

Other Supplies

Sizzix Embossing Folder #657196 "Distressed Frame A2"
3D Double-sided Adhesive Dots

The embossing layer made a nice base for the card front.  The "Freedom" overlay went on top of that, using bits of kaleidoscope paper in back of random designs to add color.  The blue dots also added glitter to the white background.  

Enjoy your Father's Day with friends and family.  Thanks for following along on this project.

Blessings,
Phillipians 4:19


May 17, 2014

Eight Weeks - Our First Glimpse Of Grand Baby #3!

Hello Fellow Crafters!

Sorry this post is a little late getting posted! Thanks Sheila for letting me share on your blog today.

We have some exciting news to share. Our youngest son and his girl friend are expecting our 3rd grand child in early December!  Proverb 17:6 says that Grandchildren are the crown of the aged, and the glory of children is their fathers. We are blessed with two already and are looking forward to spoiling yet another one!

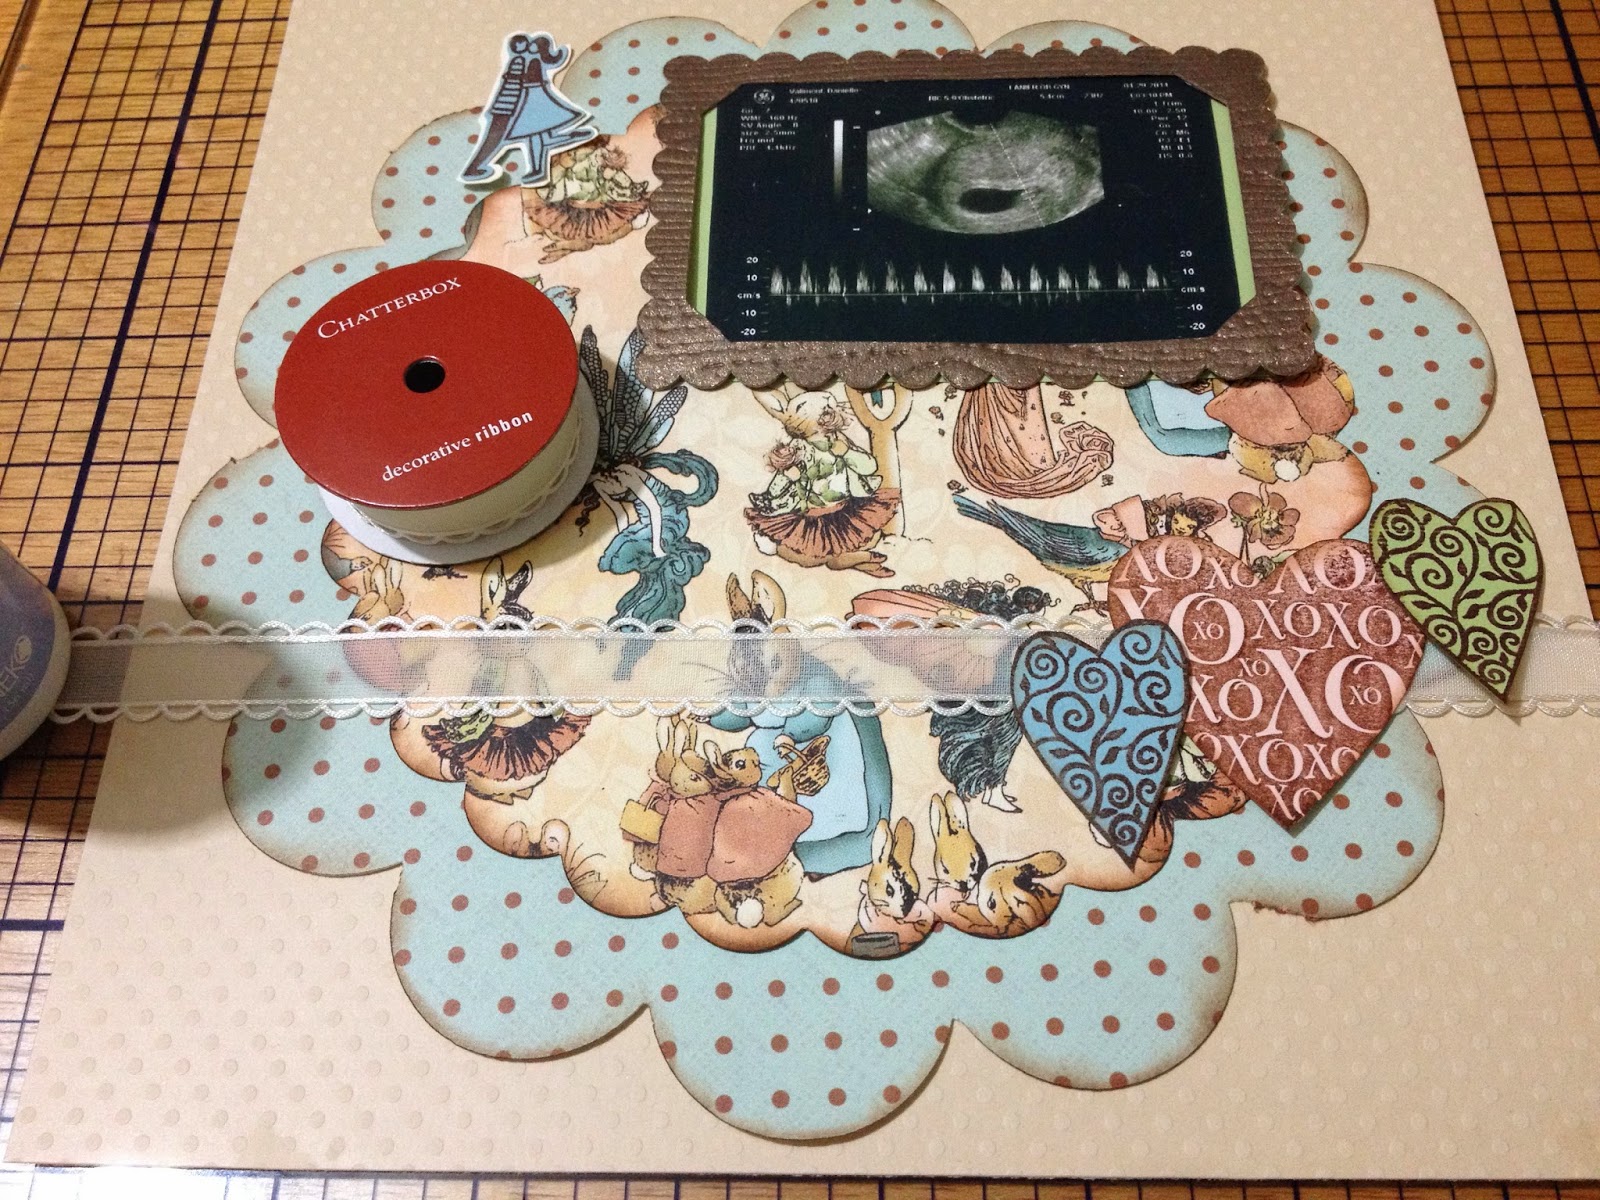
Today's post is for our little 'Baby Bean' first page in its scrapbook.  Naturally we don't know the sex of it at this time so I went with some Graphic 45 Once Upon A Springtime Collection and a few scraps from my scrap stack that I've yet to file away.


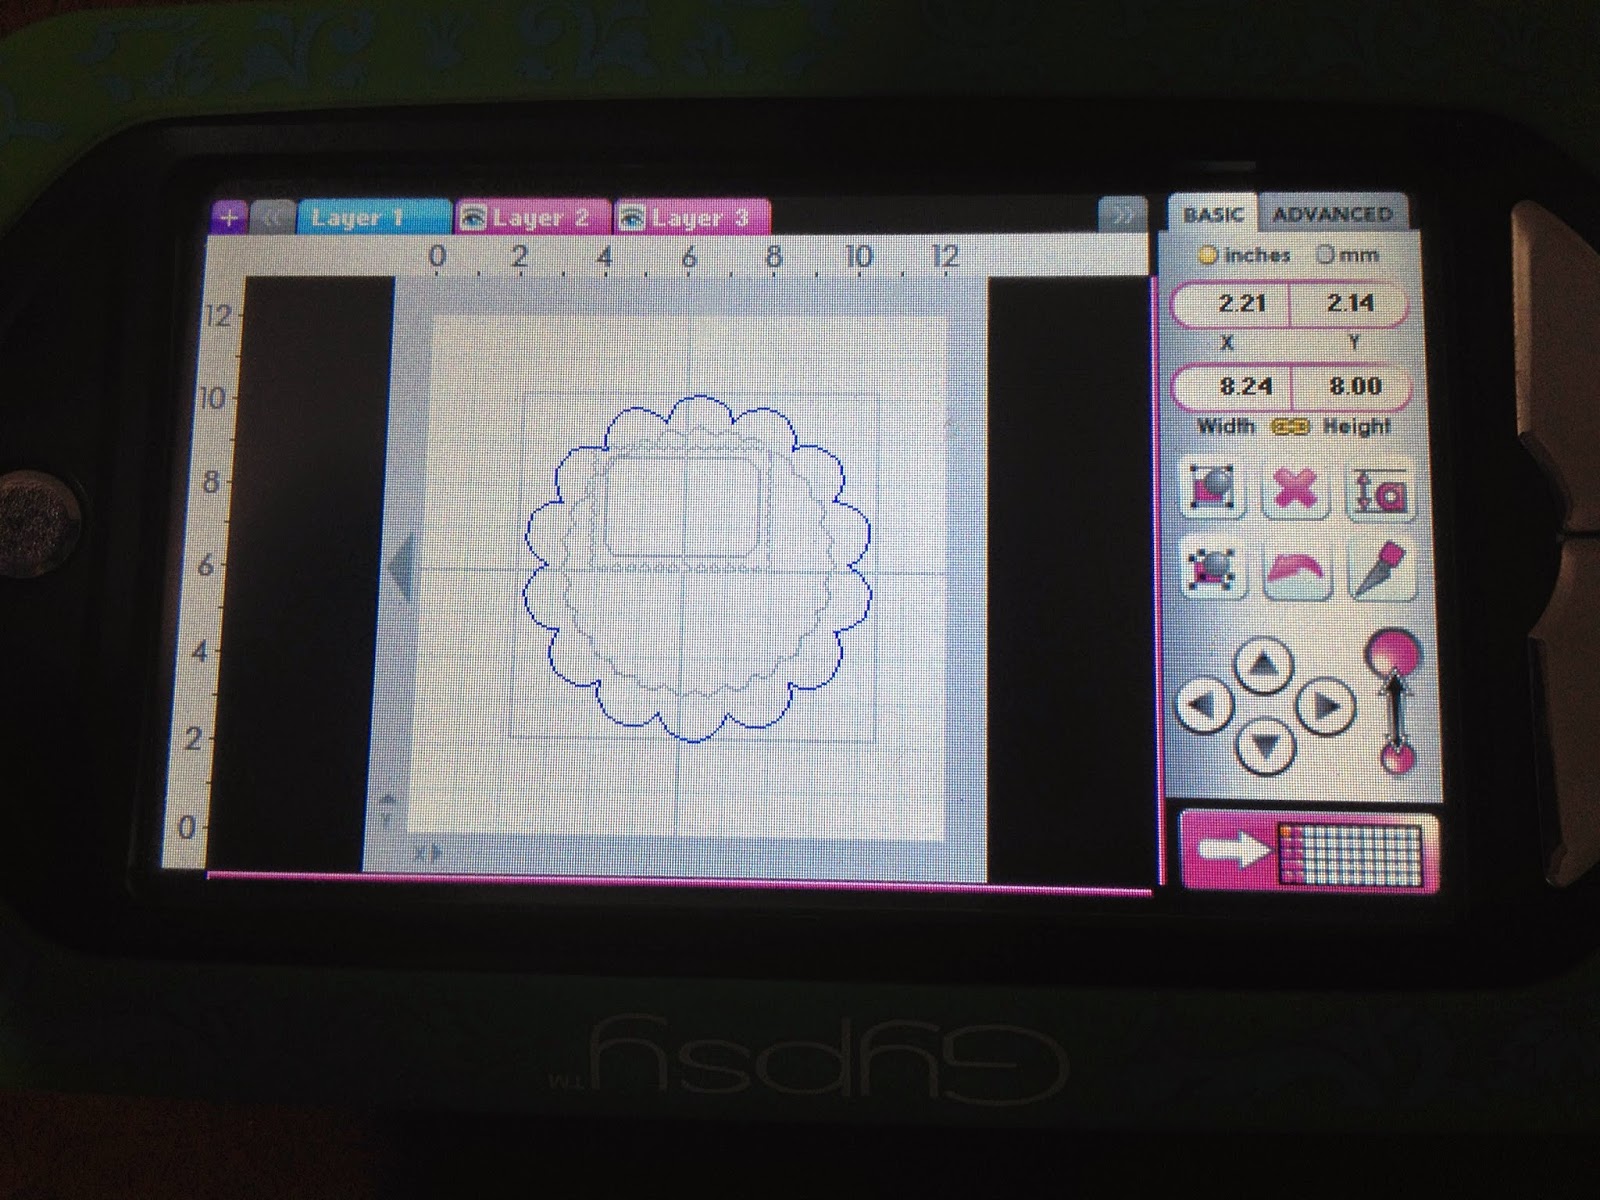
I used my Gypsy and two of my favorite Cricut cartridges from Close To My Heart.  The scallop circles were cut from Art Philosophy and the frame was cut from Artbooking.


I had just one sheet of the K&Company Neopolitan Chocolate Dots paper and my Cricut did not cut it perfectly.  I am one to use what I have and make it work for my layout so I inked up the edges and placed on my embossed Bazzil card stock. 


The smaller scallop was cut from  Graphic 45 Once Upon A Springtime Collection Fairy Folk and it cut perfectly as its a little thicker card stock.  I inked it with a Color Box Chalk ink pad as well.


I framed our first ultra sound picture of Baby Bean with a frame from the Artbooking Cricut Collection. The photo is backed with a scrap of celery card stock.


I have these two heart stamps in my supplies. They are from Hero Arts and A Muse Artstamp. I stamped them on more coordinating card stock scraps using a dark chocolate ink and fussy cut them.
 
 
A friend of mine blessed me with this stamp and its un-mounted so I am not at all sure who made it, but its cute and I though it was fitting for this layout.
 
 
I found this chatterbox ribbon in my supplies and think it adds a feminine touch to the layout.
 
 
For my title I went to my Silhouette Studio and cut my title out using AR CHRISTY font on my computer.  I cut it from a piece of Baja Blue card stock from Stampin Up!
 
 
My title was added using some dimensional adhesive and I added a few metal baby accessories to the layout from my supplies. 
 
 
Thanks for coming by today! I already have a new ultrasound picture, so I'll be back with another baby themed layout next month. I'll try to squeeze a photo in of the parents to be on that one too!
 
Blessing and His Peace,
 
Donna Lee


December 19, 2013

One More Christmas Card! Featuring Joys Of The Season

Hello Crafty Friends! Welcome to She's A Sassy Lady! 

I am Donna Lee from Stampin N Scrapin With Donna Lee. Thank you Sheila for inviting me to share here today!

Today I want to share just one more Christmas card that is easy to make using the Joys Of The Season Cricut cartridge.  I've cut the Rocking Horse card on the page below at 5.37 inches using my Gypsy.

 I set the width of my card to 8.5 inches and the Gypsy set the height for me. Cricut Craft Room will do the same.


Using my Gypsy, I was able to size my rocking horse to fit perfectly over the cut out on the front on my card. My rocking horse and it's layers are all cut at 1.75 inches. I cut the blackout, shadow, and the layers.  On the layers I used the hide contour feature to hide different pieces so that I could cut the tail and mane in a different color. Below is a picture of all my layers.


I use a Scor Pal to score my card base.


I used a piece of DCWV glitter card stock behind the window. This gets covered up on the inside of the card.


Now it's time to adhere the layers of the rocking horse. For these small pieces I prefer to use my glue pen or Tombow Liquid Mono Adhesive.


The brown shadow has dimensional adhesive on it to pop it up just a little bit. I used Stampin Dimensionsals from Stampin Up as it's the perfect height.


His saddle, bridle, mane,tail and the accent piece are next. They are cut from DCWV card stock. I was able to use my scraps for all of this card, except for the card base. 


For my sentiment I went to Close To My Heart Artbooking Cricut Collection. It's cut at 4.25 inches. I did not use real dial size. It's cut using scraps of Recollections Foil paper from Michaels.


A good glue pen is best way to adhere this.


Thank you for stopping by She's A Sassy Lady today! I wish you all a very blessed and Merry Christmas and a safe, healthy, and prosperous New Year.


Blessings and Peace,
Donna Lee

October 16, 2013

12X12 Baby Girl Layout - FeaturingArtbooking Cricut Collection


Hello Crafty Friends, Donna Lee here from http://stampinnscrapinwithdonnalee.wordpress.com. Thank you Sheila for allowing me to share here at She's A Sassy Lady.

Today I want to share a 12x12 scrapbook layout that my friend Olivia and I put together using the Close To My Heart Artbooking Cricut Collection.

The coordinating page for this layout is on a prior post on my Wordpress blog. http://stampinnscrapinwithdonnalee.wordpress.com/2013/09/29/sweet-baby-12x12-layout-featuring-artbooking-cricut-collection/

We used the star overlay from the Artbooking Cricut Collection cut at 11" and then cut it using our paper trimmer to just use one of the panels.


Next we used the same key with the Icon feature and used my Gypsy or CCR to size the star to fit as a layer on top of our overlay. We cut it from some pink glitter paper. it really looks great in person. You can see that we popped them up using some dimensional tape and added the perfect bling from Olivia's stash to highlight one of the stars.


We added a few more embellishments and made a layered photo mat to hold a 5X7 photo. All of the other embellishments are from different manufactures as these layouts are for a baby shower activity for Olivia's niece. The participants at the shower will be given a kit to assemble two 12X12 layouts. They can arrange the layouts anyway they want to. 


appreciate your stopping by today and hope you'll come back to see what else we are Stampin and Scrapin up in my Studio at:http://stampinnscrapinwithdonnalee.wordpress.com


Scrapbooking and card making have never been easier than now with the new Close To My Heart Artbooking Cricut Collection.  If you want to know more about this Collection and others plead visit my webiste at: http://donnafaglie.ctmh.com/ctmh/products/cricut-collections.aspx


Thanks for stopping by today. Have a great and crafty day!

Donna Lee 


September 18, 2013

Travel Mini Album - Artbooking Cricut Collection

Happy Thursday! This is Donna Lee from http://stampinnscrapinwithdonnalee.wordpress.com/ and I am so thankful for Sheila to allow me to share a little part of a new Travel Mini Album that I'm making as a gift with all of you.

If you are new to my blog and this project you can view Part 1 at http://youtu.be/he8ReaLFr1Q

Part 2 is available at http://youtu.be/Z4hwvqJ3xvw

Part 3 is available at http://youtu.be/W_XMELB5n-s

The link to the Part 4 video is at http://youtu.be/u5L4tSLppZc.

The link to Part 5 is http://youtu.be/2vGM0MAleR8.

Today I am sharing Part 6 of the Travel Mini Album that I am making as a gift using the Artbooking Cricut Collection from Close To My Heart. This album is on page 38 and 39 of the Artbooking Manual. You can see that the manual suggest a minimum size of 8". I wanted it to be larger so I cut at 10" and I love the size!


Both of the layouts I am assembling today are tag layouts.


These are very simple but elegant! There is a video of these two tag layouts at http://youtu.be/LDf2WOskem4 . In the video I say this is part 5, but it's Part 6! It was early...

Again, thank you Sheila for allowing me to share today! I hope you'll stop by my Stampin N Scrapin Studio at http://stampinnscrapinwithdonnalee.wordpress.com/ to check out what we are Stampin and Scrapin. 

Have a blessed and creative day!

Donna Lee

September 3, 2013

Artbooking Cartridge Organizes My Card Stash


I am so excited to share this with you today as I have an organized card stash!!! You see I am somewhat of an organized nut and it was driving me crazy to have to go through a box of cards every time I needed one. As I was looking through my Artbooking booklet I noticed this cute little file folder and new exactly what I was going to do with it.


Don't you just love how easy this was? And I used some paper from My Minds Eye from a stack a couple of years ago and easy peasy I have organized cards! Now all I have to do is the other box of cards I have downstairs. I laugh but often times I am getting ready to leave to go somewhere and think I should bring a card and I am able to get that without running upstairs so it works to have 2 stashes! Besides with these card parties it really keeps my supply up.


This is what it looks like. You could type or label the tabs but I just wrote on them and that works for me.


I hope you enjoyed my little post today and you too take just a few minutes to organize your card stash, you will be so happy you did.
Thanks for joining me today and for your sweet-sweet words of encouragement. Your comments inspire me to continue sharing with you.

August 23, 2013

Artbooking Makes Altering A Composition Book Easy And Fun!


I had so much fun using my new Artbooking cartridge to alter this notebook. Join me as I take you step by step through this process so you too can have a wonderful new journal to use. Don't you just love these yummy papers? They are from DCWV the wonderful Lemon Flowers stack. I love how nice and bright they are and would love to get another stack but I haven't found it yet.


This is how the front of the book looks with the pearls and flower attached. Isn't it beautiful?


You can see how easy it is to make the pages with CCR. Remember I just turned the real dial size on and then adjusted both sides height and width to get the actual size I needed.


To make the pocket I used terrifically tacky tape or red tape as it is also known so that it would hold the sides and bottom securely.


This is how the two pages looked folded down before I adhered the colored paper to it to form the pocket.


In this photo you can see how I folded the 2 pages to adhere the round divider and it look great when it was done.


Notice I put plenty of zip dry on it.


Then I covered the whole surface to hold the opposite side.


It was simple on the full sized dividers as you could just glue the dividers onto the 2 glued pages. Note I did glue the two pages together before I adhered the divider.


Look how nice this looks.

As you can see it really brought beauty to this book.


Don't you just love this paper? I am going shopping for some flowers and pearls I really think it will add something to the cover.


Here is the glitter divider and I LOVE LOVE LOVE this page.


Here is a close up of the inside cover of the book, notice the wonderful pockets to hold extra goodies. I originally estimated that I spent $25 to $30 but it came in less. I spent $1 on the book, $7 on paper, $7 on glue, $5 on pearls and $2 on the flower for a total of $22. Still a little steep for a composition book, but I am worth it! LOL


Close up of the divider.


Close up of the cover embellishments.

 
And another close up of the cover.... I just love how this turned out.... It was for a gift and I decided to keep it!
I hope you enjoyed today's post. I know a lot of people alter their composition books this time of year but I haven't seen anyone use the Artbooking cartridge and I really believe that it helped add a lot of dimension and gave it an elegant look.
Thank you for your sweet sweet words of encouragement. Your comments inspire me to continue share with you. Have a blessed day!


August 17, 2013

Artbooking Pic Folios Make Wonderful Gifts


I am so excited to share this little Artbooking project with you today. Not only was it a challenge to decorate but it was easy and fun to make. You see I am having a little party and wanted each of my guests to have a little gift to take home. Well I decided to print the photos from their last visit and give them to each one of them. But, I didn't want to just hand it to them so I used the little folder in the Artbooking cartridge on page 43.


See what a nice simple cut this was. Well I then checked my scrap room for multiple sheets of the same color and all I had was brown so I used that. So the dilemma was how to make it look pretty! So I played around with my stamps and had fun.


See how easy that was I just set my size to 7 inches and cut all of my pic folios out. Then I cut their names out using Cursive 101. Stamps Of Life to the rescue with just the perfect set of stamps called YouAre2Square. I also used their pigment white ink and that was a first to use that.


I really had fun experimenting while putting this little project together. The cut was simple but decorating took a little playing around. This was my first time using the white pigment ink and I finally caught on toward the end.  My Pic folios had that shabby sheik look to them and I like how they turned out.


As you can see they finally came together and I really like them and know the ladies will too.

 
Thank you for joining me today, I hope you enjoyed my little project and that you have learned along with me. The important thing to me is to make my guest feel special and I think these little gifts will do the trick, don't you.
Thank you for your sweet sweet words of encouragement. Your comments inspire me to continue sharing with you! Have a blessed day.