September 30, 2013


"Sentiment Secured"
Howdy - Adrienne, guest designer from Eagle Canyon Arts and tickled pink to be here today.  Thanks so much to Sheila for inviting me to participate!  It is so much fun to be on the Sassy Lady design team.

This card is one of five created from a Close To My Heart "Workshops On The Go" (WOTG) Bonus Project for Clementine.  My sister's birthday is in September and this card is just perfect for her.  Since the papers and stamps for Clementine are no longer offered, I suggest using Huntington paper (X7174B), In The Moment (C1565) and One Way Border (C1561) stamps or any of the appropriate stamps and papers in your stash. 

Close To My Heart supplies needed: 

Wishes Book (9041) pattern p. 78 
WOTG for Clementine (not available - substitute current product)
Colonial White Card 5 1/2 x 4 1/4 (X1410) (link is to the 50 card value pack) 
Colonial White Cardstock (1388)
Sparkles Brown and Tan Assortment (Z1753
Burlap Ribbon (Z1760
Inks - Creme Brulee (Z2167), Saddle (Z2171), Sorbet (Z2164), Topiary (Z2155
Sanding Kit (Z1294
Sponge Daubers (Z726
3-D Foam Tape (Z1151
Art Philosophy Cartridge (Z1686)
Artiste Cartridge (Z1790
Liquid Glass (Z679)
Acrylic Stamps and Blocks

Non-CTMH supplies needed: 

ATG Tape Runner Embossing Machine (Big Kick) and Folders ("Flowers") 
Cricut machine (plus Gypsy, if desired) 
Adhesives of choice 

Using the base card, cut the pieces as described in the Wishes book pattern:
Pattern dimensions
Note:  An additional 1"x 3"  cut piece is needed for this card that is not listed in the book.  It is the distressed blue piece under the burlap ribbon below the piece with the flowers, above the piece with the sentiment statement.  Clear as mud, right? 

Sponge all edges of card and pieces with saddle ink:
Distress the bottom (3") edge of the 1" x 3" piece (no picture).
If you have the sanding kit, use a tool from that to sand the sorbet colored piece (3" x 4") to obtain a distressed look over the entire surface of the piece.  A regular emery board will also work.

Stamp largest piece with straight border on all four sides:
In my stamp set this required using the edge of the stamp
The "look" desired is of a straight stitch on all four sides of the piece.  The next step I did was to emboss this piece as an extra bit of "fancy", because I knew my sister would love it!
If you look closely, you can see the "stitch" border stamp.

Stamp the medium flower in creme brulee on colonial white cardstock and cut it out.  I used my Cricut Artiste cartridge (Accent 1<s> R3, C6) to cut shapes approximating the flowers at 1" high for this card.  I still had to trim it for a final size.

Stamp the bitty flower in saddle ink on piece B.
Cut the zip strip of sentiments from the 12x12 paper and find the one that says "You're So Fun" - this will be used on the card front.  Sponge edges to give it a finished look.
Alternatively, you may decide on a stamped sentiment for the front of your card.

Assemble the card, attaching the medium flower using 3-D foam tape on piece B.  Also add a flower decoration from the WOTG package.
Assembling the card components


Trim two 2-3/4" strips from serged edges of burlap ribbon and secure them to the small distressed piece with liquid glass.
I've said it before - I really like liquid glass when securing "wiggly" or otherwise difficult materials such as ribbon, buttons or fabric to paper.  It holds securely and is reliable when mailing items.
The right side of the card didn't quite line up, so I sponged it with saddle ink to camouflage the opening.
 When closed, the card now has a nicer finished look.

Attach all pieces to the card and finish assembly by adding some brown and tan sparkles.
The bottom of this card looked a little plain to me, so I spiced it up by randomly adding as many of those itty-bitty (now I know what to use them for!) sparkles as I could fit on the bottom of the card next to the sentiment.
 The inside of the card uses "Hello Tweety" (B1420), 
a cute little stamp set, as well as the birthday greeting that comes with the Art Philosophy cartridge stamp set. Here is the inside of the card:
Thanks for joining me on this project.  If you have any questions, send me a note.  Many blessings for a bountiful autumn.  Adrienne

September 28, 2013

Join Us For Our September Card Party - 24 Cards Made!


Well here we are in my dining room with the kitchen and the snacks in the background.... Yummy. This is my friend Anita and I, join us as we show you all the cards we made today, with a special visit from Amy and MayMay Made It.


Here is my lovely daughter Jennifer, she co-hosted the party and this time I could not have done it without her help.... thanks Jen.


Meet Anita's daughter Abby.


And here is Amy.


And Taylor.


Didn't you just love all these cards? It was amazing we just kept going card after card.... snacking now and then and we even had a wonderful dinner.  Our party went from 2 in the afternoon till 8:30 that evening!!! We had so much fun and even set the date for our next party in January!

 
Here is the winning card made by Amy and it was gorgeous.... she really deserved to win with this awesome card. Now please watch Amy's wonderful video of the party (and be sure to subscribe to her YouTube channel for awesome ideas).


Now wasn't that great? It will give you a great idea of how our party goes. We have a lot of talking, joking, sharing and creating going on, and we learn so much from each other it is amazing.
 
Well I hope you enjoyed today's post and we inspired you to create and share with your friends. You will love it. Thanks for your sweet sweet words of encouragement. Your comments inspire me to keep sharing with you.

September 27, 2013

Vinyled Tile

Hello Crafty Friends!!!!
Sherri here from Sherri's Crafty Place and I have a great project for you today, a tile, a ceramic tile with some vinyl on it to be displayed on a plate holder, A friends mom just turned 65 and She loves her doggie so much, and I had no idea what to get her and this idea popped in my head, I have seen so many of these done and thought I would give it a try,
here is the final product.
starting with a picture of the dog
 My son helping me with the photo editing, In Adobe Photo Shop, we created an image I could cut out
I imported my image to MTC and added his name
 here it is all weeded, that didn't take as long as I thought it would, plus weeding is my favourite part...lol
I picked up a tile at my local hardware store, it is a 12 x 12
 using transfer tape I applied it to a clean tile,
She actually cried, she loved it, and so do I, I can't wait to make another one,
Thank you so much for stopping by today, I hope you enjoyed my prject...
Happy Crafting
❀Sherri❀

September 26, 2013

Double Heat Embossing


Hello friends! Leah from Paper Blossoms here and I wanted to share a tutorial I did showing how to double heat emboss. I also have this tutorial up over at Inspired By Stamping, so if you'd like to give it a try you can link up over there and maybe win some goodies :) 
clip_image012
clip_image002
First gather all your supplies. You will need:
*Stamp sets of choice, solid images work best for this technqiue.
I’m going to be using Happy Fall and Background Basics Lines
*Versa Mark Ink
*Two colors of embossing powder, contrasting colors are best
*Heat Gun
clip_image004
I’m going to be layering two of the line designs, each embossed in a different color. I find starting with your boldest image first and layering your finer one on top works best. To stamp the lines across my whole panel I stamp in Versamark and then cover it in embossing powder so I can clearly see where to stamp my next line. Above shows two stamped and embossing powder covered lines before they are heated. Continue until the entire panel is covered.
clip_image006
After you cover your panel heat to emboss. I hold my paper with tweezers as it can get pretty hot to hold. Allow to cool and now we are ready for the double embossing step.
clip_image008
Simply stamp your second layer in Versamark ink right on top of your embossed image, sprinkle with powder and continue until the panel is filled.
clip_image010
After heat embossing for the second time you will get a lovely layered look and can now make a card or project! When embossing an entire panel as I did the cardstock will warp some, but after it is cooled just gently bend it into shape and use a bit more adhesive to keep it laying flat.
clip_image012
I hope you enjoyed today’s tutorial! Have a blessed day!

September 25, 2013

A Few Fall Cards

Hey everyone!
Candy here from Candy's Craft Corner!
Since Fall is in full swing here in Alberta I just want to share some cards I have previously made with you.
Don't you just love the colors of fall!
Enjoy!


Thanks so much for having me today Sheila!
Take care,
Candy

September 24, 2013

Mixed media

Hi all,

 I've got a couple of different things to share with you today.

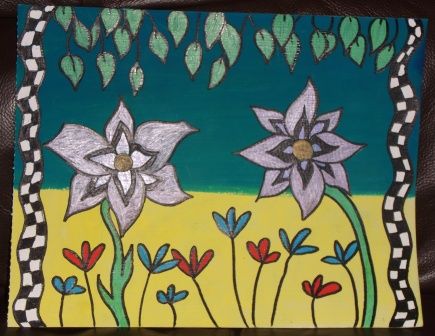
Firstly I've decided to have ago at mixed media. So I'm going to share with you my very first picture.
I used a cheap watercolour paper pad.
I watercoloured it in yellow and went over half in blue. I then doodled. I drew the flowers, leaves and borders.
I used my galaxy markers which were great.
I hope you like it.


I'm not too keen on the flower on the left, but not bad for a first go.
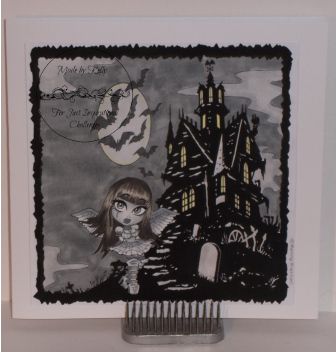
I also have a card I've made using a scene and character from Kenny K


I used the neutrals, warm and cool copic greys to colour this in.

I hope you like both my creations today.
Thanks Sheila for having me 
Hugs

September 23, 2013

A Washi Card

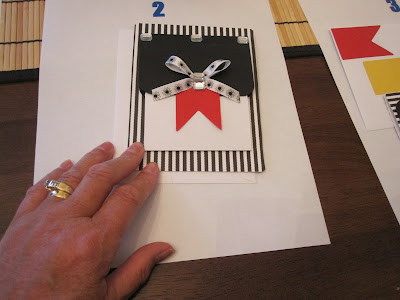
Hi Friends! Sandy, here from Scrapbook Blessings Club, joining up with She's A Sassy Lady today to bring you a new-to-me card technique...Washi Tape.  I used it once on a card challenge and that was only using two strips, lol.  This time I decided I wanted to try the criss cross patch work design using Washi Tape.

So here it goes....
  • First, I placed the tape over the front of my first layer, criss crossing. I didn't do the bottom because I was going to cover it with a pattern paper.


  •  Next, trim the base layer by cutting off all the extra tape.  Below are my card base and layers. I did add black when I put the card together. Black is my new "pop" of color.


  •  Here is the card with the mats and base adhered together


  •  Quick Tip: when I am using my markers, I will stamp two images. One is to "test" the colors to see what will match with my papers and in this case, to see which circle punch would fit this image. The second is the image I will put in on my project.


  •  Finally, I attach my sentiment using popdots/tape.


  • And that's it... my first attempt at Washi!  Now, I am looking forward to my next one!
Thanks for sharing and have a blessed day, Sandy
 ♥ Scrapbook Blessings Club DT ♥
♥ Sandy's Paper FunTime ♥

September 21, 2013

It's About To Get Wild Around Here


Good morning, here is an adorable little card made with Crocs Rule and the Close To My Heart Artiste cartridge that is great for a new baby card or even a friendship card. And it is so simple to make using the CCR or your Gypsy. Grab a cup of coffee and follow along.


Now wasn't that easy?  And you only need two cartridges for a fun little shape card.


Easy to make cards two up using just 1 12x12 sheet of paper for the base and scraps for the balance of the card.

 
Here is a close up of the little croc coming out of his egg. Notice I did ink the edges.
 
 
Finally a close up of our card. Thank you for stopping by today, I sure hope you enjoyed today's post.  Thank you for your sweet sweet words of encouragement. Your comments inspire me to continue sharing with you. Have a blessed week.