Showing posts with label scrapbook. Show all posts

June 19, 2014

Fall 12X12 Scrapbook Layout

Hello!

Donna Lee here from StampinNScrapinWithDonnaLee. Hope you all are having a very blessed and thankful Thursday.

Today I wanted to share a very simple Fall  scrapbook layout I recently made for my Grand Daughters scrapbook. She was 7 months in this photo.


Using scraps that I had of burlap (love it) and some gorgeous fall ribbon I was able to quickly put this page together.


I had these silk white flowers that I sprayed using some homemade ink sprays. Using a lot of Glue Dots I adhered them to my page and each other. I love this little metal clock. Again more Glue Dots to keep on the page.


I found these little flowers in my stash of embellishments! Oh I love this ribbon!


A little $1 bling from an Expo shopping trip a few years ago added some bling! My sweet girl loves her bling!


No title yet... But I am enjoying looking at it as I ponder this final step. Always open to ideas so feel free to share with your comment. 


Thanks for coming by! Hope to see you again next month! Have a terrific Thursday and hoping you get some craft time!  

Blessings To All!
Donna Lee

May 17, 2014

Eight Weeks - Our First Glimpse Of Grand Baby #3!

Hello Fellow Crafters!

Sorry this post is a little late getting posted! Thanks Sheila for letting me share on your blog today.

We have some exciting news to share. Our youngest son and his girl friend are expecting our 3rd grand child in early December!  Proverb 17:6 says that Grandchildren are the crown of the aged, and the glory of children is their fathers. We are blessed with two already and are looking forward to spoiling yet another one!

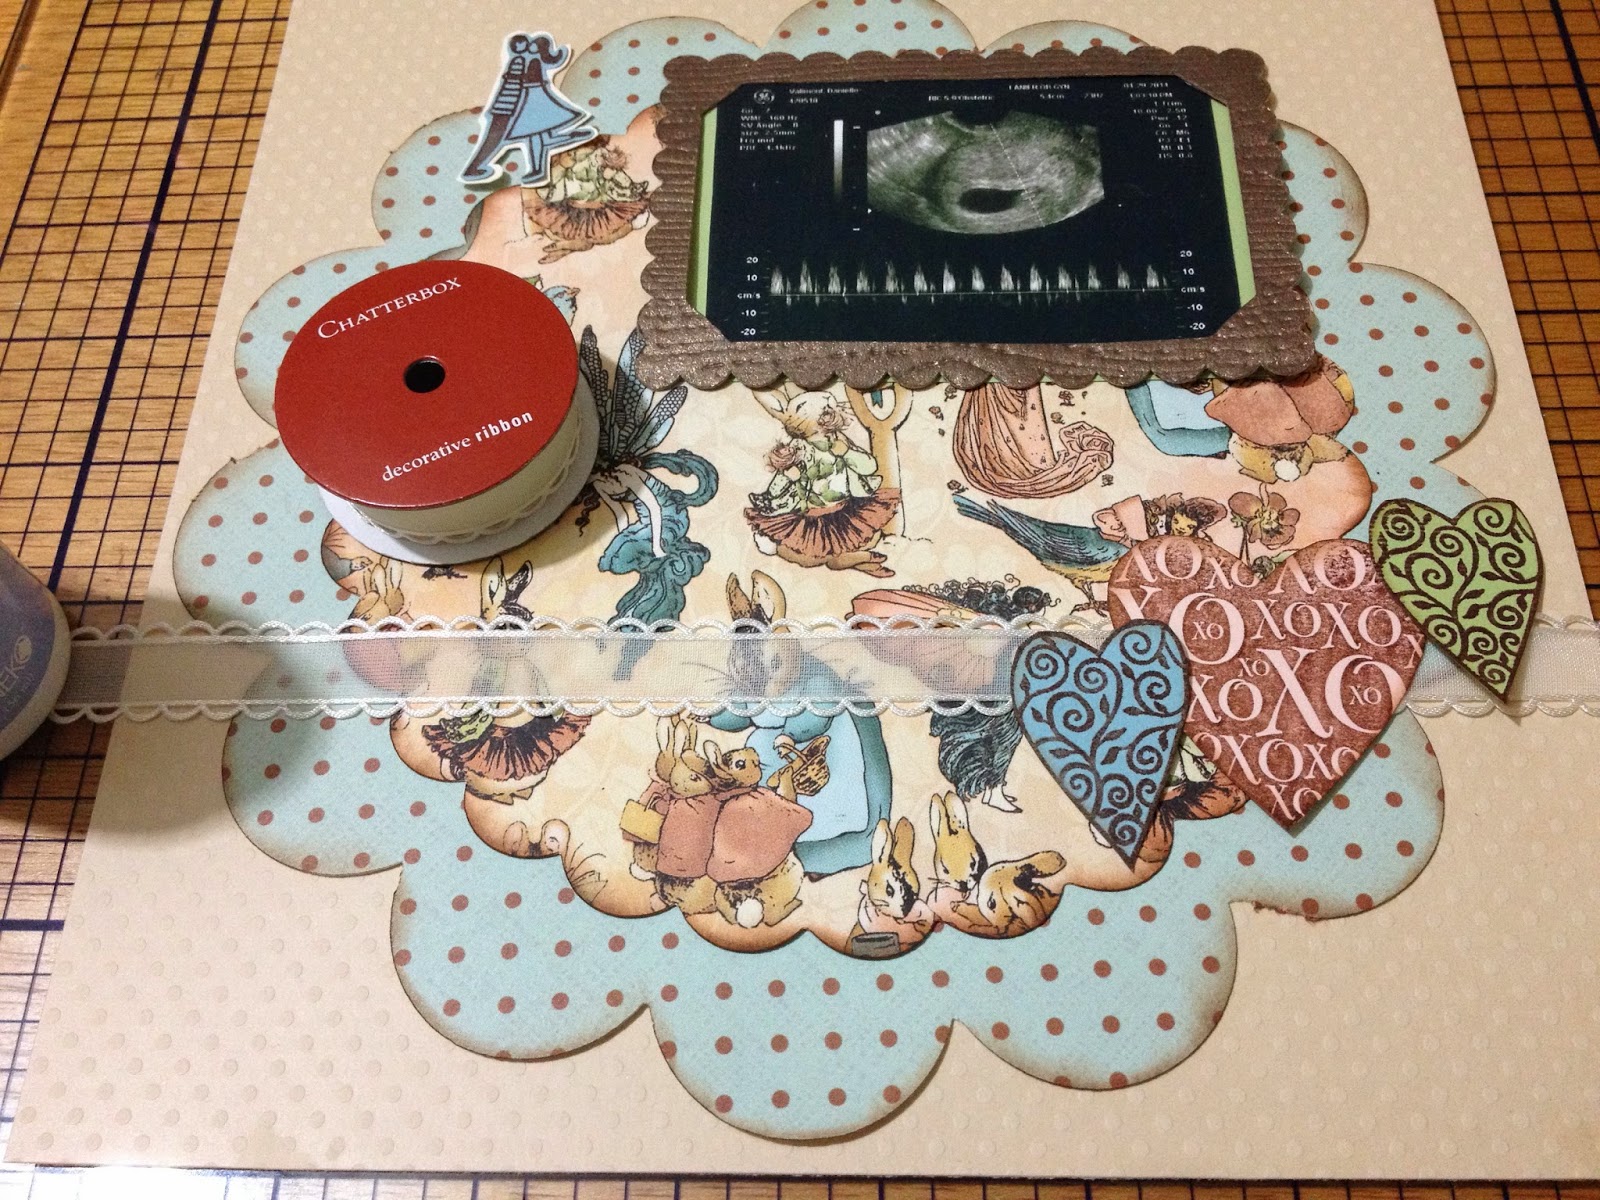
Today's post is for our little 'Baby Bean' first page in its scrapbook.  Naturally we don't know the sex of it at this time so I went with some Graphic 45 Once Upon A Springtime Collection and a few scraps from my scrap stack that I've yet to file away.


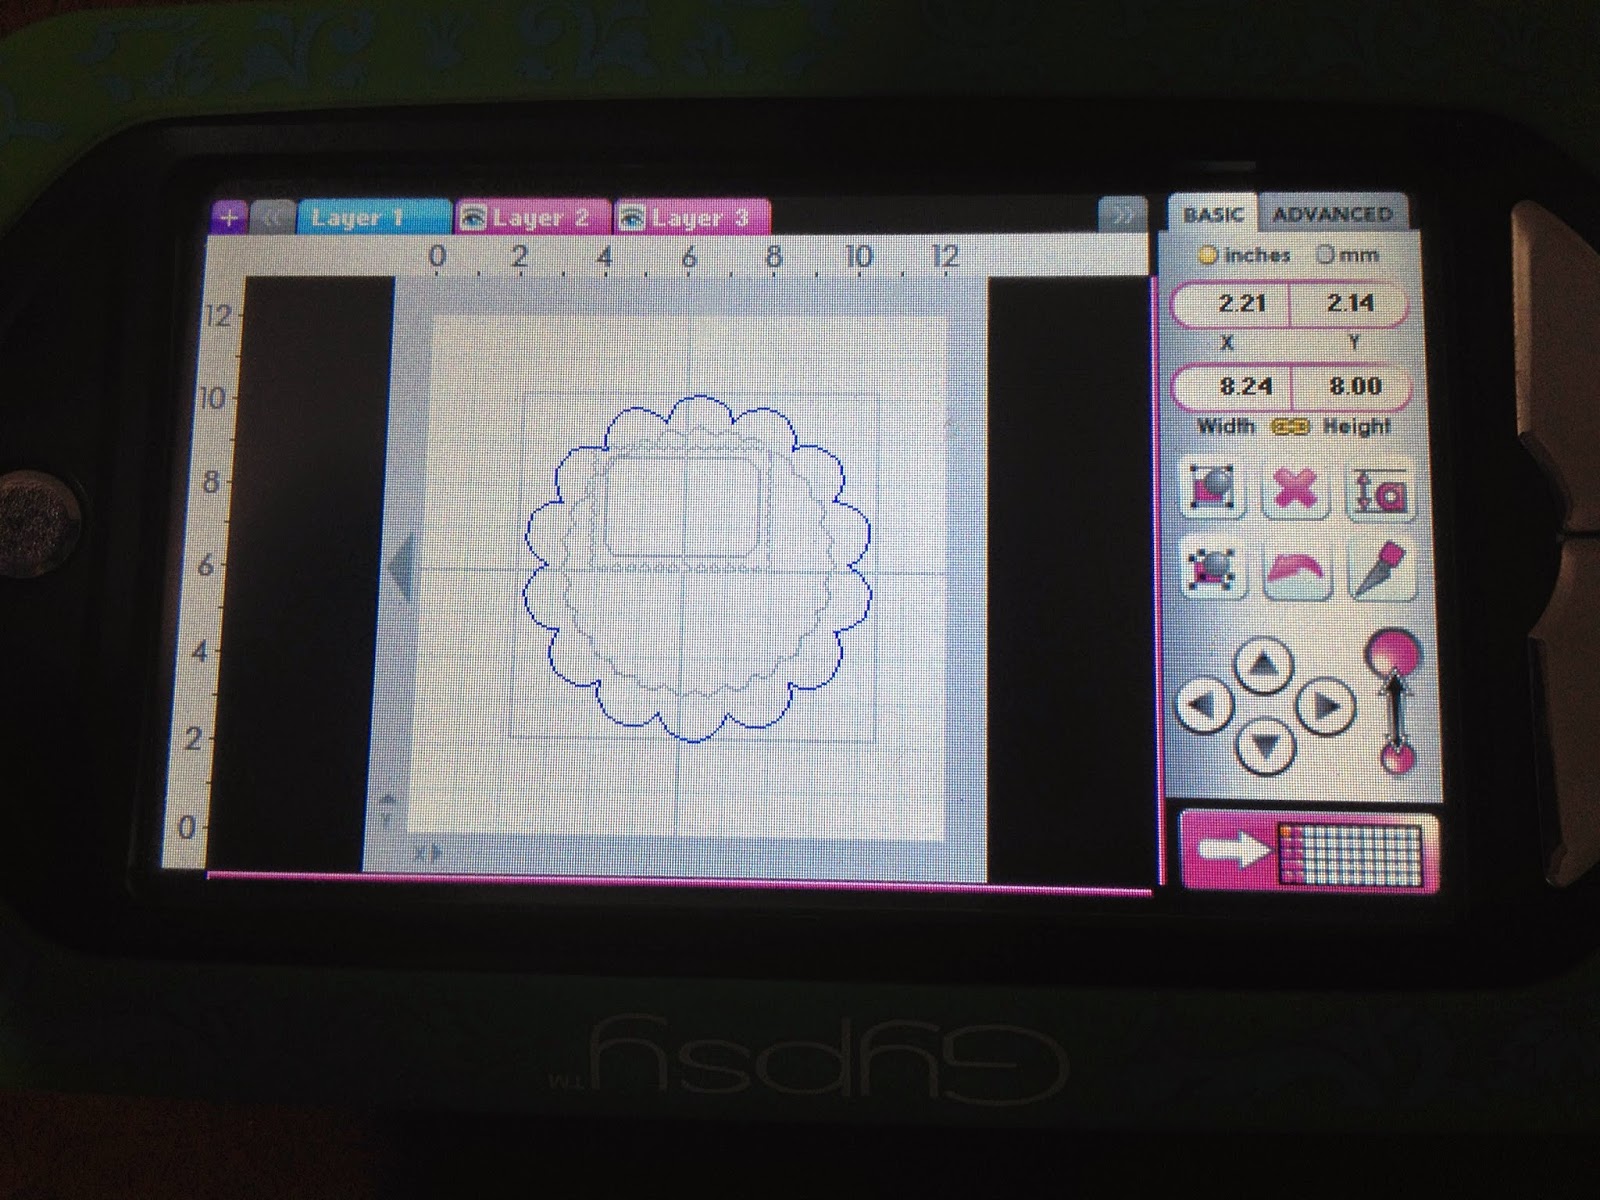
I used my Gypsy and two of my favorite Cricut cartridges from Close To My Heart.  The scallop circles were cut from Art Philosophy and the frame was cut from Artbooking.


I had just one sheet of the K&Company Neopolitan Chocolate Dots paper and my Cricut did not cut it perfectly.  I am one to use what I have and make it work for my layout so I inked up the edges and placed on my embossed Bazzil card stock. 


The smaller scallop was cut from  Graphic 45 Once Upon A Springtime Collection Fairy Folk and it cut perfectly as its a little thicker card stock.  I inked it with a Color Box Chalk ink pad as well.


I framed our first ultra sound picture of Baby Bean with a frame from the Artbooking Cricut Collection. The photo is backed with a scrap of celery card stock.


I have these two heart stamps in my supplies. They are from Hero Arts and A Muse Artstamp. I stamped them on more coordinating card stock scraps using a dark chocolate ink and fussy cut them.
 
 
A friend of mine blessed me with this stamp and its un-mounted so I am not at all sure who made it, but its cute and I though it was fitting for this layout.
 
 
I found this chatterbox ribbon in my supplies and think it adds a feminine touch to the layout.
 
 
For my title I went to my Silhouette Studio and cut my title out using AR CHRISTY font on my computer.  I cut it from a piece of Baja Blue card stock from Stampin Up!
 
 
My title was added using some dimensional adhesive and I added a few metal baby accessories to the layout from my supplies. 
 
 
Thanks for coming by today! I already have a new ultrasound picture, so I'll be back with another baby themed layout next month. I'll try to squeeze a photo in of the parents to be on that one too!
 
Blessing and His Peace,
 
Donna Lee


April 17, 2014

Bumblebee - 12X12 Scrapbook Layout With Altered Flowers Using Gelato's

Hi Fellow Crafters!

It's been a very busy and eventful 2014 so far so I am pretty far behind in my Scrapbooking.  I want to thank Sheila for having me here on her blog. Today I am sharing a 12X12 layout of our grand daughter on this past Halloween.  She is the most adorable Bumblebee ever.  I love this age and her sweet innocence and a wee bit of attitude sometimes.  She make us smile, laugh, and keeps us on the move when she and her big brother are here at our house.


Don't sweat layouts, this 12X12 page is super simple and ever so easy to make using Close To My Hearts Artbooking and Art Philosophy cartridges.  My font came from my PC and I used my Silhouette to weld and cut it.

I started out with this adorable photo I captured Halloween night at our church festival.  I printed it out as a 5X7 and matted it on some black card stock.  I added this little heart (bling) that I picked up at a scrapbook convention last summer.

I cut my honeycomb overlay to use as my backdrop on the bright yellow card stock from the Artbooking Cricut cartridge at 11 inches from some basic black cardstock.  I adore this Artbooking cartridge simply for the overlays! It has a wealth of other items on it too, so be sure to check it out if you do not own it yet.


These great little flowers were cut from Close To My Heart Art Phlosophy Cricut cartridge at 1.5 inches from a glossy textured card stock. They are so easy to alter and add bling to using Faber Castell Gelato's. I do love these gelato's because they are easy to travel with and you can use a water pen.  Michael's sells these by the way and I was able to use my coupon.


I added a little Gelato in yellow to the outside edges of my flowers and then barely wet my paint brush and moved the watercolor paint around the edge of each petal.


I inked the edges of each petal using my favorite chalk ink. A little liquid glue in the center and then add your bling.  I am using some glass glitter from Stampin Up that I've had a few years, so I am not sure its still available. So easy to make and so CUTE! I adhered them to my layout with several glue dots after allowing them to dry overnight.


I wanted to pick up on the orange color of the title and its also in my grandsons Optimus Prime costume so I made two more flowers using yellow and orange gelato's and on one of them I added the white gelato to make it a little more distressed. I like how they both turned out.


These two flowers need some bling too, so I went looking for some micro beads in my closet and added them using the same glue and allowing them to dry overnight. I love being able to use up some of my stash.


I printed this photo of my son and his sweet family from Halloween night. It's rare that I get them all together and have my camera ready so I was happy, happy, happy to get this picture!

I added my thoughts around the edge of my overlay using a fine tip black marker and this layout was complete! With the right tools, a little basic paper, and some inexpensive bling you can have your pictures scrapped for future generations to enjoy for a very long time.


Thanks for coming by today and have a great Easter and time with your family and friends! Don't forget the camera and some extra batteries too!  See you next month!

Blessings,
Donna Lee

October 16, 2013

12X12 Baby Girl Layout - FeaturingArtbooking Cricut Collection


Hello Crafty Friends, Donna Lee here from http://stampinnscrapinwithdonnalee.wordpress.com. Thank you Sheila for allowing me to share here at She's A Sassy Lady.

Today I want to share a 12x12 scrapbook layout that my friend Olivia and I put together using the Close To My Heart Artbooking Cricut Collection.

The coordinating page for this layout is on a prior post on my Wordpress blog. http://stampinnscrapinwithdonnalee.wordpress.com/2013/09/29/sweet-baby-12x12-layout-featuring-artbooking-cricut-collection/

We used the star overlay from the Artbooking Cricut Collection cut at 11" and then cut it using our paper trimmer to just use one of the panels.


Next we used the same key with the Icon feature and used my Gypsy or CCR to size the star to fit as a layer on top of our overlay. We cut it from some pink glitter paper. it really looks great in person. You can see that we popped them up using some dimensional tape and added the perfect bling from Olivia's stash to highlight one of the stars.


We added a few more embellishments and made a layered photo mat to hold a 5X7 photo. All of the other embellishments are from different manufactures as these layouts are for a baby shower activity for Olivia's niece. The participants at the shower will be given a kit to assemble two 12X12 layouts. They can arrange the layouts anyway they want to. 


appreciate your stopping by today and hope you'll come back to see what else we are Stampin and Scrapin up in my Studio at:http://stampinnscrapinwithdonnalee.wordpress.com


Scrapbooking and card making have never been easier than now with the new Close To My Heart Artbooking Cricut Collection.  If you want to know more about this Collection and others plead visit my webiste at: http://donnafaglie.ctmh.com/ctmh/products/cricut-collections.aspx


Thanks for stopping by today. Have a great and crafty day!

Donna Lee 



July 21, 2013

Artiste Mini Scrapbook Layout Featuring Artbooking Cricut Cartridge

Hi, this is Donna Lee from http://stampinnscrapinwithdonnalee.wordpress.com/.  Not long ago I received the new Artbooking Cricut Collection from Close To My Heart and I was oh so happy to get to play with it!  I have a Mini Album that I made using the Artiste Cricut Collection that need to add some embellishments to. You can see that album on this post,http://stampinnscrapinwithdonnalee.wordpress.com/2013/06/08/mini-album-2-artiste-cricut-cartridge/ .
One of my favorite cuts on the Artbooking cartridge is this branch (border) and adorable owl (Icon).

I was not able to use my Gypsy or CCR because the Artbooking Cricut cartridge has not been added to the updates. I started with cutting the Icon images at 4.25 inches to get an idea as to how they would size because they are set to cut based on the size of the entire layout they are attached to.  That being said, you can use the Real Dial Size key to get them to the exact height you want but I wanted to see what they would cut like at different sizes. I also cut two at 6.75 inches. The eyes and feet cut, but I chose not to use them.


Just like the Close To My Heart Art Philosophy and Artiste cartridges the Artbooking cartridge cuts with great detail at very small sizes! You are going to love this Cricut Collection! 


I needed a title for my Mini Scrapbook layout and thought this "look whoos here" would be perfect. This is cut a 6.75 inches. I am using a vellum from Hobby Lobby. My blade is always at 6 for any paper, my speed is at Medium and speed is set at a High. 

As you can see, it cut perfectly! 

I added some bling for her eyes and inked the edges of my branch and leaves. I used dimensional adhesive to pop the 4.25 inch branch and owl onto my mini layout.


A simple 3X3 mat was added for a photo and this page is done! The Artbooking Cricut Collection makes scrap booking or card making a breeze no matter what size you are working on! The images on this cartridge are very versatile for all paper crafters. 

You can learn more about this Artbooking Cricut Collection http://stampinnscrapinwithdonnalee.wordpress.com/2013/07/15/artbooking-cricut-collection-details/. Thanks for stopping by today and be sure to subscribe to my blog at http://stampinnscrapinwithdonnalee.wordpress.com/ for more creative paper crafting projects. Have a blessed and crafty day!

July 17, 2013

Simply Stampin N Scrapin ~ Two Easy Layouts

Hello! This is Donna Lee from <a href="http://stampinnscrapinwithdonnalee.wordpress.com/">StampinnscrapinWithDonnaLee</a> and I am thrilled to be here to share two simple scrapbook layouts with you!


The first layout is 8.5x11 and was made using what was on my Scrapin Island. I used a Stampin wheel for my borders. Simply roll the Stampin wheel in your ink and roll onto your card stock. 


Next I found a Nestabilities DieCut and a scrap of pink card stock to use behind my photo.


I adore my Cuttlebug and have gotten my $ worth out of it. In my opinion it's one of best deals for a die cut machine out on the market still today. You can see it cuts perfectly.


I found a 6X6 paper stack at Hobby Lobby called Madeline that adore! I found this sheet and ripped the edge off, then inked and distressed the edges. I added the die cut after applying some chalk ink to the edges and then adhered everything together, including my photo.


Embellishments took some digging under piles of papers but alas I did find these flowers from Stampin Up that would work with my colors.

I had this ribbon left on my Scrapin Island that did not get used for a different project. I think it's made by May Arts. I love the color and texture it adds to this layout! I found a little box from Michaels/Recollections that had some clear bling left in it to use.  A scrap of light blue card stock is my journaling spot to document this page. I do not feel that each page needs a story journaled. Simple captions and the year is perfect for most of my single photo layouts. If there is a story to tell I will often type it out in a word processing program and then print it on the back of my layout before I get started adhering everything. 

So I had another photo that I wanted to scrapbook for my grand daughters album and decided to use this same layout but on a larger scale. This time I decided to use my Cricut Expression, Gypsy, and Close To My Heart Artiste Cricut cartridge.

I cut one of the flowers on page 57 at .75 inches tall out of several small pieces of double sided paper. Its a great way to use up scraps of your favorite papers and keep them in a handy place for future use!

This cartridge cuts at such small sizes with great detail. I adore it and can't wait to get my hands on the new Art Booking Cricut Bundle from Close To My Heart that will be available to order on August 1st! More details about that later!

Here are three of the 5 flowers I cut and rolled. I added some leaves using a Two Way Bird Punch and some pearls for extra little elegance! I adore these flowers and they are SO easy to cut, assemble and put on your cards or scrapbook layouts using a glue dot or liquid adhesive.

Here are two more flowers from the Artiste cartridge. You can see that one of these is rolled more loose so that I could add the bling to the inside of it. Super easy to make your own flowers and add some pearls or bling to dress it up. 

Again I used the two way bird punch for my leaves and added some chalk to them.

I used my Nestabilities die cut and Cuttlebug again, the same ribbon, and more scraps from my Scrapin Island to wrap up a page for my grand daughters scrapbook.

The paper is from the same Madeline Paper Stack from Hobby Lobby and I used the same Stampin Wheel as in the first layout. Being that these 2 layouts will be in two different scrapbooks it did not bother me to repeat the same layout design. I was done with both pages in 90 minutes, which is pretty quick for me!

Thanks for stopping by and I hope you have a blessed and crafty day!

Donna Lee