August 31, 2013

Have A Dog Gone Good Day!


Good day! I hope you are having a wonderful day today. I am so excited that I finally had a little time to play in the scrap room and get a little work done.  I prepared this little card to share with you today using my Close To My Heart Art Philosophy Cart and the little Bow Wow stamp set. I stamped the little doggie image on some scrap paper and then did a little fussy cutting. To finish him up I just colored in his collar and little tongue. Isn't he just too cute?


Here is what the complete card looks like. As you can see it has plenty of detail with the extra stamping I did and the little bit of embossing on the background paper.


Now wasn't that just as easy as can be? I love to try new techniques, and this one was a new one for me. And I love the shape of the card too. The Art Philosophy cart make it so easy to make a card. I just love it.


Here is  another close up of the little doggie as you can see I popped it up with foam tape.


Well I sure hope you liked today's little card. I enjoyed my time with you. Thank you for your sweet sweet words of encouragement. Your comments inspire me to continue sharing with you. Have a blessed day and see.

August 29, 2013

Fall Note Cards Featuring Artbooking Cricut Collection

Hi, this Donna Lee from StampinNScrapinWithDonnaLee.wordpress.com http://stampinnscrapinwithdonnalee.wordpress.com/. Thank you Sheila at She's A Sassy Lady for allowing me to share two fall cards that were very easy to make!

It's so much fun to create two quick cards using the Artbooking Cricut Collection from Close To My Heart. I am not done playing with this jewel of a cartridge, so many cuts and so little time!

I started with the Overlay feature on page 72 and set the size to 4".  I cut 2 of these so I could make a Thanksgiving card and a general greeting card. 

I used some thick card stock from DCWV. My Expression was set at Max speed, Max Pressure, and the blade set at 6.  You can use Cricut Craft Room or just use the cartridge in your Cricut. 

They cut perfectly and are ready to put on our card fronts!

Next I choose two different titles from this fabulous cartridge.  I choose the Hello title that is on page 51 and its cut at .75" using Real Dial Size.

The next  greeting is from page 72 and is cut at 1" using Real Dial Size. 

These were cut using some Craft Core card stock from Tim Holtz. Look how perfectly they turned out.

For the base of my cards I again used some printed heavy cards stock from DCWV.  I cut one card at 4"X8" and the other at 4.25"X8.5". When I make more of these I will use the 4.25"X8.5" size. 


I used Tombow Mono Multi Adhesive liquid glue to adhere the overlays and my sentiments to the front of my cards. Above is the 4"X8" card base. I ended up having to trim 1/16" off the height and the width to make this work. So if you want to have a 4X4 card cut your overlay at 3.75". 


Above is the 4.25"X4.25" finished card size. I like the small border all the around the overlay. There is so much more to do with this overlay and the extra tree image that can be cut! I kept the card very basic and will decorate the insides using layers of this gorgeous paper and a little stamping once I know who I am going to give it to.

Thanks for stopping by My Stampin N Scrapin Studio today. I hope you are inspired to get creative this holiday weekend! Fall is right around the corner so take a little crafting time to create a few Fall cards for those that you might not see over Thanksgiving.

Enjoy a safe and happy Labor Day with friends and family.  Hope you get some additional craft time in! 

August 28, 2013

Teddy Bear Invasion 101

Hi Friends!  Sandy from Scrapbook Blessings here to show you another card tutorial for She's a Sassy Lady.  I have been on a teddy bear kick lately and was inspired (link is below) to make every bear on the Teddy Bear Parade cart from Cricut. So I wanted to show you my little tips in making a lot of diecuts for future projects in a short time.

Here is my Inspiration Bear...


So let the teddy bear assembly line begin!!!!

  • You need a bear (cut at 3"), glue pen, black scrap card stock, pink and tan color pencils, white gel pen, black sharpie


  •  Using the sharpie marker, fill in the nose, draw the mouth and the ear creases all following the cut lines on the die cut


  •  Flip the bear over and adhere a piece of the black card stock over the eye holes (tip: no one is going to see the back so you don't need to waste paper and cut another place bear in black unless you want a shadow, just use scrap pieces. I do this ALL the time)


  • Using the color pencils to color in the ears and muzzle (tip: if you are doing a lot of die cuts that have little pieces, try to find another medium to create the details ie: pencils, markers, stickles, etc). I think the color pencils give the bears a softer, "fuzzy" feel


  •  Using a distress marker or fine tip marker, draw the muzzle line that you see on cuddly little creatures. and the while ink gel pen to for the eyes and nose. I think it gives the bears a little dimension (tip: the BEST for details is pigment ink white pen by Singo. I have tried others and they just leave me frustrated)


 There you go a ton of little bears for my parade.  This is a great idea for mass quantities for any die cuts.

Now all I have to do is put my little guys and girls into a baggie and as I want to make a card, just pull one out and decorate. (Tip: save your die cuts, even the "mistakes" like the wrong size or color, etc. Put them in a baggie and toss them in your embellishment/sticker draw. When you want to do a quick card, pull one out and there you have instant die cut without getting your machine out)

Here is my little example bear made into a card. He is the New Year Bear.

This guy was made by my little girl. She was watching mama make these and I just couldn't be stingy, lol. So I gave her one to decorate. Using my scrap pieces, she designed his outfit.

Here are a couple of other cards that I have recently posted on my blog for My Crafting Channel Teddy Bear Series.


Hope you have a blessed day and thanks for stopping by,
 

Lunch Notes at She's a Sassy Lady

Hey everyone!
Candy here from Candy`s Craft Corner!
 It's my turn to share here at the fabulous She's a Sassy Lady blog today. Thanks so much Sheila for having me!
Since my kids will be starting school next Tuesday. I thought I would make some lunch notes for my 8 year old to put in his lunch box. I got the stamps and die from Jaded Blossom. So super easy to make. I am sure they will put a little smile on his face. 
The little note cards are about 2 1/2 x 2 1/2.

I hope you enjoyed my little project today!
Take care,
Candy

August 27, 2013

Sepia

Hi all,

Today I thought I'd share with you a card I've made using images from Delicious Doodles.
 I combined two images together, butterfly frame and Thorne. 
I used the copic colours E 40, 41, 42, 43, 44.

Here's my card


I hope you like it.
Thanks Sheila for having me today.

Hugs

August 26, 2013


Howdy - Adrienne, guest designer from Eagle Canyon Arts and tickled pink to be here today.  Thanks so much to Sheila for inviting me to participate!  It is so much fun to be on the Sassy Lady design team.

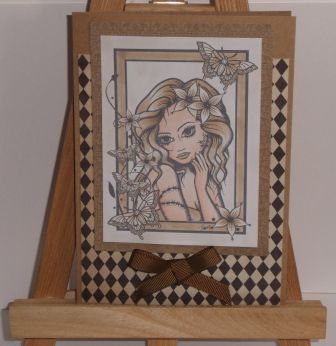
It is never easy to see friends move away, even when we know it is for the best.  The French always say, "Au Revoir", which means, "Until we meet again", a very hopeful outlook.  Here is a card made for such a time.

This project uses several Close To My Heart products including the exclusive CTMH Cricut Art Philosophy cartridge. 

Close To My Heart Supplies Needed:

Papers  - "Stella" (no longer available) and small scraps
Inks - Ruby Z2170  Cocoa Z2114  Lagoon Z2195
Embellishments - "Stella" workshop lace and button (no longer available)
Stamp Set - "Bonjour Occasions" B1414 (retired)
Art Philosophy Cartridge (Z1686)
Colonial White Card 5 1/2 x 4 1/4 (X1410) (link is to the 50 card value pack)
Liquid Glass (as adhesive) (Z679)

Non-CTMH Supplies:

Embossing Machine (Big Kick) and Folders ("Botanics")
Cricut machine (plus Gypsy, if desired)
Adhesives of choice

To make the card: Choose your embossing materials, cut your main paper at 1/4" less than the size of your card and emboss that paper for the front of your card.

Sizzix "Botanics" Embossing Folder
Paper in folder ready to emboss
Embossing detail - pretty flowers!
Using your Gypsy (or inputting directly into your Cricut machine if you prefer), find the designs on the CTMH Cricut Art Philosophy cartridge needed for this project.   

Heart - p. 26  Layer <s> setting (row 1, col. 5).  Cut one each at 1", 1.5" and 2.25"   
Scallop - p. 55 <Rctngle7>** (row 5, col. 4).  cut one at 1.5"

**(note - on the Gypsy, to me, this means NONE of the buttons are pushed on the left hand side where you pick icons or fonts and "shift" - clear as mud, right?  It would be the same thing on the Cricut keypad.)

Designs laid out on Gypsy
Papers loaded and ready to cut
Brush edges of card and embossed paper with ink
Attach main paper to base card

Brush edges of hearts with ink
Here's the pretty embossed paper on the card
Brush edges of scallop with ruby ink, stamp sentiment with cocoa ink, add embellishments and secure with liquid glass.  Note - Liquid Glass is wonderful for adding a 3-dimensional look to paper, details, or stamped images, making them sparkle and shine.  It is also terrific as used here - securing embellishments absolutely.  They WILL NOT fall off your card!

Completed card
Thanks for  joining me this time.  If you have any questions, feel free to send me a note.  Have a wonderful week and a safe Labor Day holiday.

August 23, 2013

Artbooking Makes Altering A Composition Book Easy And Fun!


I had so much fun using my new Artbooking cartridge to alter this notebook. Join me as I take you step by step through this process so you too can have a wonderful new journal to use. Don't you just love these yummy papers? They are from DCWV the wonderful Lemon Flowers stack. I love how nice and bright they are and would love to get another stack but I haven't found it yet.


This is how the front of the book looks with the pearls and flower attached. Isn't it beautiful?


You can see how easy it is to make the pages with CCR. Remember I just turned the real dial size on and then adjusted both sides height and width to get the actual size I needed.


To make the pocket I used terrifically tacky tape or red tape as it is also known so that it would hold the sides and bottom securely.


This is how the two pages looked folded down before I adhered the colored paper to it to form the pocket.


In this photo you can see how I folded the 2 pages to adhere the round divider and it look great when it was done.


Notice I put plenty of zip dry on it.


Then I covered the whole surface to hold the opposite side.


It was simple on the full sized dividers as you could just glue the dividers onto the 2 glued pages. Note I did glue the two pages together before I adhered the divider.


Look how nice this looks.

As you can see it really brought beauty to this book.


Don't you just love this paper? I am going shopping for some flowers and pearls I really think it will add something to the cover.


Here is the glitter divider and I LOVE LOVE LOVE this page.


Here is a close up of the inside cover of the book, notice the wonderful pockets to hold extra goodies. I originally estimated that I spent $25 to $30 but it came in less. I spent $1 on the book, $7 on paper, $7 on glue, $5 on pearls and $2 on the flower for a total of $22. Still a little steep for a composition book, but I am worth it! LOL


Close up of the divider.


Close up of the cover embellishments.

 
And another close up of the cover.... I just love how this turned out.... It was for a gift and I decided to keep it!
I hope you enjoyed today's post. I know a lot of people alter their composition books this time of year but I haven't seen anyone use the Artbooking cartridge and I really believe that it helped add a lot of dimension and gave it an elegant look.
Thank you for your sweet sweet words of encouragement. Your comments inspire me to continue share with you. Have a blessed day!