Sassy Dude here again. If you want to check out some more from us, just pop on over to
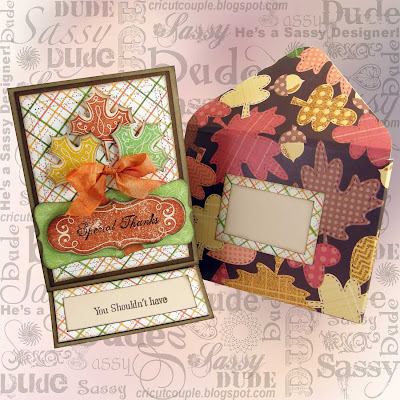
Cricut Couple! We love all of our wonderful visitors! I called this project "The Total Package" because I have been getting a lot of requests lately for an explanation of how I make my envelopes and envelo-boxes. This is great fun for me because I am going to share with you my second favorite tool! Here is the project for this month!
So... my absolute second favorite tool is by far, the Ultimate Crafter's Companion (further mentioned in this post as "UCC"). I got mine a LONG time ago on HSN. For what I am showing today, you can also use the Crafter's Companion Enveloper as well. It's the exact same thing as this one side, but with the Ultimate Crafter's Companion, you can do so much more. It comes with tools, scoring boards, card maker, embossing templates, cutting blade, mini-bow maker and more. This one costs around $40.00 and the Enveloper costs around $15.00. The best part about it is that it comes with a DVD with instructions for making tons and tons of cool stuff! OK... was that good enough for the commercial? Hee! Hee!

The UCC comes with a complete instruction book with directions and measurements of everything you need. The card that I made is the basic 1/4 card size, so I needed to make an envelope to fit. The cool part about the UCC is you can make an Envelobox. Since the card I made is an easel card that is pretty thick, a standard envelope will not work. Since I have a 1/4 card, I need to figure out what paper I need and where to score.
This is the A2 section.... So for a quarter card, I have to start with a "Square" piece of card stock that is cut 8 1/4" x 8 1/4". To score on the board, I have to use score lines D & F.
So, using a straight cutter, I lined it up at 8 1/4" and cut it down to the square size that I needed.
This is what the board looks like on the Envelope side. Note: If you have the Enveloper, this is all that you would have anyway. It's just this single section of the board. You can see in the picture below where I highlighted lines D & F. To start, I have to score this corner at line D.
So below is where I scored the line D. BTW, the tool comes with a folder and scoring tool.
Now, since I am making an envelobox, I have to have that little extra edge for the thickness of the card. That's what is so cool about this tool. On the right side of the picture below, you will see that there is a second groove in the corner. SImply slide over the card stock into this second groove and score line D again. It's that simple.
In the next picture, you will see that you repeat the same thing with line F on the next corner. You can see the original score lines at the bottom of the picture. One thing to remember is that you score D across from D and then F across from F.
The most important thing to making envelopes is that the score lines cross over each other. If not, you will not get the pocket. The corners would be open. For the enveloboxes (and not standard envelopes) you need to cut out the corners where the score lines cross over. This will allow you to have nice clean corners and make it much easier to fold. You can see below how I cut the corners. I also need to mention that I added a scrap piece of card stock from the card I made to use as a liner for the envelobox as well.
Once you know which end will be the flap on the envelope, I use a rounded corner punch for the tip. Sometimes, if they are for a very fancy card, I will use a Martha Stewart Corner/Border punch combo to make a lacy edge to the closure as well.
Fold everything on the lines and you will see below what you end up with. The bottom flap in this picture is where you add adhesive. You want to add just a line of adhesive from the edge to the tip of this one part.
The best method I have found for this is 1/4" ATG tape, so I just used my ATG gun for this part.
Below is what the card looks like from the other side once corners are cut and the tip has been punched.
Once you have your ATG on, fold in both sides, stick the bottom flap to the sides and then fold in the remaining corner as shown below. I always use my folder tool and press this very good and everything is stuck and done! If I am someone has ordered a card from me, I will use scrapbook adhesive squares that have the tape tabs on them. This way, they can personalize the card and still stick it closed. I have never liked the lick and stick glue, so I don't use it. If I am giving this card, once it's ready to go, I will use ATG on the top flap to close it. If it's very fancy, I sometimes use a two slit punch on the tip of the top flap and the bottom of the opening (where it's folded over) and feed through ribbon. This way, when the envelope is closed, it has a pretty bow.

Once the envelobox is complete, I use scraps from the card papers and make a label to write the recipient's name on it. A lot of times, I will use a rounded corner punch or a Martha set. For this card, I kept it all straight and simple and inked it to match the card.
Now, for the card. This is very easy to do. This is an easel card that I made. I also used the UCC for making the card. For this size, I used an 8 1/2 x 11 piece of craft card stock. I sliced it down the middle-long ways- in order to get the larger piece. This makes it 4 1/4 x 11. The next piece is 4 1/4 x 5 1/2. This is for the front of the card. The card board on the other side of the UCC breaks things down in halves and quarters rather than measurements. I scored on the half US letter and then on the Gate Fold Line for Half US letter. This makes the bends for the card. Then I used ATG to tape together the top with the base. You can see how this card is hinged in the pictures below.

For the front, the base mat (Chocolate) is 5 1/4 x 4. The plaid mat is 5 x 3 3/4. I used CTMH-Art Philosophy for the leaf cuts and the sentiment. I also used the stamp sets. The cuts were made based on the instructions on the stamp set. I used a Thank You set of stamps from Inkadinkado for the sentiments. The bow was made using Marmalade Crinkle Ribbon from My Craft Spot. Everything is inked with a cocoa ink on all edges. On the left (picture above) is the front (cover) of the card. The top right is the inside of the card. The bottom right is what it looks like standing up.
The picture above shows what they look like next to each other showing off the inside lining of the envelobox.
You can see now how such a thick card just fits perfectly inside since that extra edge is put on the envelobox. Well, we sure hope you enjoyed our little tutorial today. I hope the instructions are clear. It's such a difficult thing using the camera and typing it all out. I have NO idea how to use the video camera or I would have tried to make a video for this. Hee! Hee! We would love to hear your comments today. We also wanted to say a big THANK YOU to Sheila for letting us play today!































