February 28, 2013

Altered Strawberry Vase

Hello! Leah here from Paperblossoms with a little project to share with you. I have been preparing for my daughter's birthday in March and decided to do a strawberry garden theme for her party. I made this altered vase for one of the decorations by giving a major face lift to an empty salt container. Let me show you how I did it:)

 When I bought this salt I wasn't thinking of re-using the container, but when I emptied it into the container I keep my salt in, I thought it would be a great thing to alter as it's sturdy and not too big around to cover with pretty paper.
 My first step was to select my cardstock base and what stamps I wanted to use as I wanted to do some random stamping to create my patterned paper. Since the theme is strawberry garden I pulled out a great strawberry set I have from PTI. I also wanted the top to have a decorative border, so I used an edge punch from Martha Stewart to create that edge.
 I got to work filling in the entire paper with the largest of the strawberry images.

This is what it looked like all stamped with no color.
 The great thing about this stamp set it's a multi-step so if you want to add the color by stamping you can or you could color it with Copics or pencils too. I chose to use the stamps to fill in all the images and this is the patterned paper I ended up with.

To finish it I wrapped the paper around the container adhering it with Scor Tape and added some jute twine and a tissue paper flower I made to finish it off. The final touch was adding Stickles glitter to all the berries and flower centers...gives it just the right amount of sparkle for an upcoming 5 year old's birthday party. Thanks so much for visiting, I hope you enjoyed my project!

February 27, 2013

Just A Little Give Away


I have 2 little I Frog-Got! card kits to send out 1 to 2 individuals leaving a comment by midnight February 28th. Just leave a little comment and you could have a little kit sent to you.
Thanks for playing along... be sure to leave a comment.

February 25, 2013

Warning: Rated NC-17!

Hi folks,

Ian, here, from A Newbie Crafter.  Today I did a quick little sign for myself for my upcoming job search conference (more on that to come at my blog).  I wanted to create something that was small enough to travel with and something that I could post in the hotel room.

For this project, I used a small 4.25"x5.5" single side cardstock and drew lines with a gel pen. I used a white gel pen to put a dot in each corner box.  I then took a gold gel pen and drew squiggly lines to give it some flair.  I stamped "screw" on and wrote the other words with my white gel pen.  Although this is not the best word to use...I could have used an even worse one.  :)  I then took some Martha Stewart flowers and put them on the corners to give it a more frilly look to it.  I am planning on taping this to the mirror in my hotel room, or the back of the door so I can see it right before I leave for the day to go to all of the interviews.  The other idea I had was to keep it in my bag so that I could look at it between interviews for a little comic relief.  I was nervous to do this, however, this IS She's a Sassy Lady, so I thought I could get away with it being a little sassy.  :)


I hope I didn't offend anyone!  You were warned in the title of the post.  :)

Craft on,
Ian

February 23, 2013

The Card Party Was A Success! Wish You Could Have Joined Us!

 Look at this awesome Easter card, Abby designed it and how adorable is this.... the little bunny moves up and down and everything.  You have to love the bright colors and all that glitter paper! And look at the bling ... LOVE IT!
Here is my little A2 Friendship card. I just love the paper, it is from Close To My Heart and the wonderful stamp set is from Stamps of Life. I used the plastic from my cartridge wrappers and ran it through the Cuttlebug, and it gives it a sparkly look.


Thought I would stop and show you what I did to set up and organize the party. Don't you love how I have all the packet arranged? It made it so much easier to move along and get all the cards done in a timely fashion.

This great little birthday card is designed by Anita and was so much fun to put together. I love black and pink together, don't you? The inside has the sentiment on a little pink insert.
This little note card was designed by Jennifer. It just glistens and shimmers - I love it. Such a simple design like this makes for an elegant card! Wouldn't you love to have a set like this?

This beautiful little card was designed by Angie. She hand crocheted all the little flowers for each of our cards making it special to each of us! Then the card was embossed to make for such an elegant look.
This masculine birthday card is great for the man in you life. It was designed by Anita and I was thrilled to get it as I need some masculine cards in my stash as I have 1 son, and 2 son-in-laws and am always trying to figure out what to send the. I think I need to make a few more like this.
This is one of my little cards and fortunately I have about 3 of them as I am the worst at getting my cards out in time! Love it!
This card was designed by Jennifer. She actually did this on my Gypsy while we were driving to Florida. Boy was it hard to give instructions without seeing or touching! But Jennifer did a great job designing this and I love the matching envelope don't you?
Here is the flip card that I used for our contest.... We ran into a snag as I had two that didn't cut all the way through so I had to stop the game and exchange out the 2 cards and let those 2 catch up before we proceeded.
This last card was designed by Laura. It is amazing. She did a great job and we all had fun putting it together. Don't you just love the colors in this card?


Don't you just love all thes cards? We had so much fun putting them together and visiting with each other. We all enjoy making cards as a hobby so it really is special to get together every couple of months just to play. I sure hope you enjoyed this.... now please take a minute an let me introduce you to the group.
Here is Laura, and we are so proud of her. She designed this card on her own and put together each packet with out the help of anyone. I want you to know Laura is a new card maker and this was her second party and her first card without help. GREAT JOB LAURA!
Meet my friend Anita and her daughter Abby. Both are Cricut owners and great at crafting. Next month we will party at their house and I can't wait to see what Abby has up her sleeve this time. That Easter card was awesome Abby!
Meet Angie on the left, and my daughter Jennifer on the right. This was Angie's first party and I can tell you she fit right in and I am sure we will see her alot in the future!
Here is Anita and I. We always have such a great timne when we get together... many common interests make for wonderful times together.
Well thank you all for joining us, I sure hope you enjoied todays post I know I was thrillled to share our good time with you. Thank you for your sweet sweet words of encouragement. Your comment inspire me to continue sharing with you. Have a blessed week.

February 22, 2013

Writing On The Wall


Hello Crafty Friends, 
Sherri here from Sherri's Crafty Place and today I would like to share  a project I did for my MIL, she had just painted her bedroom and wanted some writing on the wall above her bed, she had a picture in her room in a frame with some beautiful, romantic saying on them so we used one of them to put on the wall....here is a pic of the finished work.... I am so happy with how it turned out, and She LOVED IT!!!!
So using your a font from my computer and my 12 x 24 mat I started typing...
using a ruler and painters tape we made a level starting line....
and we used a lot of transfer tape
 I found it easier to start at the end and work backwards....
after we place the words she felt it was missing something.... 
we added the 2 hearts, they were an after thought but they fit perfectly where they are, almost like we planned it...hehehe
 here a little close up 
I did use my MTC software, but you could use this with your Gypsy or the CCR
Thank you for stopping by today, 


❀Sherri❀

February 21, 2013

Happy Birthday Sweet Sixteen!

Hi!  Charlotte here today from A Little Bit Of Detail.  I am excited to share with you a birthday ard I have made for my sweet neice, Bailey.  She will be celebrating her sixteenth birthday tomorrow!!  WOW, how time flies.  It is so hare to believe that she is so grown up.  Sometime it seems as if it were just yesterday that I was smocking daygowns for her.

Now on to the card.  I began with the sketch this week at Mojo Monday.


The little bird and bird cage are both cut from the Seranade cartridge.  The number 16 is from the Cake Basics cartridge.  All of tje circles were cut with Spellbinders dies. and inked with brown and gold.  The papers are from My Mind's Eye and K&Co.  The little flowers and gems are Recollections and the pretty ribbon is from JoAnns.  

So glad you dropped by The Sassy Lady today.  Please come back and visit often!

February 20, 2013

Paper Crafting Technology!!

Cricut Mini, Gypsy, and Kindle Fire!
What a great combination of paper crafting technology!
I love to attend paper crafting crops, but I do not enjoy carrying lots of Cricut Cartridges and bulky electronic die cutting machines!   Here is the answer to my traveling problem!
I have downloaded most of the handbooks for Cricut Cartridges that I have onto my Kindle Fire!
I have the handbooks at my fingertips!

Hello, this is Carolyn from
I do not have a project to share today, but I do have some information that I hope you will find helpful!  I plan to give the steps for downloading the Cricut Cartridge Handbooks to the Kindle Fire and provide a website for more information.

To download Cricut Cartridge Handbooks to the Kindle Fire...(using Adobe Reader)
**On the Kindle Fire home page, in the top right corner, click on "Web" and enter cricut.com in the search engine.  Click on cricut.com.
**On the left of the screen at cricut.com  choose the "Cricut Cartridge Library"
**At the top right corner in the search engine, enter the name of the cartridge handbook you wish to download, and press "Go"
**Click on "learn more" under the picture of the cartridge you are wanting to download the handbook
**Under the description of the cartridge, click on " 'Click here' to ready product details"
**This will take you another screen, on the left of the screen, scroll down to "digital handbook" or "digital trifold" (depends on the cartridge handbook you are wanting).
******Tip*****At this point, you should see a statement that will pop up quickly and tell you that the handbook is downloading.  You do not actually see the handbook, it is being downloaded into the Adobe Reader that comes with the Kindle Fire.
**After downloading as many handbooks as you wish, close the program.

**To see the downloaded handbooks in the Adobe Reader, return to the Kindle Fire home page and click on "Apps", click on "Adobe Reader"
**Click on "documents" in the top left corner and all the handbooks will appear in "Recents" downloads.
**The handbooks are saved on your Kindle Fire!  By clicking on "documents", the handbooks will be in alphabetical order and readily accessible for use!

If you prefer a video for downloading the handbooks to Kindle Fire, please visit... Okieladybug's Scrap and More Website

The Cricut Mini is a small, lightweight electronic die cutting machine by Provocraft that cuts using the Cricut Craft Room or Cricut Gypsy.  I prefer using the Gypsy, a handheld electronic tool from Provocraft that allows me to design projects with the Cricut Cartridges. Then cut out the project using the portable Cricut Mini.

The Cricut Mini, mats, blades, cables, Kindle Fire, and Gypsy....
everything fits into one tote bag!
Isn't technology grand!!!

Thank you for visiting "She's a Sassy Lady" Blog today!
You all come back again!
Carolyn


February 19, 2013

Double Embossing Technique

Hi everyone, it's Karon, from Karon's Krafty Korner and it's that time of the month for me to come visit. Thanks for having me come over Shiela.

Today I wanted to share with you a "new to me" technique.  It's called double embossing and there is a fabulous video tutorial on The Cuttlebug Spot.

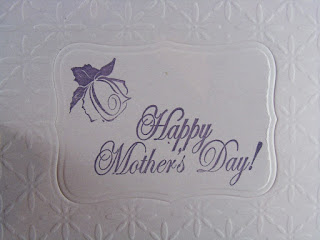
I needed to make a Mother's Day card for my MIL, who lives in the UK.  The UK Mothers Day is earlier than in Canada/USA and is on the 10th March, so I thought I would be organised this year.

It also needed to be postage friendly, but I still wanted to make it look pretty, so when I saw this technique I had to give it a go.

Here is my finished card.


I will try and explain the technique as best I can, however if you click on the link above, for The Cuttlebug Spot, it will take you to the video tutorial.

Firstly, for my chipboard pieces I just used a Quakers Porridge Oats box!  I cut two pieces 5.5" by 4.25" and then ran both of these through my Cuttlebug with a Nestabilities labels 8 die.  You will then have one cut piece and the second is slightly embossed.


You can see the slight embossing on the one piece, this helps you position the die so that you cut in the same place.  So position your die and then run through the single piece to die cut.


You then have two die cut pieces and two windows.


Now stick these pieces together so that you have a double thickness window and double thickness inner.


I first stamped my image on to a piece of card stock.  The stamps are from a See D's stamp set called Springtime Swirls.


For the first pass through the Cuttlebug, I placed the stamped piece inside the embossing folder - this is called Baby's Breath and this folder is placed on the A Plate.  Then I positioned the chipboard window on top of the embossing folder and over the stamped image.  I found doing it like this, I was able to position it better.


Next you place the C Plate on top and then run this sandwich through the Cuttlebug.  When you take your piece of card stock out, you will have a smooth place over the stamped image and just embossing around the edge.


Now to dress this up a bit and to make that centre area pop, you need to do the following.  Take your A plate, then a B plate, then one of the tan embossing mats, then your embossed paper and your Nestabilities die with the groves down to the paper.


Next, use your two spare pieces from the chipboard to place over the die - this will help with the embossing.  


Finally comes your B plate and then pass this through the Cuttlebug.


When you remove your card stock, you will see that it has now embossed the edge of the die around your stamped image.  It will not cut through because of the tan embossing mat.


I then trimmed my piece and inked the edges and placed this on my card.


I added a little ribbon to add a little more detail, but as you can see it is still quite flat - so good for overseas posting.

For the inside I used the same papers and just the little rose for the corners.


I hope you will give this technique a go - it has so many possibilities.

Thanks for stopping by today.

Happy crafting.

February 18, 2013

Double Slider Candy Wrapper


Hi, this is Charlotte C.  I’m so thrilled to be here again on Sheila’s blog.  I want to share what I made for our guests at my daughter’s birthday luncheon.  The original inspiration for these came years ago from Dawn’s Stamping Studio and I’m finally getting around to actually making them. 

Materials:
Hershey chocolate bar
Card stock for wrapper and panel (see my note below)
1” x 13” (approx) strip cut from plastic bag you get from the supermarket
Red line tacky tape
1 ¼” circle punch (I used 1 ½ because that’s what I had)
Embellishments as desired.
NOTE:   8 ½ x 11 will make one wrapper and one panel..  If you use 12 x 12 as I did, you will get two wrappers, two panels, plus some great strips for a later use, with very little waste.

Here’s the how-to as I did it and what I used:
Printed 12 x 12 kraft card stock from Recollections Love Letters scored at 2 7/8, 3, 5 ¾,  5 7/8, 8 ¾,  8 7/8
I then cut the card stock at 9 ¼, then across at 6”  (I did this on white here so it’s easier to see)


Fold all the score lines going the same way toward the inside.

Working from the left section, wrap the plastic strip around it bringing the bottom up over the top piece.  Use a piece of tacky tape to secure it and cut off the extra.  You want this wrap to be snug, but not tight; it has to move.  Slide the wrap more to the right and slide the secured seam toward the bottom.
Add a piece of tacky tape over that seam and stick the Hershey bar on it
Flip open that section and on the back of the plastic strip put a piece of tacky tape near the top.  Adhere a panel cut at a scant 2 ½ x 5 ¼ to that tacky tape
Use half of the circle punch on the right section to cut an opening so you can pull the candy up.  (If you’re going to do any stamping on the cover of the wrapper, do it before the next step).
Fold the wrapper as shown below and use tacky tape to secure the opening on the left. 
When you pull up the candy, part of the panel will slide out the bottom.  This is where you can stamp your greeting or sentiment.
Here’s a few I finished.  I kept the cover very simple – just added a computer-generated label cut from Art Philosophy, then used antique linen distress ink and a script stamp to soften the look.  I also computer-generated the wording on the panel that slides out the bottom before I adhered the panel to the plastic strip.  

Thanks for stopping by today.  Hope you have many sweet celebrations in your life.