Welcome to my fun little site. My name is Sheila, you may know me as Sassy Lady. I am a Chicago transplant to the Birmingham, Alabama area. I like to say I am southern by the grace of God! My blog was started to share with family and friends my love for scrapbooking and of course special moments with those around me. Being an avid scrapper I also dabble in card making as I love to remember people and their special times with a card. Click Here To Read More!
Grab my button for your blog! Copy and paste the text below:
GET $10 OFF DIGITAL SOFTWARE
CLICK PHOTO TO ORDER YOUR SOFTWARE TODAY. YOUR DISCOUNT CODE IS STMMMS32096
Unless otherwise stated within the post, this is my original work or design. You are free to use any of my designs as INSPIRATION for your own personal use. My work is not for use for publication, contest, message board entries or for profit. If my designs inspire you in any way please give credit where credit is due. If you post information about my files to any message board or mail group, please direct users to this blog rather than attaching the file itself. Leave me a comment and by all means post a link to my blog. Thank you!
Good day! It's time for another Gypsy Made Simple project. Today we are featuring shape cards, flowers in particular. So go grab a cup of coffee, turn your Gypsy on and let's get to work. This is really a simple design. This exercise teaches you to weld, size and duplicate the same image to make a beautiful card.
Start out by choosing a cartridge with a flower shape on it that you like. I am using the Art Philosophy cart but you can use what ever you want and there are many to choose from. As soon as you have a cart chosen you are ready to proceed.
Now wasn't that simple? And just think all you used was 1 image! Doesn't that blow your mind when you think of all the carts you have? The possibilities are just endless. Be sure to save your image before you move on. Get it cut out and now we can put it all together.
Easy isn't it when you just break things down into little steps? Oh before I forget, for those of you that have the Art Philosophy cart, click HERE for your free download of the chart of sizes.
Here is a close up of the completed card. I actually did 1 with and 1 without inking the edges to see which I like better. They both looked great. In the card above I use the Stella Paper Packet of paper from Close To My Heart along with the Lagoon Ink Pad and Sponge Daubers.
This is a photo of both of the cards finished, don't they look awesome? I just love the colors and 3D-Foam Tape helped give the cards dimension. The card on the right is the one that I used the Lagoon Ink on, the one on the left is plain, so see either way they look beautiful, just a matter of personal preference.
Here is the inside of the card. It is stamped with one of the sentiments from the Hooray Bouquet Stamp set. Note this set will also stamp the flowers we used to make this card.
This is how the card looks when you stand it up. I love the bright colors and the dimension this card has, don't you? If you have the Art Philosophy Cart and want a cope of this Gypsy File click HERE.
I challenge you this week to make a Flower Shape Card and link it up.You can use any cart that you have as long as a flower is the base and it has many layers of various sizes using the same flower.This week we will have 2 lucky winners chosen by random.org. One will win a wonderful Car Charger for their Gypsy and the other a little stamp set from Close To My Heart. All you need to do is link up your card by 4:00 PM on Friday April 6 to qualify. The winner will be announced on Saturday morning.
Thank you for joining us today, I sure hope you are growing in you Gypsy skills and enjoying designing. I look forward to seeing these link ups each week as they are so encouraging to see all your talent and to learn from you! Thank your for your sweet sweet words of encouragement. Your comments inspire me to continue sharing with you! Have a blessed week.
I just have to share this adorable card with you. It was made by Melissa at Melissa Made and I so want to be able to color like Melissa someday! I took her beginner class and am currently working on my final! Now when I finish and get up the courage I will share it with you I promise! But please know that I could only hope to be half as good!
The class, Created from Color was great. I learned how to use my Copics! After buying them here and there I am thrilled to say that I know how to use them to their fullest potential thanks to the gals at Created From Color. And you can too.
I couldn't wait to learn all of the things the class had to offer. If you are like I used to be you will want to know where to start? Did you know that there only certain types of ink you should stamp with when using Copics and that certain papers work better then others? This class will help me to understand the basic concepts like those mentioned and how to start coloring with Copic markers. Also, our very own Sassy designer, Melissa of Melissa Made will be co-teaching the class with the very talented Kristy Dalman - owner and artist of Some Odd Girl. Check out their work:
Be sure to contact them today as I know they only take a limited amout of students and you don't want to miss your chance to learn in such an easy and affordable manner. I am so excited for all of you that take this class you will love it!
Well, ladies... it is down to the final hours where you can take advantage of the March sign up special at Close To My Heart. I would be remiss if I didn't remind you that you too can take advantage of this supe offer good only through March 31st! I just love the products that I received and can't get over the quality in the Close To My Heart product line up.
How to get it? Sign up to be a consultant with Close to my Heart and get, not only the amazing start up kit, but you get your choice of the Cricut Art Philosophy Collection or $100.00 in free product (if you already have one) for just $99.00 as it is included with the amazing starter kit! To skip the rest and sign up now, just use this
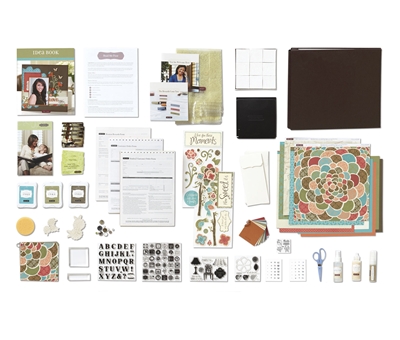
What is the Cricut Art Philosophy Collection? So glad you asked. It is pictured below. You get the Cricut Art Philosophy Cartridge. It is the most versatile cartridge that has ever been created. In addition to the cartridge, you get 3 full sized coordinating stamp sets that include cut sizes on the stamps to get the perfect cut to use with you Close to my Heart Stamp Images. You also get 3 large sheets of chip board shapes that match the cuts on the cartridge. They are ready to perfectly work with your stamps and inks. This is a $124.00 value. CTMH's normal price is $99.99 for this collection. You get yours FREE!!!
So... What do I get in my Kit? What a Sassy Question! Everything is pictured below. You get business goods and tons of the best CTMH products to get started with! The collection included in this is gorgeous and so versatile! You get inks, tons of stamps, acrylic blocks, embellishments, the famous stamp double scrubber, cards, envelopes, paper samples, idea books, cleaners, adhesives, liquid glass, etc. etc. etc... That's a $288.00 value and it's yours for $99.00... plus you get the Art Philosophy Collection FREE!!! That's almost $400.00 worth of amazing stuff for $99.00!!! Not only does the Art Philosophy cartridge include shapes that were created exclusively to go with CTMH stamp sets, but there will be more and more future stamp collections in the future. Basically, this means... you don't need more cartridges, dies or punches to go along with your favorite stamps. You just cut the shapes with your Cricut and stamp away! Now, that's what I call Sassy!
Is there more? Abso-sassy-lutely! Below are some add ons available exclusively when you sign up as a consultant. These each include a workshop on the go, extra inks, extra stamps, extra acrylic blocks, extra embellishments... Both are worth $94.00 to $95.00. You can add them for $40.00 each. These are completely optional, but both include amazing stamp sets that you are going to want because they coordinate with your new Art Philosophy Cartridge Too!!! When you complete your order form, you will have the option to add these to your starter kit. If you add both, you are looking at over $600.00 worth of amazing stuff for $179.00! Wow!!! Again, this is optional.
One last thing that is also available as an add on is a 3 month Studio J Membership. If you are into digital scrapbooking, this is a great package. It's a $63.00 value for $40.00 exclusively to "New" consultants. Just wanted to make sure you knew of all the extra savings values.
So... What makes this offer so Sassy? There is NO PRESSURE! You can sign up today, enjoy all of these goodies and learn everything you would ever want to know about Close to my Heart. You will not only get these amazing values, but you will also have full online access to the behind the scenes places of Close to my Heart. There is an entire online training academy for every consultant. You can learn everything you need to know about making this a successful business opportunity, you can learn how to use the products, techniques you have never seen before, technology you didn't know existed and access to a full network of consultants who have been doing all of this for years.
You also begin with a 22% discount on all of your purchases. If you sell products, you receive a 22% commission on all of your sales. These increases with continued success with the business side.
How much am I going to have to pay if I don't use this as a business? Answer... NOTHING! There are no hidden fees, no hidden pains, no hidden hardships. If you want to continue with it as a business and maintain your consultant status, you need to have at least $300.00 worth of sales per QUARTER. That's it. Of course, you are encouraged to do more than that, but that's all it takes to keep everything at the status you are beginning with and maintaining your commission/discount.
What happens to me if I don't sell $300.00 in a quarter? You become a Jr. Consultant. The commission is smaller and you don't have as much access to everything online. You will not have any fees or anything like that. However, you are still going to be stuck with seeing us make all kinds of fun stuff and constantly inspire you. If you don't stay a consultant, you will always have a place to be inspired and get all of your favorite products!
How do I keep things going? Well, that's the easy part. Use up your beautiful and amazing products and show them off! Get together with the girls and make some sassy things. You know, everyone is gonna want what you are using and you can provide that for them. As you get stronger with your craft, you get stronger in your business. It's that simple sassy!
How do I keep up to date and know what to try next? Well, that's easy too! You will have the support of the Sassy team, the support of CTMH at every turn with the latest techniques, ideas, products and I will be sharing lots of Sassy things! Our very own Sassy Dude is also creating a new blog that will just be for CTMH. The Sassy Lady will be making an appearance here and there and you will always get lots of great information from it. The new blog will be up very soon! The biggest thing is that as you create and as you develop your skills, you are going to be asked about it. You will be the one everyone wants to learn from. We will teach, you get all the credit! Now, That's Sassy!
I have a blog and lots of friends who would be interested in this too. What do I do to really get a jump start on this offer? Simple answer for that one. When you sign up, you will receive an e-mail while your shipment is being processed. Once that e-mail comes in, you will immediately be able to go online and get into the consultant website. While in the consultant website, you can go right in and set up your own MYCTMH website. Simply click on My CTMH in the training page and set it up. Again, there is a $5.95 per month fee if you want your own website, but as soon as that is setup, you will have a link for others to take advantage of this amazing offer and sign up with you! It's really that easy!!! Besides that, you have the ENTIRE MONTH OF MARCH to advertise this to friends and family and get them started as well! How cool is that?
Have you seen the CTMH Video about it yet? Here it is!
Well, everything is ready for you! Just hop on board. This is going to be such a fun start for everyone and I can't wait to get started and play with all of this new amazing stuff!
Click HERE to take advantage of this Awesome & Sassy Deal and you too can become a Close To My Heart Consultant. I look forward to a long journey with you.
or if you just want to shop Click HERE
Hello! Seems like this is the time of the year where everyone is organizing their scrap rooms and supplies. The biggest hurdle many of us have is what to do with our carts. Well I thought I would show you both the methods I am using and both work wonderful depending on your needs. Most of my carts are in this wonderful container that was purchased at Joann's. Most of the carts have their name on the top and all are in alphabetical order. This 3 row plastic container holds 144 carts..... 48 on each row. I have to buy 3 more carts to fill it up!
Notice how most of them have a little tag on the top saying what they are, yes I am just a little behind buy I was taking advantage of all the sales they had over the holidays and need to make tags for the new ones. Now I don't worry about the books on any of these as the books are on my kindle fire and I can easily refer to that for all the details, but honestly most of the time I just check my Gypsy Woman and the carts wit safely on the shelf.
This is the first method I used but it is a little more expensive.... Cricut.com sells these carrying cases for $29.99 and they hold 12 carts. They are wonderful for keeping your cart and book together as there are many carts that PC still does not have on their site for downloading. They are also great if you are going to a crop and want to take your carts along.... Now I have my Gypsy Woman so they sit on the shelf too.
This is how the inside of the case looks, you can see how convenient is is. I hope these little organizer tips helped you today. I am a Gypsy user though and love that I no longer have to carry them around. I am excited for all you CCR users that now can link your carts as you too feel the freedom of not switching carts and it is wonderful!
If you use a different method to store be sure to share in the comment section of this post as I am sure there are many methods that work and will be helpful for others.
Thank you for your sweet sweet words of inspiration. Your comments inspired me to continue sharing with you.
For our Gypsy Made Simple Window card that posted on 3/17 (thanks for the reminder). I don't know who made this beautiful card so I will post and ask that you email me your name and address so I can send you your stamp set. Thank you for playing along at She's A Sassy Lady.
Collage cards are difficult for me! I have trouble making decisions about what to use and how to layer! So, I use reference magazines and internet websites to get inspiration. However, I have found a fabulous resource for collage cards...with very little layering and embellishments!
I saw this stack in Joann's on Saturday and immediately knew it was a wonderful resource! The pages are designed for scrapbooking, but I could see beautiful cards in the images! I hope you agree!
I also bought this great collection of clear sentiment stamps by Fiskars. The sayings seem to reflect the images in the stack!
This is a page from the stack. I created two cards from this page. I am saving the chandelier!
All the papers are from the stack.
The "layers" are printed on the paper!
"Inspire" is from a sheet of sentiments included in the stack. Twine was added for interest. All cards in this series are 5 inch x 7 inch when folded.
This card was created using another corner of the same paper.
The Tower is cut from a sheet of images (total of 3 sheets) included.
Page of coordinating images!
Crossword puzzle fun...
...helped to create this card for a "Scrabble" addict! :0)
A beautiful page for journaling...
...or another card!
Thank you for visiting today! I hope you have been inspired to create collage cards!
To see additional pages and cards from the DCWV "The Heirloom" stack, please visit my blog
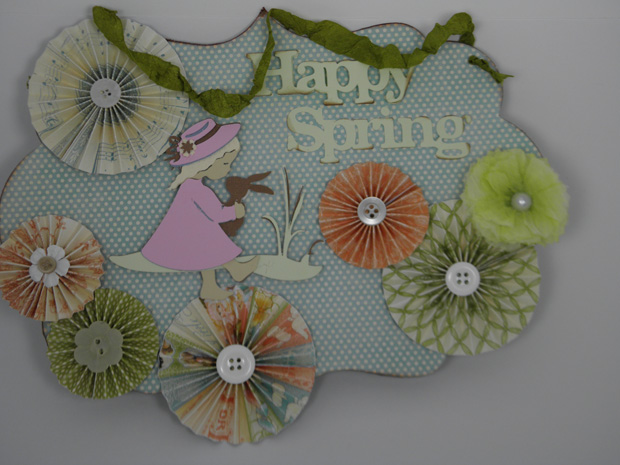
Hi everyone, Beth here from Thunderbirdlindybydesign. Today I wanted to share with you a festive spring sign made with Art Philosophy, Kates Abc's, and MS seasonal Cakes. I also used a new Graphic45 paper stack, called Little Darlings. I love this paper and didn't want to cut into it. I also used my Gypsy, but you don't need one for the project.
I started with Art Philosophy and chose the Oval5 Banner sized to 8.18" on my Gypsy. I cut one out of chipboard and one from patterned cardstock.
I cut several 12x1", or 12x1.5" strips of patterned paper and made rosettes out of them. I glued them in a pleasing pattern on the Oval 5 cut. Leave enough room for the Happy Spring and the girl with bunny. After these were attached, I glued buttons on top.
From Kates Abc's I cut the Girl 4 with all of her layers at 3.68". I glued her offset from the middle of the banner. I cut Happy Spring from MS Seasonal Cake at 2.29".
Here is the finished plaque. I inked the edges slightly on some of the cuts.
Thanks Sheila for having me as a guest designer, Beth.
Hi everyone
~Happy Tuesday To You~
I figured since I am a grand-mom now I should happily flaunt it right? So, I thought I would decorate a license plate frame for the front of my truck.
I used the Cricut Gypsy along with Cricut E2 for this project. The lettering came from the super cute Cricut Nursery Rhymes cart and the hearts are from Accent Essentials.
The first thing I did was measure the plate so I knew how much room I had for my design to fit.
Then I chose my lettering. I used a new layer to add the lettering and the hearts. Once I selected them, I made sure they were centered and looked how I wanted.
For the cutting I used the setting 3, 3, 3. That is a kiss cut for vinyl. If you don't have vinyl you can also use contact paper, it works just as well and a lot cheaper :)
I took it off the mat using the transfer tape and applied to the frame. Once that was finished I headed outside with excitement to attach it the front of my truck.
I think it turned out super cute. Not sure about the Grandma part though. I think I want to be called Nana. The hubby and I are still trying to decide. Hope you give this a try, it is really easy and makes a great gift.
Hugs to all
Stacy
aka ~ lovethatbug
Hey there y'all! Aymee Gandy of 'A Scraphappy Southernbelle' here with you today. I hope all of you are having a grand day so far!
I don't know about you, but have you ever had one of those days when you sit and stare at blank paper in your scrapbooking room? This happened to me a few weeks ago when I created this project. I had been on a big sewing kick, working every single day, scrapbooking from dawn until dusk and all creative mojo was at rock bottom. So I started to dig through my Momenta supplies and kept going back to their flourish stickers. I just love their flourish stickers and all of a sudden an idea that I had seen a while back hit me...to use the flourish stickers as 'sea weed.' I had seen this idea from the talented Erin Morehouse. I have had the privilege to design with Erin on a couple of DT's and she is amazing! Her work always speaks to me. Check out her fish project HERE. I wanted to make sure I gave her proper credit for scraplifting her sea weed idea. Thanks Erin for the inspiration! You rock girlfriend!
This card is in the shape of a fish bowl. The fish bowl is from the 'Create A Critter' Cricut cartridge. I used my Gypsy to weld the 'shadow' fishbowl to create the card. I then added some layers. Last, I added stickers to finish off the card.
Aren't these puffy stickers so cute? I love them! They make me smile!
I bunched up crinkle ribbon from My Craft Spot to create the 'sand' in my fish bowl.
More dimension...
For the inside of the card, I cut the word 'friends' out using the "Life's A Beach" cartridge and I stamped my sentiment using a stamp from My Craft Spot.
I hope you have enjoyed this project! Thanks for visiting us today at the Sassy blog! We hope to see you again soon! Happy Scrappin'!!!
Hello
I want to share with you about a class that I just completed that is once again being offered for beginner Copic users like myself.
The Copic Class - Created from Color - teaches how to use your Copics! Personally I've been buying them here and there and now I know how to use them to their fullest potential thanks to the gals at Created From Color. And you can too.
I couldn't wait to learn all of the things the class had to offer. If you are like I used to be you will want to know where to start? Did you know that there only certain types of ink you should stamp with when using Copics and that certain papers work better then others? This class will help me to understand the basic concepts like those mentioned and how to start coloring with Copic markers. Also, our very own Sassy designer, Melissa of Melissa Made will be co-teaching the class with the very talented Kristy Dalman - owner and artist of Some Odd Girl. Check out their work:
Be sure to contact them today as I know they only take a limited amout of students and you don't want to miss your chance to learn in such an easy and affordable manner. I am so excited for all of you that take this class you will love it!
Don't you just love children's Easter cards? They are just so much fun to make and the children just love them so much. My grandchildren just love getting my homemade cards and I am thrilled when they show them off to their friends and other relatives! So today we are going to step up Gypsy Made Simple just a little and make another window card but with a few more pieces to make it a little harder. So go get your coffee, tea or coke, turn your Gypsy on and let's get to work.
Now wasn't that easy? And you do the same thing for any cart you want. I used the CTMH Art Philosophy cart as I knew it had plenty of frames to choose from but you can use any cart that you own with frames and of course any fun little piece of art to go in it. Just have fun and do the steps.
Look at the yummy papers that I picked out. They are from K and Company, their 2011 spring stack. I chose from these as they were on the top of the pile of paper stacks. LOL Still organizing and I have a closet with 75 stacks in it and it seems that only the top ones get used! LOL
Here you can see how clean the cut was. Just remember to layout your colors according to the arrow on your Gypsy matched to the direction of the arrow on your mat.
I used scrap paper for this cut and then before I even removed it from my mat I took some pink chalk and colored the little pieces for it's ears and feet as well as colored in cheeks.
I used the sentiment from the My Peeps stamp set and was impressed at the clarity and how easy this stamp went down.
Look at my Simply Charmed bunnies aren't they adorable... all ready to put on the base of the card.
And this little bunny and carrot is from Create A Critter. I have to tell you this is one of my favorite carts for making children's cards and they seem to love them too.
See how easy it is to put these cards together. I put all my outside piece together first along with any inking and stamping and then you can easily put together the entire card in a matter of just a couple of minuets.
Thought I would show you the other cards too. Designing them is done the same was as with the little duck card. EASY! And as you can see they go together in just a little time.
Thought I would show you a little close up of the cards. This is the Simply Charmed card. If you would like the file click HERE.
This is the little Create A Critter Duck card and if you would like the file click HERE.
And this one it the bunny Create A Critter card and if you want this file click HERE.
I challenge you to make your own window Easter cards this week and link it up!It can be for a child or adult as long as it has a window and an Easter theme it qualifies. Those of you that do not have a Gypsy can still enter, you can use your design studio or CCR can be used too. Remember the CCR is a free tool that Provocraft has designed to go with our Cricut machines. This week I will be giving away a stamp set to one lucky entry chosen using Random.org.All you need to do to enter is link up your entry by 4PM on Friday March 30 for your chance to win. The winner will be announced Saturday morning.
Thank your for joining us today. I sure hope you enjoyed yourself and hopefully learned a little something to help you along the way. Oh just so you know I love challenges too, and have linked this up with SOUS StuckOnYouSketches! So if you do a bunny on your window card, be sure to rush over there and link up your card there too! You will love them.
Thank You for you sweet sweet words of encouragement. Your comments inspire me to continue sharing with you. Have a blessed day.