July 31, 2012

Tomorrow Is The Big Day

Finally it's here we have a new Idea Book!  You have probably already heard about it, but CTMH has a NEW CRICUT CARTRIDGE COLLECTION!  It's called "Artiste"! I am so excited to share this with you and know you are going to love it just as much as I do.


There are so many changes that have been made with this new catalog. You are going to love it. To check out the amazing handbook, click the link below. I can't wait till you see all the new products and collections that will go with this cart. This is the all new Artsie Cartridge, you have hever seen so many amazing cuts on one cartridge, I guarantee you that this cart is a must have for your Cricut library!


One very exciting change for everyone who loves to color, the Exclusive Markers have changed to an alcohol marker.  So just for now, when you order, you get a color matched marker for the ink you would like and then you get a complimentary marker for shading for FREE!  On the color page of the idea book, it shows you whether the complementary shade is lighter or darker.  Now, the original style is still available on the site, so when you order, make sure you get the kind that you want.  I am sure it will take quite a while for the old ones to officially run out.


The August Stamp of the Month is called Baroque.  It's very pretty.  Above are some inspiration using this beautiful set. I can't wait to get this.


Something else that has changed is the way you can become a consultant.  This is very exciting.  You can become a consultant with CMTH for just $49.00! This is a picture of the new style kit.  Since everyone in the crafting world is online, some don't need the extra forms and such that come with hosting home based gatherings.  When you sign up with CTMH now, you can get just the crafty essentials that you need to get started!  If you plan on having in home gatherings, you can get the $99.00 kit like before as an option.  This is a much more affordable way to get involved and get $130.00 worth of wonderful CTMH products!  There is also an extra bonus for signing up in August.


 Whether you sign up with the $49.00 kit or the $99.00 kit, you get this great tote for free!  This is a "While Supplies Last" offer.  So... for $49.00, you get $130.00 in beautiful products and the free tote bag, plus you get 22% off of your purchases as a consultant. Clicke HERE if you would like to sign up.


 Something that I am REALLY excited about are changes made to the Workshops on the Go!  This a picture of an AMAZING halloween WSOTG kit.  The cool part of this is that everything with this kit coordinates with the new Cricut Artiste Cartridge!  How AMAZING is that?  I was wondering when they would create some things based on the cartridges, which is why I got involved with CTMH to begin with.  It's AMAZING!!!


Another exciting change for CardMakers is the WSOTG card kits. This is the Christmas one!  Amazing, huh?  I love the beautiful sentiments and that they say "Merry Christmas".  I am not a big person for saying Happy Holidays.


This Work Shop On The Go card kit has amazing stamps and gorgeous new papers!
So, there are exciting things happening with Close To My Heart!  To order your cartridge or to become your own consultant, click HERE!  Just a note, when the Art Philosophy Cartridge came out, they ran out at one point and they were back ordered for a bit.  If you want it soon, don't wait.

July 30, 2012

Created from Color - Copic Classes for you at home!

Hi ya everyone!   This is Melissa from Melissa Made and Created from Color and we have open registration for both our Basic and Advanced Class.  The basic class offers all of the basic information to get you started with your Copic markers.  We won't just get you started but take you to a new level in your coloring.  Our techniques are those taught in Copic Certification courses.  Though, you will not receive a certificate from Copic, you will understand how your markers work from the comfort of your own home.  The Advanced class goes into more elaborate information surrounding your Copics for those that have been using Copics and understand their basics. I wanted to share the clear difference in a beginner that took our class.  Brenda at Infinite Possibilities was a fabulous student, completing homework and practicing.  This shows in her work at the beginning and at the end!
As you can see her coloring was pretty in the beginning.  However, in the end she added much more contrast, new how to blend her markers and add details to make the image come alive! Kristy of Some Odd Girl and I are the instructors.  We offer one one one assistance, a fabulous forum, and communication through Facebook and email.  Also for both classes, we have downloadable content and the ability to print all the written information for your use once the class is over! Please head over to the registration page for Basic OR Advanced and check out all the wonderful details!  We'd love to have you in our class.

Sheila allowed me to share this with you today as she herself took the Basic class!  Thanks Sheila for allowing me to share today!!!  I hope to see some of you in class. If you aren't ready for the class then come by our Facebook page and see what we are all about!  We have tutorials most Mondays and Fridays on our website.

July 28, 2012

Gypsy Made Simple - This Is A Test


Good Morning.... time to take the test! That's right, I have been teaching you how to do all kinds of things on your Gypsy, now it is time to find out a little of what you have learned! I fell like I am putting myself out on a limb with this but we are going to give it a try. This week you will weld 3 pieces together for form some type of design and you will make a shadow. Sounds simple enough doesn't it? Well go grab a cup of coffee and turn your Gypsy on and enjoy your coffee while watching these super quick videos.


No see how easy this will be. Again choose a cart with a shadow feature and weld at least 3 piece together. You can do more if you want just have at least 3 items and make a card or page or just show the welded image, just as long as you link it up. I want to see how you are doing so I can gauge what I should be focusing on in the future.


Isn't this a beautiful card. I made this for my friend Judy and her husband Tom as they will be celebrating their 50th wedding anniversary. The solid papers are from the Metallic stack from DCWV, and the beautiful floral paper is a retired print from Creative Memories. I had a lot more in videos to show you but accidentally deleted them when I was on the phone with Pam at the Bug Bytes, so now you get this test!


All kidding aside it is important for me to know if I should revisit some of these designs or move on to more complicated designs so please help me out and link up your design.


Here is another close up of this 5x5" card. Don't you love how using the shadow feature really adds dimension to this card? This is why it is important to know how to do this feature. Now if you don't know how to or would like me to do a video on this please leave a comment telling me so. I challenge you to make a 3 piece weld and a shadow for the same and link it up. Let's see what you can do with this. Make sure you use at least 2 characters, it doesn't matter if you use number or letters and then add a piece of artwork to make your project. LINK IT UP!
Thank you for your sweet sweet word of encouragement. Your comments continue to inspire me to keep sharing with you. Have a blessed week.

Elmo's Party Cartridge Winner Announced!

Thank you so much everyone for all your sweet sweet comments. But let's get to the heart of the matter, who one the cartridge? Drumroll please....

Thanks to Random.org we have a winner... I just love using this as I couldn't possibly choose from all these wonderful comments.

Dan and Heather you have one week to contact me with your full name and address so that I can get your cart sent out. If this gift is not claimed by next Saturday the prize will be awarded to someone else.
Thank you everyone for playing along.

July 27, 2012

Quick Card

Morning All,
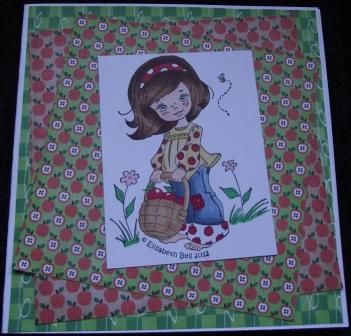
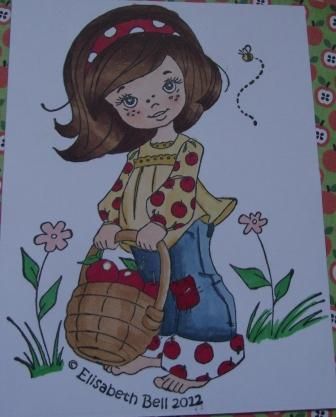
Today I thought I'd share with you a quick card I made. I'm new to digi papers and my friend Amanda, showed me some that she'd printed off. Well I saw the designs and had to buy some. I brought them from Sassy Designs. The stamp is by Elizabeth Bell through Whimsy Stamps.
Here's the card.


Here is a close up of the stamped image.


I hope you like the card. Thanks Sheila for having me today.
Kelly x
Kams Crafty Place

Welcome Back Teacher Gift

Hi, all! This is Jeannie from Nonnas' Scraps and it is so nice to be with you today! Thanks, Sheila, for allowing me the guest spot once again.

Don't you think this summer has spend past? I have two short weeks of vacation left. And, I will be getting a few "Welcome Back" gifts for my grandson's teachers finished. Join me in this project.

I know of very few teachers who don't enjoy a gift card. And this holder will make the grade! 

Please note: this project was completed on the Zing with MTC software. It can, however, be accomplished using a Gypsy or CCR.

Cardstock:
Brown 6 x 12"
Black 6 x 6"
red 3 x 3"
green 2 x 2"
Font: LDT Teacher from Lettering Delights
Shapes used: rounded corner square, from from square and apple
White pen (I used Inkssentials)
Chomas Adustable Pen holder
Wood Grain embossing folder
Distress Ink: Antique Photo
Tape runner 1/4" wide
Pop dots
A gift card to insert in the back

First, I created the file in MTC. 
I Selected the rounded square from Basic Shapes. I then, sized it to 3.5" 
and duplicated for a total of 3

To create the the frame I started with one of the squares and generated an inset shadow:

I accepted my imaged.
To finish the "frame" I then joined the two together:

I opened the Font, LDT Teacher and typed the message. 
"Java great year!"

I then, opened an apple file that I had in my "stash" and sized it to 2".

I arranged all of my cuts on a 12" mat. I have the cuts assigned to different layers in the software...
you'll see that in a second! (BTW, the writing will be on the solid square in the upper right hand corner. 


This looks funny now, 
but that is because I will use the arrangement so I can cut with scraps of papers. 
And this is how the screen translates to my actual mat:


On to cutting! Or, rather the writing...
I loaded the white pen in the Amy Chomas holder. 
(For more information on using this pen holder in your Zing click here.)
From the software, I selected only the layer with the writing. 


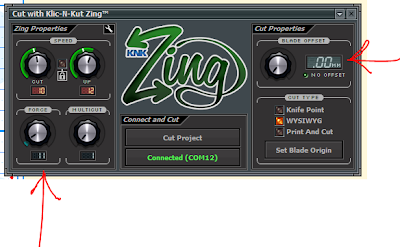
 I set the software as shown:
Force 10-11
Offset: 0
WYSIWYG
I chose: Set Blade Origin

The laser light illuminates and it can be seen reflecting off of the paper.
Using the arrows, I moved it until I could see it approximately 1/8" from the upper and
right edges of the paper. 


I then told the software that I was finished. Within seconds, 
the white writing was on the black cardstock. 

I did not remove the mat from the machine at this point. 
Instead I changed the pen holder for the Red blade holder (and red blade). 
I returned to my software and reversed the layers selection:

Onto cutting! 

Force: 83
Cut one time
Offset: 0.35
WYSIWYG
When asked to set the origin, I chose "use last"
The cutting was so smooth!

To assemble:
Ink all parts
Emboss the frame with the wood grain folder.
Assemble the front of the holder first, in this order:
black board with writing
Brown frame
Apple
I ran 1/4" tape around the edge of 3 sides
 of the solid brown backing.  
I positioned the edge without tape at the top.
Finally, I pop dotted the apple to the front and inserted a gift card. 

Such a warm greeting for any returning teacher, don't you agree?
Thanks for stopping by...


July 26, 2012

Ink, Muslin and a little Fun!


Hey Ya'll,
It's Sassy Dude Day!  YAY!  Bobby here from Cricut Couple.  I hope you all love today's projects as much as I do.  I saw this card in a magazine with an ink and stamping technique, but I put a little different spin on it using muslin.  Here goes...
 For all of the cards that I made, I did half cards.  8 1/2 x 11 folded in half.  The first thing I did was prepare my muslin.
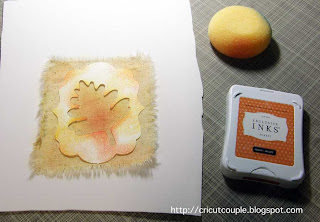
 You can see the measurements here.  For this technique, it's a little distressed in appearance, so I snipped a tiny cut and then tore it.  Then I picked a few strings here and there to fray the edges.  This is also a great base for doing embroidery for a card.
 I used CTMH AP for the shapes and Flower shoppe for the leaf cut.  With the AP cart having so many wonderful shapes, I didn't have to use Flower Shoppe, but I liked this particular leaf.
 This is what it looks like on the Gypsy screen.  Basically, you are creating a stencil.  For this technique, you want a shape within a shape so that you have the distressed edges on the outside as well as the inside of the shapes.  I wanted to do a few different styles, so these are the shapes I selected.  Since my Muslin was 5x6, the label shape I chose was 4x5.  I also used the Gypsy to turn the inside cuts to the way I wanted them to layout on the stencil.  I used a thin white card stock to cut these so that the edges would be crisp.
 These are how they come out on the mat.  Very simple shapes and very simple cuts.
 For the next phase, it works best if you use a thin piece of craft foam under the muslin that you aren't worried about getting ink on.  This gives you a protective surface as well as a cusion under your stamping and inking.  I used three different inks for this pattern starting with Sunflower.  You simply put your craft sponge on the ink pad and pounce to ink it up slightly.  Then you pounce on the muslin.  Cover the entire exposed area with the Sunflower Ink.
 You can turn your sponge as you go along.  I added a little bit of Sunset ink in the center and randomly on the outer edge.
 Then I added a bit of Pear ink here and there to balance the fall look.  Keep in mind that the ink will darken in the fabric as it dries, so you don't have to have much ink at all.  The more you add, the darker it will become and you are simply adding color hues.
 The next phase is using a black (or whatever color you choose) of an archival ink.  Simply ink up your phrase stamp and start stamping while still keeping the stencil in place.
 This is what it looks like when you have the stamping done.  doesn't look so great right now, right?  Hee! Hee!
Once you remove the stencil, this is what you have.  From here, you can design anyway that you want.  For the leaf card, I used some glitter glue around the frame edge.  If you choose to have more contrast, you can also use a good distressing ink like Chocolate or Cocoa around the outer edge.  You can also at this point, use a warm iron and an old towel and iron this piece.  This will flatten it out and also heat set the ink.  Since these are water based inks, don't use any steam.  Since these cards are a distressed look, I didn't iron them.
I added a label on the bottom and more glitter glue to highlight the shape.
 I wish that you could see the detail in the pictures, but it's not showing that well.  The glitter looks amazing and the details really stand out on the fabric.
 I kept the inside very simple.  I inked everything for this card in Sunset.
 Here is the Love card.  This one uses Roxie paper and an old retired CTMH stamp set.  I used Tulip and Blush and a little Cocoa on this one.
 I wanted to do lots of fun stitching on this one, but while attempting, our sewing machine decided to start breaking into many pieces.  Arghhh!!!  At least, I got the butterfly card done first too.  Hee! Hee!
 The inside is pretty much the same as the first.  I Inked this entire card with Tulip.
 I really loved how this Christmas tree turned out.  I used Olive and Ponderosa Pine and Cocoa on the outer edge.  I added a Merry Christmas label to the bottom with adhesive elements on the sides.
 Again, the glitter isn't really showing in the pictures, but I edged the entire frames as well as added dots on the tree and dots on the label shape.
 Inside was also kept simple.  I inked everything in Olive.
 For the butterfly card, I changed the layout a bit.  I used Orchid and Pansy Purple for the shading and then tried to do a frame border with the sewing machine.  I also added a label shape.
 I used the Martha Stewart Butterfly Punch (but you could cut them with your Cricut) and glued them everywhere that the stitching was messed up (as my sewing machine was dying).
I just added a simple sentiment mat to the inside and I inked the entire card with Pansy Purple.

Well, I was thrilled with the way all of these cards turned out.  I sure hope you enjoyed them and I would love to hear your comments.  Be sure to check out Cricut Couple and see what else we've been up to!  Thanks Sheila for inviting me to the sandbox!  Thanks for sharing your time with us today here at Cricut Couple!