May 31, 2013

Gypsy Made Simple - Altering A Card Size From Cartridge Size


Good Times Ahead! Don't you just love that sentiment for the front of a card? Boy you can use that for just about anything positive! Today on our Gypsy Made Simple series you will learn how to alter a ready made card that is on a cart to fit the size that you want while still retaining all the detail that you loved. I am also scrap lifting this AWESOME card from Aaron Brown of Booth 32. She sent me a similar card and I just had to make it on my own and share it with you today. I am a fairly new follower on Aaron's blog and I just love the awesome projects that she shares. This card though got sent right to my door and that is when the trouble started... I had to make this awesome card.
Now let's get out your Gypsy, grab a cup of coffee and let's get to work.


Now wasn't that easy? I used the Art Philosophy Cart but you can use any cart you want that has complete cards on it. You know, Just Because Cards, Birthday Bash, Wild Cards just to name a few. Use what you have already. See how easy it is to put together! Just take your time and do all the steps that give your card a finished look. Use hide contour if you don't like the score marks and if you chose a card with a window in it, remember you can hide that too.

Here is one of my completed cards and I have to tell you I love it! I used the Workshop On The Go Cruisin' Kit from Close To My Heart to create this card and I just love the papers. It even came with the bottle caps and stamp set. I just my own inks and I was good to go with Grey Flannel, I used the twine that I had from My Craft Spot, some left over paper scraps from the card party, and some black ribbon. I was trilled with the way this turned out.


Now wasn't that easy to put together. I kept Aaron's card close at hand the whole time as I didn't want to miss any detail on it as I thought the card was just perfect. I love the colors and the detail she used and I think I accomplished a very successful scrap lift that the original crafter would be proud to say yup that looks good! I always like to make mine as good as the original even if I don't have all the material they used.

This is a close up of the 2 fronts. Aaron's gorgeous card is on the left and mine is on the right. Aaron used the Adventure USA stamp set They both have the same look and feel even though I didn't use the exact materials.
Don't you just love how easy it is to alter a card from the cart and call it your own. The Gypsy makes it so easy and remember just like a computer if you make a mistake, just redo or restart your project. No loss it is like putting in a fresh sheet of paper each time you use it.
Now I challenge YOU to make a card this week by using one of the carts that offer cards on it and make the card fit an A2 size, then make it 2 up so that you are actually making two cards with one cut!

Thank your for joining us, I hope you enjoyed today's post, be sure to come back every day for a new project offered on She's A Sassy Lady. Thank you for your sweet sweet words of encouragement. Your comment inspire me to continue sharing with you.
May 30, 2013

Making your own sticky pick up stick and/or glue dots

 Hello! Leah from Paperblossoms here and this month I thought I'd share a little tip that I have found to be so useful and inexpensive. I love to use little rhinestones or flat backed pearls on my cards and other projects but find that picking them up and getting them placed just so can be difficult. I have tried tweezers, but those just don't work well for me. I have tried getting the tip of my finger wet and trying to place them, which usually ends up that they fall off my finger right as I am about to place them! I have seen the Quikstick but honestly didn't want to fork over the $8 or so bucks for it. So one day an idea struck me and it works wonderfully!
 I purchased some Tack it Over and Over from Michaels (I know Amazon has it too) and first started by making my own glue dots. I saved a used roll of purchased glue dots with a good amount of the waxy paper that the dots come on and just dotted the Tack it Over and Over on to it and let it dry overnight. It makes fabulous glue dots! Then I found an unused rub-on tool in my stash (but you could use anything that has a bit of a point on it, such as the pointy end of a pen cap or a bamboo skewer) and stuck one of the glue dots onto the end of it, kind of wrapping it onto it.
 Like this. It picks up the tiniest gems and pearls perfectly! To get them to release, especially when the glue dot is new and extra sticky, I use a small stylus tool (pictured above) to release it, but again just a toothpick would work too. :)

Now I can add my gems and pearls SO much easier and they don't fall off mid placement. And no more buying glue dots! I hope you'll give it a try! Thanks so much for stopping by :)
Supplies:
Inspired by Stamping sentiment stamp from Big Wishes II and Background Basics II
Flower is cut using the Cindy Loo Cartridge

The Sassy Lady Is Looking For A Few Good Designers


She's A Sassy Lady is always looking for a few good designers. With almost 1500 followers I want to continue to offer new fresh ideas to them.
If you look at things a little different from the rest... always wanting to improve or change? Or if you take photos to use on a layout you have already designed in your minds eye? Or if you love to show people how to make those  projects? Then you are just what Shes A Sassy Lady needs!
If you are interested, please contact me by hitting the contact button on the top of my blog leaving me a link to your blog and your email address. You must be willing to share at least one post per month. 
MyFreeCopyright.com Registered & Protected

May 29, 2013

Gypsy Made Simple - Wedding Accordian Card


Good Morning! I had to scrap lift another card! The basic design of this card is scrap lifted from Bobby Hardgrave of the Cricut Couple.... we know him here as the Sassy Dude Well a couple of weeks ago Bobby made this wonderful accordion card and I knew it was meant to be a Gypsy Made Simple project! A card this good we just had to make! Bobby did a beautiful card that was pretty complex so I thought I would use the K.I.S.S. (Keep It Simple Sassy)system so we could all do this wonderful card in just a few easy steps.
I decided to do a wedding card as I am going to Chicago in for a friends wedding. I can't wait as we will be able to visit with friends and family. Now if you don't need that type of card then please make something that will work well for your needs.
So let's grab a cup of coffee, turn your Gypsy On and let's get to work.


Now wasn't that easy? Remember you can change out anything about this card to fit your needs you just need a window. I decided to leave the heart open on both sides as I was intrigued by the accordion shape and wanted to see it on both sides.


Now before we get into putting this card together let's get the accordion piece ready.
I took a 4.75x12" sheet of paper and placed it on my scoreboard. I scored the
paper every 1/2 inch. Then I flipped the paper over moved the paper over 1/4"
to make life easy and then scored every 1/2 inch once again.


I then folded the paper and set it aside until I was ready to assemble the card. I have to tell you my hands hurt by the time I finished doing this. I decided next time I am using velum as I think it would be prettier and a lot easier to fold that the heavy card stock I used.


Now let's put this card together. I can't wait to see it done. The colors I chose was to match the bride's colors and I just love the glitter paper that I have with this, don't you?


Now wasn't this an easy card? And so pretty. I know this is going to be one of my go to cards to make for weddings in the future... simple and elegant.
Now it is your turn. I challenge you to make an accordion card and link it up. Everyone wants to see what yours looks like. I know, let's make this interesting. I have a set of stamps that I will give away to one of the individuals that link up their card. The card must be linked by 3pm on Friday September 30th and the winner chosen using Random.org and will be announced on Saturday October 1st! Good luck and let's see those cards!

Thank you for joining us today. And thank you for your sweet sweet words of encouragement. Your comments continue to inspire me to share. See you next week.

Sheila

May 28, 2013

Some News to share

Hi all,

Today I thought I'd share with you some news I have.

We're back at Just Inspirational Challenges and to celebrate we're having a super blog hop.
We have lots of sponsors and fab prizes to give away. 
You can find all the rules here.

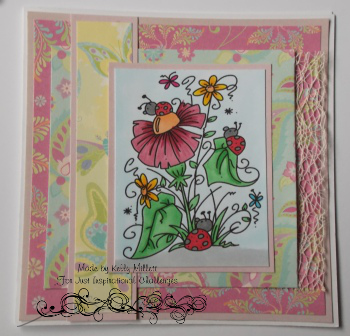
Here's my card for the hop. I used a digi from Bugaboo who has sponsored us with 7 digi's.


Here is how you can enter.
So in order to win one of the 7 digis from Bugaboo all you have to do is leave me a comment at Kelly's Crafty Place, leave my Team members below a comment and finally head back to Just Inspirational Challenges and leave a comment there. You can also see what the rest of the DT have made with our other sponsors and can enter to be in a chance to win any of the other prizes.

Here are the rest of the team who've used Bugaboo


I hope you like the card and are able to join in with our celebration.
Thanks Sheila for having me today,

Hugs
Kelly x


May 27, 2013

Father's Day Card

Hi folks,

Ian here, from A Newbie Crafter.  I have a Father's Day card.  I thought the superhero-themed papers would pair well with this card and I was pleased with the turnout.  I hope you like it or it inspires you to create your own Father's Day card for that special guy in your life.

Here are the pictures!


Although a little early, Happy Father's Day to all the Dad's and Mom's that fill in as Dad out there!

Craft on,
Ian

May 24, 2013

Vinyl Project for a vehicle

Hello Crafty Friends,
Sherri here from Sherri's Crafty Place 
Today is my day to post here at She's A Sassy Lady,
Today I have a sticker I made from vinyl, I LOVE Vinyl.....
I must give you a little story on this prject.....
My son LOVES for me to make him vinyl stickers for his truck, bike, and well pretty much anything else he can attach them to...LOL he comes up with some pretty funny stuff.....and I create it....He LOVES to go Muddin' he has a 4x4 Toyota 4 Runner and loves to get muddy, well one day he hit a tree and put a pretty good dent in his back fender, he was upset for about a minute, then he came up with "chicks dig body damage" and said mom.....can you....and I said of coarse, so using my Cricut and MTC I found this great font ( it doesn't have a very nice name)......and was it time consuming to weed, it really looks like someone wrote it in marker on his truck....
here it is on my screen...along with some 4x4's for his friends atv.....
                 
here it is after a lot of weeding
 and here is the final project......
 I think it looks great!!!!! when we can see it...his truck is usually covered in mud!!!! and the Cricut Vinyl is so great!!!!! he power washes his truck 4 times a month.....at least, and some of these have been on there for months......( I have made all the stickers in the picture) 
doesn't the font look like someone wrote it in marker!!! I will put the name of the font in my comments.....I really don't like the name of it...
Thanks for stopping by today, and a big thanks to Sheila for having me......
❀Sherri❀

May 23, 2013

Just A Super Quick Graduation Card


Good morning, I sure hope all is well with you!. Well last night my handsome hubby says, "Do you have any graduation cards?" No mind you this is 8:30 at night and I have to get up and get to work.... So then he says "could you make one real fast?" Well our little grandson Justin graduated from 5th grade and no one told me about it! Can you imagine? It was 6th grade when we were raising our children so I was really surprised. Anyway, you know I had to put something together real fast...
So I reached for Create A Critter 2 and made my first card using it, from scraps none the less!


By the time I got up to my craft room it was a little after nine and I went right to work.  In less than a half of an hour this little cutie card was complete!

 
And our little Justin loved the card... I remember telling hubby, just put a little cash in it and he will love it! But he loved the card as it looked like his dog so he was a happy camper!
Hope you enjoyed my little post today. Have a blessed day!

May 22, 2013

Thanks a Latte

Hey everyone! It's Candy here from Candy's Craft Corner!
It's my turn to share at She's a Sassy Lady! Thanks for having me again Sheila!
My card today is a super simple monochromatic card. 
I used the Stamps of Life stamps, bakers twine, kraft and chocolate cardstock and even made my own background paper. Super easy!


Thanks so much for stopping by today!
Take care,
Candy

May 21, 2013

Some more inky goodness!

Hi everyone.  Its Karon here from Karon's Krafty Korner sharing with you another new to me technique.

This is called Smacking Acetate or I would prefer to call it "Messing around with ink and water!" LOL!

You can make some fabulous background papers or papers that you want to cut and make flowers - the uses for this are endless, and you get a unique result every time.

Here is my finished card.


Firstly, you will need a piece of acetate, either some water based markers or some re-inkers.  I used CTMH  water-based dye ink markers.  Some white paper, I used the Recollections white paper, you want something that is a little porous - to take the ink and water. A mini mister or water spray.


I found this technique by Gina K on Stamp TV, she uses re-inkers and here is a link to the video for this method.

I do not have any re-inkers, as such, so I used the markers instead and was still really pleased with the results I got.

So, cut a piece of card stock a little bigger than you actually need.  This will enable you to trim to your desired size afterwards.

Take you acetate, and as many markers as you want to use.  I chose 3 colours, that I felt I could work with. Don't do too many, or I think you will end up with just a muddy mess.

Now comes the fun part.  Just scribble randomly over the acetate with your markers.  I have done two to show you.


Get you water mister and spray gentle over the inks until you see that the whole area is wet, but not soaking.


Place you piece of paper (smack) down on top of the inked acetate and press out gently.  Lift the paper away and wait to dry - or use your heat gun.  Your acetate sheet can be just wiped clean and used again.


Here are the two papers, and I even tried it with some doilies.


Now all you have to do is use them on your cards.

For my card I used a 6" by 4" base and then layered up my papers.  The designer paper is from a stack by Me & My Big Ideas called Forever Water Colour.  The ribbon flower was made by my daughter Shannon.

The sentiment is from a set call Hooray for Birthdays by Scrappy Mom's, stamped using Memento Tuxedo Black.


For the inside I used the same papers and stamped a little flower in two of the corners.


I hope you will give this technique a go - it is so easy and yet so effective and of course unique every time.

Have fun.

Thanks for stopping by today.

Happy crafting.

May 18, 2013

Thank You Cards Designed On CCR Complete With File

 
Good Morning! It has been a while since I have been on and I have missed sharing with you. This week I am sharing a card that I made on the Cricut Craft Room... CCR. I actually had a little free time at work and designed this card at work. As I am still learning CCR I did find it harder to make than with my Gypsy. This is similar to a card I shared with you many time from my Gypsy and I found it harder to maneuver on CCR. But it worked and the card turned out great... I am sure it is a matter of just learning and playing with it more to hon in my skills.
 

This is what the first page looks like. As you can see I used a frame  and just hid the inside for the back of the card.


This is page 2. Remember you must have a duplicate frame for the top of the card if you are inserting plastic on the top of the card and this gives a nice finish to it. I have been using white as the base and then covering the top with colored paper and it helps keep the cost of paper to a minimum.

 
This is the third page and it is the inside of the card where you put the sentiments. I usually use some of my scrap paper for this as I have a ton of scrap paper in all different sizes.


Now wasn't that easy.... I know I got a little chatty but it has been so long since I have shared with you!  This card was really easy to put together
 

This is a close up of the front of the card... I embossed the plastic with the Divine Swirls folder and it just added so much shine to the card.... and you have to love that glitter!

 
Another close up of the card... I love it. And, you can see the writing on the inside but because of the embossing you can't read what it says.... just kind of makes you want to open it just to see that it says!

 
And of course the card isn't finished until I stamp the back! Love my little Sassy Lady Stamp!
 
 
Thank you for joining me today. Click HERE if you would like a CCR file of this card. And let's see what you put together.... if you would like to share your card with the followers of She's A Sassy Lady just mail your card to: Sheila McShea,
3005 Stonecreek Trace, Helena, AL 35080. Cards will not be returned.
Thanks again for joining us today and for your sweet sweet words of encouragement. Your comments inspire me to continue sharing with you.