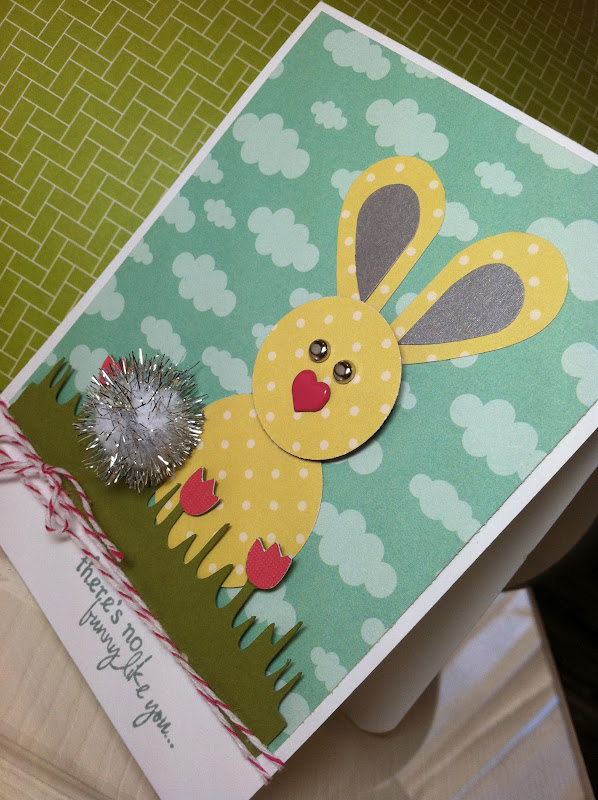
Hi everyone! This is Kristy from craftin-on-my-door and I want to thank Sheila for allowing my to be her guest designer again today! I look forward to my monthly She's a Sassy Lady posts! Today I thought I would show you the last set of cards we made at our card club! The theme was "with sympathy" or "thinking of you."
It's always nice to have cards like these in your stash. I hope these inspired you to make up some sympathy or thinking of you cards. Thanks for stopping by today! ♥Kristy
Showing posts with label Kristy Craftin-on-my-door. Show all posts
July 17, 2012
June 19, 2012
Masculine Card idea...
Hi everyone! This is Kristy from craftin-on-my-door and I want to thank Sheila for allowing my to be her guest designer again today! I look forward to my monthly She's a Sassy Lady posts! I know that Father's Day has come and gone, but I am always looking for a masculine card idea and thought that maybe some of you may be looking too! ;) These would make great "guy birthday" cards too!
The mustache and tie are from the Billionaire cartridge. The mustache was cut at 1.20" and the tie was cut at 8.45". The heart is from the Birthday Cakes cartridge and was cut at 2.00". I used My Mind's Eye paper, Jillibean Soup letters, and my corner chomper.
I hope these cards inspire you, the next time you need a masculine card idea! Thanks for stopping by today! ♥Kristy
The mustache and tie are from the Billionaire cartridge. The mustache was cut at 1.20" and the tie was cut at 8.45". The heart is from the Birthday Cakes cartridge and was cut at 2.00". I used My Mind's Eye paper, Jillibean Soup letters, and my corner chomper.
I hope these cards inspire you, the next time you need a masculine card idea! Thanks for stopping by today! ♥Kristy
May 15, 2012
Las Vegas Card Club Update...
Hi everyone! This is Kristy from craftin-on-my-door and I want to thank Sheila for allowing my to be her guest designer again today! I look forward to my monthly She's a Sassy Lady posts!
This month has been super crazy! So today I simply have some fun pictures to show you, that I hope will bring you all a little inspiration! I was so excited when Sheila introduced her card party. HERE is the link for Sheila's party. Here are some pictures of our cards from the last couple of months. The first group of cards are birthday and the next group are thank yous! Everyone made a card that went along with our theme and then brought the supplies for 5 of us to make the same card. Here are the cards:
Each month we look forward to getting together, enjoying some yummy food, and having time to chat and create with each other! This month's theme is "sympathy or thinking of you!" I hope these pictures will inspire you in either your card making, party planning, or just crafting! Thanks for stopping by today! ♥Kristy
This month has been super crazy! So today I simply have some fun pictures to show you, that I hope will bring you all a little inspiration! I was so excited when Sheila introduced her card party. HERE is the link for Sheila's party. Here are some pictures of our cards from the last couple of months. The first group of cards are birthday and the next group are thank yous! Everyone made a card that went along with our theme and then brought the supplies for 5 of us to make the same card. Here are the cards:
Each month we look forward to getting together, enjoying some yummy food, and having time to chat and create with each other! This month's theme is "sympathy or thinking of you!" I hope these pictures will inspire you in either your card making, party planning, or just crafting! Thanks for stopping by today! ♥Kristy
April 17, 2012
Sushi & Donuts layout...
Hi everyone! This is Kristy from craftin-on-my-door and I want to thank Sheila for allowing my to be her guest designer again today! I look forward to my monthly She's a Sassy Lady posts!
Today I have step by step pictures of how I put a layout together. These pictures just crack me up! Little Stinkerbella likes to do certain things. For example, whenever she has a doctor's appt. and has to get shots I let her pick what and where she would like to go for lunch. The past two times she has picked sushi and donuts! Of course I had to preserve these memories! ;)
I started by placing my 3 photos onto the page.
The background piece for the title is from Graphically Speaking and was cut at 6.74" in width and 6.50" in height. Then I tied twine around it and attached it to the page. I also picked which Kiwi Lane Design templates I wanted to place onto my page.
I took one template off at a time and traced them onto my papers. For the grey shadow, I traced the template, cut it out, and then cut it down the middle.
For the title the word "Sushi" is from the MS Birthday Cake cart and was cut at 2.25". The word "Donuts" was cut from the Birthday Bash cart at 2". I thought it would be cute to have the "o" in donut be made out of a donut! The donut is from Slumber Party, was cut at 2.25", I also added some Glossay Accents to the frosting, and used foam adhesive to pop it up. The "&" sign is from Sugar and Spice and was cut at 7.15".
Then, I attached the title onto the page.
Next, I attached the pictures onto the page and used a fun SU punch to add a tab to one of my pics.
I used a mixture of rub-ons to put the date onto my page.
I also used a grey marker to add some journaling, straight to the page.
I also added some small round stickers that said, "YUM!" to the tab.
Thanks for stopping by today! I hope you all get some scrapping time this week! ♥Kristy
Today I have step by step pictures of how I put a layout together. These pictures just crack me up! Little Stinkerbella likes to do certain things. For example, whenever she has a doctor's appt. and has to get shots I let her pick what and where she would like to go for lunch. The past two times she has picked sushi and donuts! Of course I had to preserve these memories! ;)
I started by placing my 3 photos onto the page.
The background piece for the title is from Graphically Speaking and was cut at 6.74" in width and 6.50" in height. Then I tied twine around it and attached it to the page. I also picked which Kiwi Lane Design templates I wanted to place onto my page.
I took one template off at a time and traced them onto my papers. For the grey shadow, I traced the template, cut it out, and then cut it down the middle.
For the title the word "Sushi" is from the MS Birthday Cake cart and was cut at 2.25". The word "Donuts" was cut from the Birthday Bash cart at 2". I thought it would be cute to have the "o" in donut be made out of a donut! The donut is from Slumber Party, was cut at 2.25", I also added some Glossay Accents to the frosting, and used foam adhesive to pop it up. The "&" sign is from Sugar and Spice and was cut at 7.15".
Then, I attached the title onto the page.
Next, I attached the pictures onto the page and used a fun SU punch to add a tab to one of my pics.
I used a mixture of rub-ons to put the date onto my page.
I also used a grey marker to add some journaling, straight to the page.
I also added some small round stickers that said, "YUM!" to the tab.
Thanks for stopping by today! I hope you all get some scrapping time this week! ♥Kristy
March 20, 2012
There's no bunny like you...
Hi everyone! This is Kristy from craftin-on-my-door and I want to thank Sheila for allowing my to be her guest designer again today! I look forward to my monthly She's a Sassy Lady posts!
With Easter just around the corner I thought it would be fun to make a spring like project! I have a super sweet friend that spoiled me rotten over the weekend, and I needed to make her a thank you card. I found a cute bunny idea using punches at the Papered Cottage, and I have the perfect set of stamps from My Creative Time to add to the card! Here's what I came up with:
Here are the papers that I started with:
And here are the punches...
Punch a large heart and a small heart
Cut the hearts in half and use your scissors to curve off the top inside half of the heart. Below the one on the left has been cut.
I didn't like the black in the pattern paper so I switched it to a light silver paper. ;)
Using the Give a Hoot cartridge and the fit to length feature I cut a grass border at 4 1/4.
The card was cut at 4 1/4 x 5 1/2. Then, I laid out my papers and stamped the sentiment, "There's no bunny like you!"
The cloud paper was cut at 4 1/4 x 4 1/2, and then I tied some hot pink twine around the bottom of the card.
I used a couple of glue dots to attach the grass border, glued the larger circle down, and popped the smaller circle up with foam tape.
I then decided that the cute little bunny need a face so I took it off the card and added some fun brads. Lastly, I added the sparkly silver pom pom for the bunny's little tail and rounded the bottom corners of the card with my corner chompers!
Now, I just need to write my many thank yous inside and mail it off to my friend!
I hope this inspired you to pull out your punches and create a fun card! Thanks for stopping by today! ♥Kristy
With Easter just around the corner I thought it would be fun to make a spring like project! I have a super sweet friend that spoiled me rotten over the weekend, and I needed to make her a thank you card. I found a cute bunny idea using punches at the Papered Cottage, and I have the perfect set of stamps from My Creative Time to add to the card! Here's what I came up with:
Here are the papers that I started with:
And here are the punches...
Punch a large heart and a small heart
Cut the hearts in half and use your scissors to curve off the top inside half of the heart. Below the one on the left has been cut.
I didn't like the black in the pattern paper so I switched it to a light silver paper. ;)
Using the Give a Hoot cartridge and the fit to length feature I cut a grass border at 4 1/4.
The card was cut at 4 1/4 x 5 1/2. Then, I laid out my papers and stamped the sentiment, "There's no bunny like you!"
The cloud paper was cut at 4 1/4 x 4 1/2, and then I tied some hot pink twine around the bottom of the card.
I used a couple of glue dots to attach the grass border, glued the larger circle down, and popped the smaller circle up with foam tape.
I then decided that the cute little bunny need a face so I took it off the card and added some fun brads. Lastly, I added the sparkly silver pom pom for the bunny's little tail and rounded the bottom corners of the card with my corner chompers!
Now, I just need to write my many thank yous inside and mail it off to my friend!
I hope this inspired you to pull out your punches and create a fun card! Thanks for stopping by today! ♥Kristy
Subscribe to:
Posts (Atom)