November 28, 2012

Christmas Penguin

Hey guys! It's Candy from Candy's Craft Corner! It's my turn to share here at She's a Sassy Lady!
I have a Christmas card to share today! I can't believe Christmas is less than a month away! I am so behind on shopping and crafting!! This is another step towards getting ready! LOL!
I coloured up this little cutie from Peachy Keen with my copics. The outside sentiment is from Peachy Keen and the inside one is from My Creative Time. Patterned paper by Recollections.

Thanks so much for having me today Sheila and thanks to you for stopping by!
Take care,
Candy

November 26, 2012

Pumpkin Pie, Anyone?

Hi folks!!

It's Ian from A Newbie Crafter!  Long time no see but I wanted to share with you all a project I did for my RAs for Thanksgiving.  Every year I try to do something special and unique for them to thank them for all of their hard work so far for that semester.  This year, I think I outdid myself.  I recently snagged myself a Silhouette Cameo at a great price and knew that I wanted to use it for this years gifts.  Upon perusing www.svgcuts.com I found this fun little pumpkin pie treat box that I just HAD to make!

After I figured out what I was going to do, I went to the larger Michael's and searched through their open stock paper for Thanksgiving themed cardstock.  If there is one thing I learned, you MUST be one season ahead as a crafter.  The paper was pretty stagnant so I had slim pickings.  I did get to pick up a couple cute papers that weren't grabbed so I knew I would use them for this project.

I downloaded the file and started to cut the files.  The mat that came with the Cameo was tearing the paper and I had read that you could use your Cricut mat so I grabbed that and continued.


Once I was able to cut everything out, I lined everything up in piles so I knew exactly what I had to do.  I posted this teaser photo on my Facebook with the caption "I'm making something fun."  :)


I took the orange cardstock and embossed it with a Darice 2 inch folder I found at AC Moore.  I thought that added a nice little dimension to it.  This photo was taken after I had already started piecing the top of the box together.


I took the orange cardstock after it was embossed and used Scor-Tape to glue the top box together.  It was starting to shape up quite nicely.


The next thing I did was add the top layer of the pumpkin pie and adhered the crust to it.  I also folded it up to give it some dimension and for a real-pie effect.


Next thing I did was start piecing together the lower portion of the box.  Svgcuts.com makes it very easy to do these 3D projects as the machine also cut scor-lines on it too.


Here's a picture of the inside of the box.  About 3 slices in, I realized I should have turned the photo upside down so that the words were right side up.  UGH!  Oh well.  No turning back now and there wasn't enough of the cardstock to recut this portion.  :(


I went ahead and made Muddy Buddies (Puppy Chow to some of you) and placed that in baggies to cool.  If you want the recipe - I posted it below!  Funny story (not so funny at the time).  I was making the muddy buddies and put the powdered sugar into the bag and started to shake and the seal broke on the gallon sized bag I was using.  I lost about 2 cups worth of Muddy Buddies on my kitchen floor.  UGH!!  I did have enough for the 13 RAs I have to each get 1/2 cup which was perfect because that barely fit in the box.


Here's a photo of the completed pumpkin pie.  I found this ribbon at Joann's and it was the perfect dollop of whipped cream.   Isn't it cute?  I adhered these with a little Tombow adhesive.


Here's an artistic shot of the individual piece of pie.  Just lovely!


Here's the top shot so you can see the "whipped cream" on top of the piece of pumpkin pie.  Looks good enough to eat, eh?  :)


Well, that's my project for today.  I made 13 individual pieces of pumpkin pie for my 13 RAs.  I ended up cutting 14 pumpkin pie pieces in case I messed up - but I didn't need the extra.  Score!  I hope you all had an enjoyable Thanksgiving day surrounded by friends and family.  I was alone but did get to FaceTime with my mom.  I'm on duty for my job and had to stay back at work.  My coworkers all live within 2-3 hours driving distance here in NY and I'm originally from Wisconsin so I didn't want to be selfish even if I couldn't go home.  It was a quiet couple of days on duty.  Nice!  However, most of campus was gone and they all returned yesterday.  Anyway, I hope you are all doing well and gearing up for the next holiday whichever it is you celebrate.  :)

Craft on,
Ian

Muddy Buddy Recipe9 cups Chex (whatever kind you like best; Corn, Rice, etc.)
1 cup chocolate chips
1/2 cup peanut butter
1/4 cup butter
1 teaspoon vanilla
1 1/2 cups powdered sugar

Place chocolate chips and peanut butter in a microwave-safe bowl.  Heat on high for 1 minute.  Stir.  Heat on high for another 30 seconds.  Stir in vanilla and make sure mixture is smooth.  Pour Chex in a GOOD gallon sized bag or paper bag (some prefer paper so issues like the one I had don't happen) and pour chocolate, peanut butter, and vanilla mixture over chex mix, seal and shake rigorously making sure all gets covered.  Take powdered sugar and pour in bag.  Seal bag and shake again until well coated.  Place on wax paper on a cookie sheet and place in fridge to cool.  Once cool, serve individually or in a large bowl for your guests.

Enjoy!

November 24, 2012

A Special Event Book Makes A Great Christmas Gift

Hello, this is Sheila from ShesASassyLady and I am so excited to share with you this wonderful Special Event Book.  This post is a re-run that I made a while back as I really think that it would make a wonderful Christmas gift and it is so easy to do.  Pam at TheBugBytes had been focusing all month on Just Because Cards and although I love that cart I had just made a bunch of cards and wanted to share something else with you! So today I will take you from thought process to completed project. This is a much longer post than I normally do so please grab a cup of coffee or tea or maybe a diet coke or pepsi and sit down and spend a few minutes with me...


I am so excited with this big-little project!!! I say big as it is my first little book of sorts. After deciding to make this project and the size I was going to do I had to come up with a cover that I felt was sturdy enough to take a little abuse and I did not have any thick chip board. So I collected the pieces of cardboard around the office and started cutting and stacking until I felt I had the right thickness.
Before the final cut on my cardboard or should I say future cover I took my papers that I used for the thought process and placed and cut the cardboard exactly the size I wanted.
I ended up using 2 with an old file folder sandwiched in between and I am thrilled with the results. I used an ATG to adhere the three pieces together.
I then trimmed my DCWV Maraposa card stock and covered the cardboard making sure edges were glue with Zip Dry so they wouldn't pull apart.
I marked where the bottom was to I could make sure I had a front and back cover and as I was using the same paper on both it was easier to match and make sure the paper was going in the right direction.
I inked the edges of the dark brown as I didn't want any white edges, just a nice finished look to it.
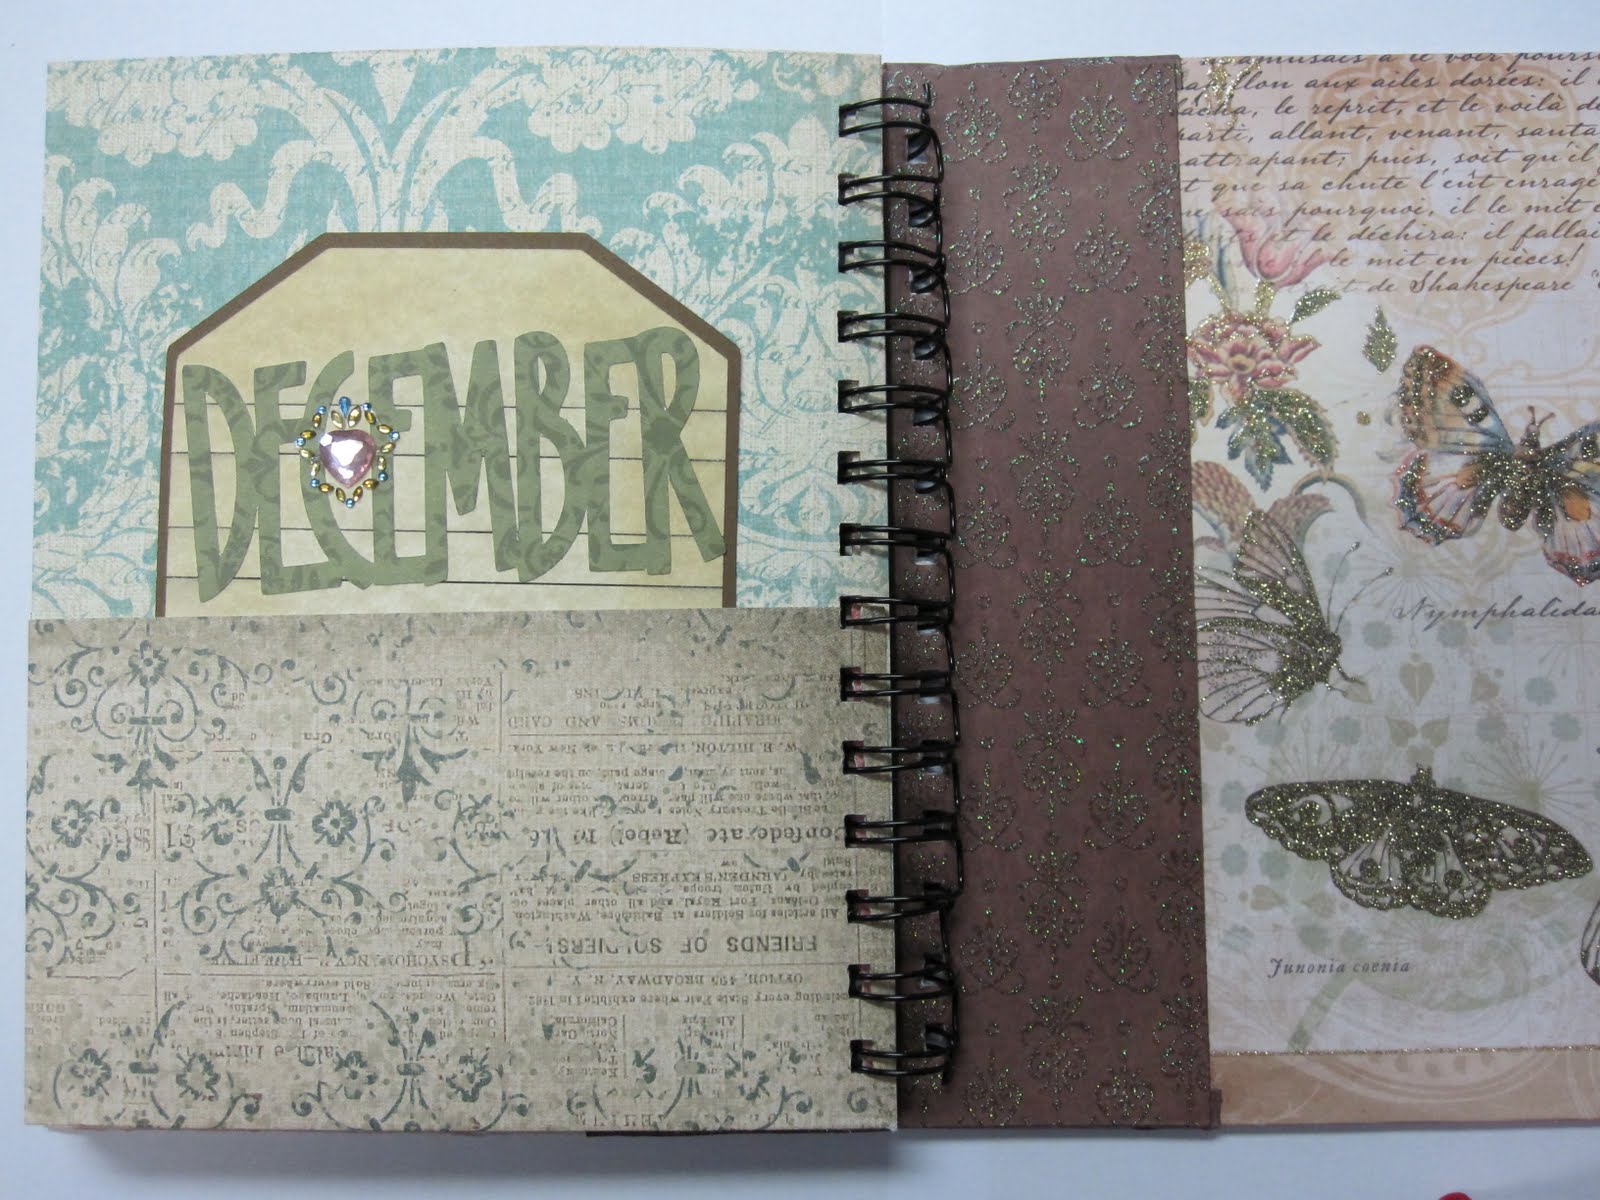
Here is my front cover and all the different color papers I chose to go inside. They are from the K and Company Life's Journey stack. The nice thing is every page had a different coordinated color on the reverse side. Aren't the papers just beautiful. Make sure you tap the photo to enlarge so you can see what I mean. Next I trimmed off 1 inch of the paper so that I would have an 11x12 inch paper.
Then I used my score pal with a score mark at the center or 6 inches on 1 side and then 3 1/2 inches in the other direction.
Then all I had to do was draw up the bottom to form the little pocket, use the bone folder for a sharp edge.
Then fold in half again, and once again take the bone folder and get clean sharp edge.
I continued with this until I had 6 pages or 12 pockets; 1 for each month of the year.
Well the book part is almost ready.... All I have to do is bind it and decorate it. Look how nicely these colors coordinate?


Next I need to start making my tags. I decided to do a tag I could fit right in the pocket rather than on it as I didn't want to make another book it the space filled up, but I could easily replace a tag or write on both sides if I needed to. It was actually easier to design this on my Gypsy Woman and write with the Cri-Kit Pens than to type up and then print with card stock on my computer. I use my pens whenever I can.

This was the second video I did with the pens, you know I made a blunder with the first and had to redo it!

I took the extra time to ink the little calendar pages and I am so glad I did, they look so much nicer, don't you think?
I glued all the months on the tags and there is plenty of room for birthday and even anniversary's. The neat thing is that if one side gets full I just cut another and adhere it to the back! so easy!
Thought I would show you a couple of the backs. They come from the same K and Company Life's Journey stack and are so beautiful!
Well here are my pages before binding them. I don't mind telling you I am a nervous wreck as I have never used the Zutter Bind It All before and I don't want to goof this up!!!
Let me tell you even though I watched the video several times and read the little book I did plenty of praying when I did this, and God is good - it cut beautifully. I had a little problem with my page order but was able to get that figure out too. If you need assistance in this click HERE for the Bind It All video.
Now that it is all together I will use my little cuts from my wonderful Gypsy and Cricut... my Dynamic Duo to embellish along with other goodies. I am going to keep it lite as I don't want this book to get too bulky.


Now I sure hope you like my little special events book. It sure has changed from thought process to finished product but I love it. I can keep all my dates in one place and plan for the entire month what cards need to be ready and when. After making I realized there isn't a book big enough to hold a years worth of cards for birthdays and anniversaries but this is the perfect answer for what I need. It is pretty and so easy to refer to and update when ever needed.
I sure hope you enjoyed today's project and I hope I didn't bore you with my first videos for a project. This book was so much fun to make and it really challenged me, yet it is something each and everyone can do too.
MyFreeCopyright.com Registered & Protected
Thank you for your sweet words of encouragement. Your comments continue to inspire me and lift my spirits.
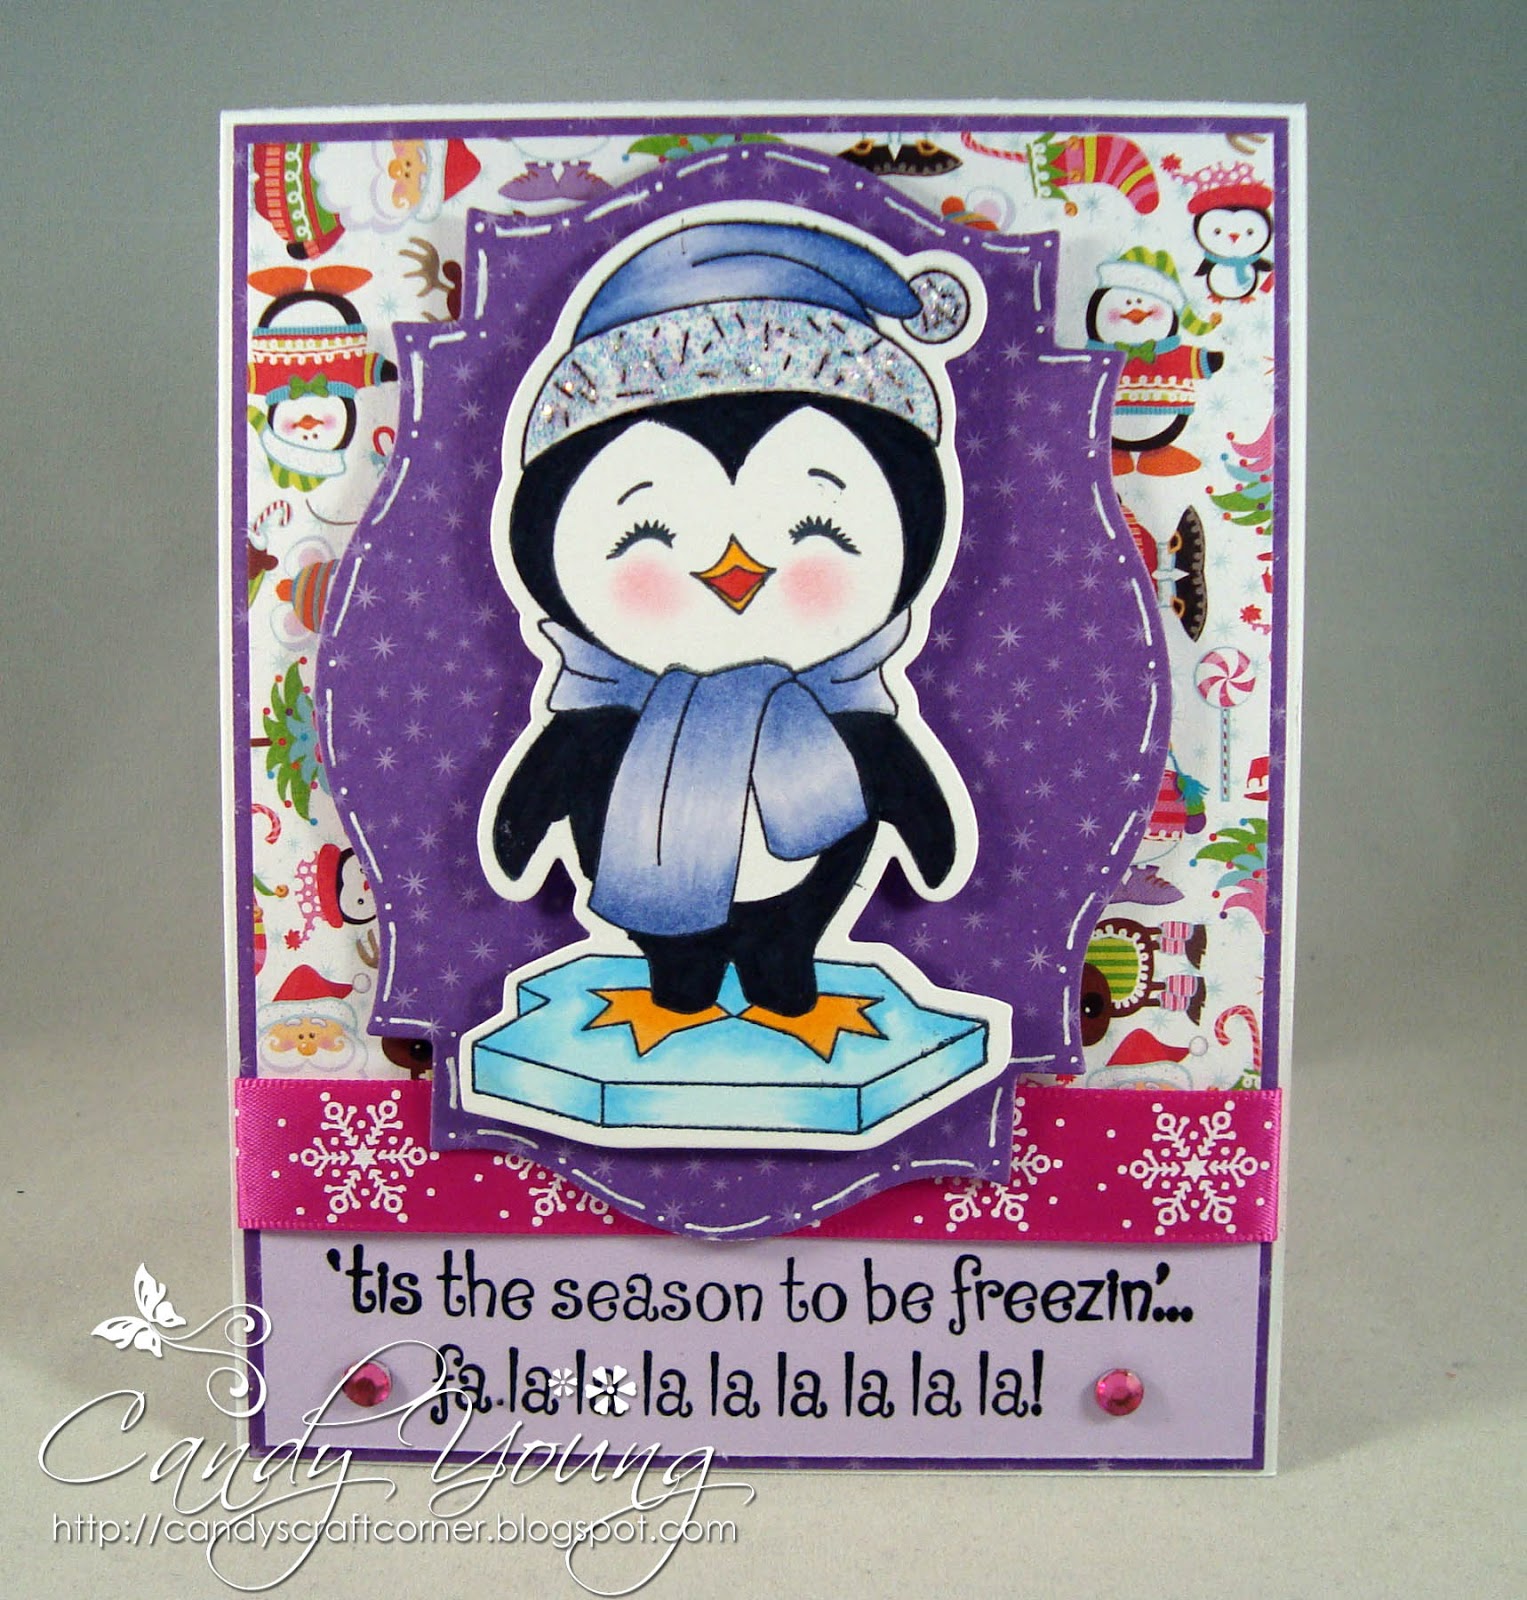
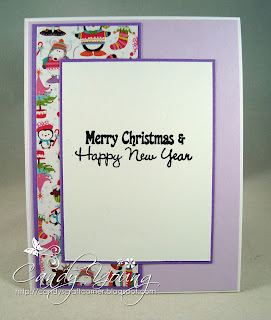
November 21, 2012

Tree of Many Colors!

 
Hello, everyone, Carolyn from Carolyn's Creative Corner!
 
I have lots of Christmas scrapbooking paper...lots of paper!!!
To use some of my paper, I decided to create a 'collage' and cut images from the board. These are paper strips of different sizes, layed next to each other, and topped with ribbon/fibers/rick rack. The paper is glued to a piece of heavy white posterboard.
Close up! I varied the placement of the patterns and solids and had enough paper strips cut to cover four boards.
Remember the trace-and-cut templates of many years back? Well, I found this one with a tree pattern that worked beautifully! I had space on the collage board to add another image, so I chose a Christmas stocking to fill in the spaces.
Christmas Stocking template
 Cut outs!
The Christmas tree was inked and glued on a green card front, a gold star that was applied with foam tape for depth, the sentiment was stamped with white pigment ink.
The base of the tree is gold cardstock that was cut to fit behind the bottom of the tree.

Completed card front
What is a tree without gifts?
This is a Fiskars "Gift" punch. I punched patterned paper for the gift base, then punched solid colored gifts, trimmed away everything but a 'bow', and glued the two pieces together. The little gifts can be cut to several sizes as needed.
Close up of the 'gifts'.
Tip...When I purchase one of Fiskars punches, I will punch a sample and glue it to the top of the punch. I can now see the image easily!
Card fits into an A6 envelope.
Same card front with gifts. I use foam tape to attach some of the gifts for depth on the card.
Inside card
The fuzzy top of the Christmas Stocking is created by cutting a piece of white MS "flocking sheet" a little larger than the top of the stocking, run the flocking paper through the Xyron...
Adhere the flocking paper to the stocking top...
...and trim the flocking sheet to fit the stocking top.
The top is decorated with MS holly leaves/berries paper punch and a small heart punch. A strand of stars was added to the bottom of the stocking.
The stocking was adhered to the card front and a sentiment was stamped.
Card fits into an A2 envelope.
Completed card front
Inside card
The envelopes are decorated with a tree roller stamp by Stampin' Up. Each card has a liner created from the paper used for the strips.
 
Thank you for visiting "She's a Sassy Lady" today!
Y'all come back!