Showing posts with label Beyond Birthdays. Show all posts

April 21, 2015

Friendship Card

This A2 card gets my vote for the easiest card I have ever made. I started with an 8-1/2" x 11" piece of patterned cardstock, cut in half width-wise.


Hello Friend, card front

Sentiment

The 'hello friend' sentiment was cut using the Cricut Beyond Birthdays cartridge. I shadowed it in a charcoal gray.

The dragonfly took a little bit of time. This was mostly because I was using a new die and stamp set, and tried to get too fancy with the vellum wings. I do like that they are still transparent, yet with a little bit of veining.


Inside


Since my aim was to make this attractive yet quick, I did not over-embellish the inside. I did however, print a custom message inside. This is easy to do in Word as a text box. 


And while I was at it, I printed my own little logo on the flip side to appear on the back near the bottom (another text box).


Embellishments

  • The obvious embellishment is the dragonfly, of course. Cut twice - once from white cs, once from vellum. I trimmed off the wings from the white one and sponged the body with aqua and light green. Then I adhered the body to the vellum layer. A couple of blue rhinestones finish him off.
  • I chose a ribbon that coordinates with the yellow and gray in the sentiment. Before applying ribbon to the yellow bottom strip, I punched the edge with my MS lattice punch.

I hope my friend likes her card. This one was fun to make!
I'd love for you to drop by my blog at Gracenotes For Today.


June 16, 2012

Gypsy Made Simple - From Super Simple To Challenging You Too Can Make This Father's Day Card


Time for something new this week! We have a card for you to create whether this is the first time you turned your machine on or you are a pro we should be able to challenge you this week to create! This week I took 2 cuts; the globe on going places and the word Dad from Beyond birthdays and created 3 different cards.  Go grab a cup of coffee, turn on your Gypsy and let's get to work.


This first card was made by setting the height for the word Dad to 2.75" and then stretched the width to 5". You can see this done in video 3.

In this video you will learn to take a simple shape in shadow form and double it to create a card. Then you will be able to add the layers needed to bring interest to your card. You will also learn to use the hide contour and lay your layers on the page for ease of cutting different colors.

This is a cute little card that is as easy as can be to make. Add the right sentiment and you have a great little card that is sure to put a smile on the recipients face.


See how easy this little card went together. I love typing the sentiment on me computer and with a little planning I can effectively place it on my mat to fit the image I am cutting. Now let's move on to the next video and we will crank it up a notch and you will just add 1 more shape to your card to create a totally different look.


See how a few extra steps can make a huge difference, and it isn't that difficult to do. I just love using my Gypsy to weld diffent peice together to create an awesome image. Just think after today you will too.


Let's put this card together now that we have it designe. In the this video you will see me put together two more Father's Day cards.


Isn't this card great? I love it, and with just a couple of extra little steps it just makes a 'world' of difference. I know my hubby will love this card. And doesn't it have a masculine look to it. No bows, bling or ribbon just a nice straight cut and lots of inking.

Here is a close up of the card. Don't you love the dimension? And the inking jsut adds that little extra it needed.

Here are all three cards. I love that I was able to make just a few alterations and have 3 very different cards. I challenge you to use your Gypsy this week to create a card or page. Just create and link it up. And, I really do want to see all of your Father's Day cards and anything else you create. Just link it up and let's see what you did.
Thank you for joining us today and thank you for your sweet sweet words of encouragement. Your comments inspire me to continue sharing with you. Have a blessed week.

April 7, 2012

Gypsy Made Simple - Get Well Card

Good Morning. It is time for Gypsy Made Simple, so go grab a cup of coffee, turn on you Gypsy and let's get to work. This week we are doing a very simple card that utilizes one of the basic features of our Gypsy that makes it so valuable to us. I am using the Beyond Birthdays cartridge today. If you don't have it, that's OK, just choose any cart that has a card shape with a window and any group of words that are welded together. I chose 'get well soon' as I need to get a few more get well cards in my stash as that is getting low.


Now wasn't that easy? This basic technique is so valuable in your creating so I want to make sure you understand how to do it to fit your every creating need. So practice and let's make cut that card out and see how it looks.


Don't you just love the papers I chose? It is from the K and Company 2011 Spring Stack. And look how easy it went together. In less than 5 minutes and it is so cute.... it is just bound to cheer anyone up.

 Look how pretty they look.
 And the inside look awesome matted to match the outside of the card. And the white sentiment section really helps the letters jump right off the card when it is closed. I used the CTMH Cotton Candy Ink Pad to ink my edges using a little Sponge Dauber.

Here is a close up of the letters, don't they look beautiful in that pink glitter paper?
I challenge you to make a Get Well card this week. You need to squish and stretch your letters into a window card like I did and then link it up. I will be giving away a stamp set to 1 lucky link up chosen by random.org. So be sure to link your card up.
If you would like the file on this card just click HERE. Remember to choose your paper wisely.... I didn't the first time I made them and made it all over again. Pattern paper just didn't look good on the letters when I did it.
I sure hope you enjoyed today's project. I sure enjoyed making it and I know someone will feel better just receiving it from me. Thank you for your sweet sweet words of encouragement. Your comment inspire me to continue sharing with you.

August 15, 2010

Card Designing On The Gypsy

I love window cards and thought I would take just a couple minutes today and show you how I design them rather than put them together! Now I will caution you this is my 4th video and I have one 15 second area where you see nothing that I just haven't learned how to edit out yet so please be patient as you will see the rest. I will also provide a file for you on this card and all you would need to do is switch out the number for the age of your recipient. So here goes...


Now wasn't that easy? I am sure you will be able to make your own in no time at all. Just take your time and don't be afraid to play with the design, if you make a mistake start over. It's just like any computer, a wonderful tool that does exactly what you tell it to do.
Here is the inside of the card, isn't it cut with those big tassels on the top of the hat?

I thought I would give you a side shot of this card so you could see this awesome paper from My Mind's Eye.
Aren't these papers just yummy?

Here is the inside of the card, don't you just love the little tassels on the top of the little birthday hat. I'm sure this will put a smile on our little Carissa's face.
Thanks for joining me for today's little project. Here is the Sassy 6 Birthday Card Gypsy File and DS File.
MyFreeCopyright.com Registered & Protected
I am always encouraged by your sweet - sweet words. Your comments inspire me to keep scrapping and sharing things with you.
signature

July 13, 2010

6 WINDOW CARDS IN JUST AN HOUR!

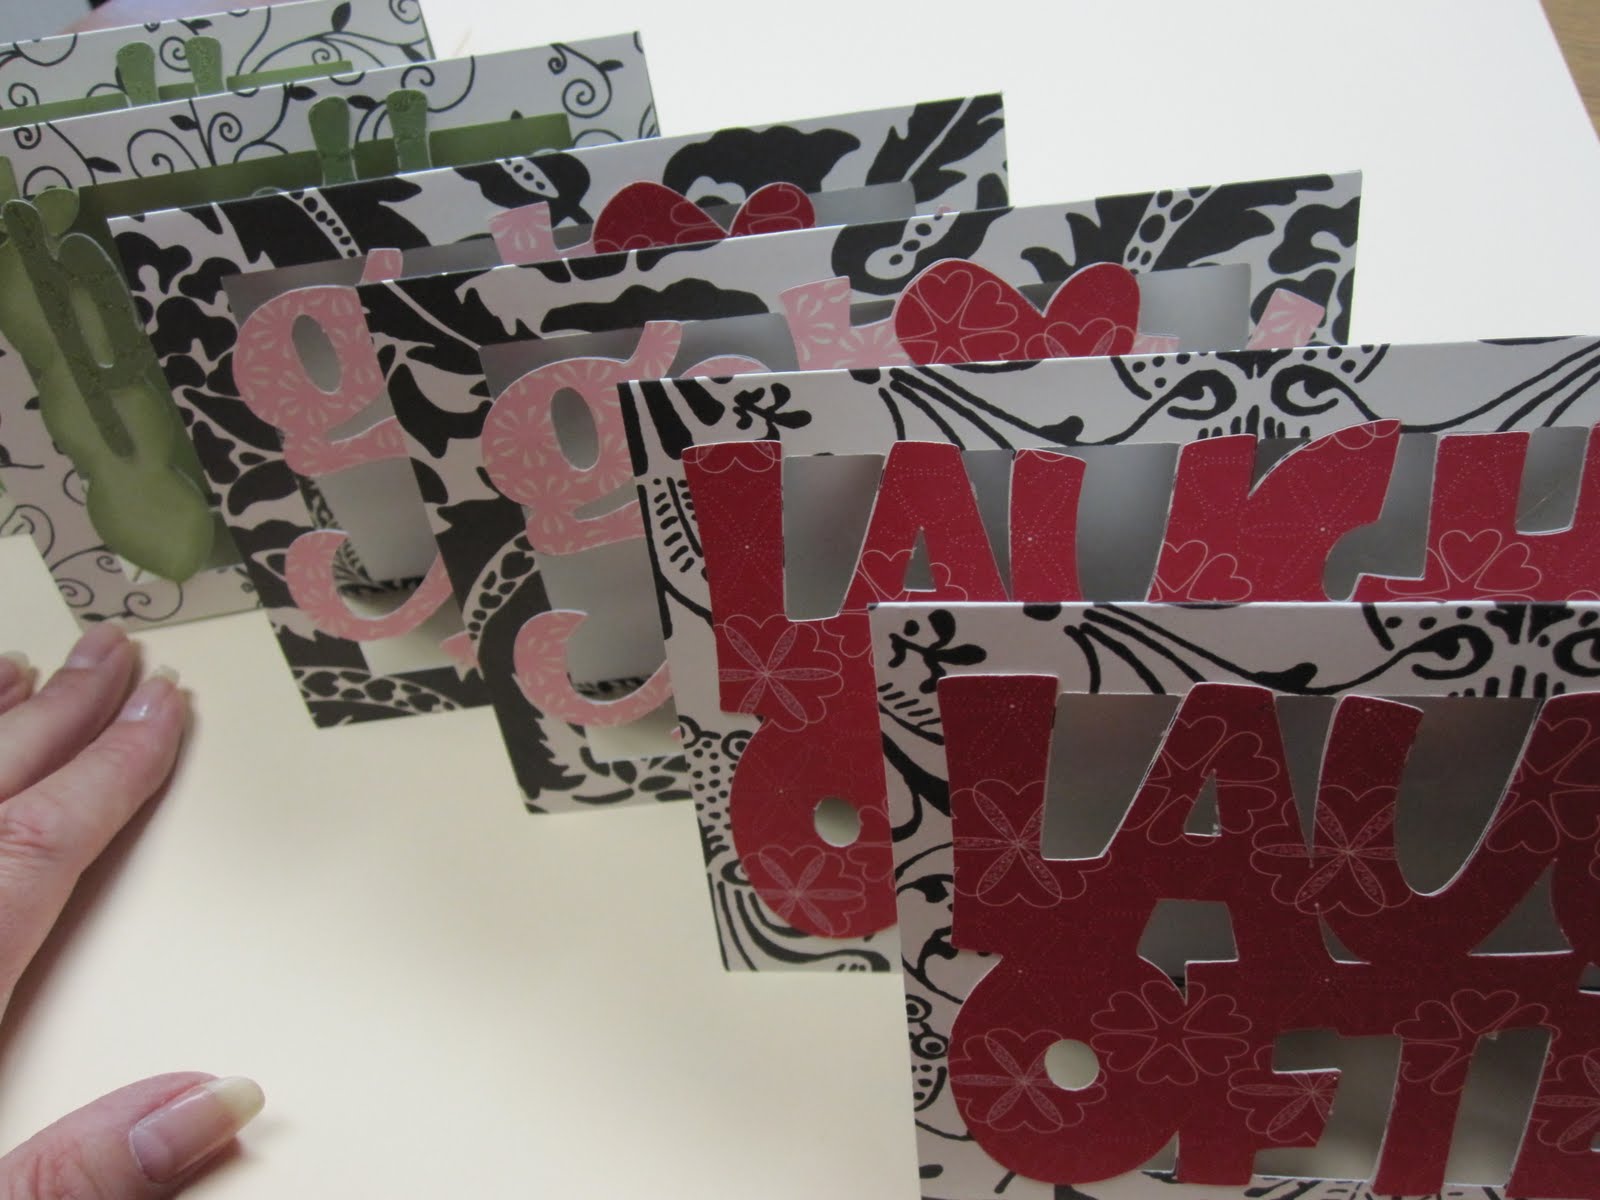
Doesn't this look like a lot of work? Well with a little planning they were all completed in just under an hour! I am trying so hard to get my card file back in shape that I am creating cards like crazy. With my work schedule I don't have the luxury of making something at the drop of a hat and I bet yours is the same to. When I have the time to create I need to be productive and produce results. So let me share with you what I did. Below is a copy of the three individual cards.
Don't you just love the brightness of Laugh often?
The Get Well Soon needed a pick me up so I added stickles on all the white dashes.
I love the colors here too.
The first thing I learned to do is cut 2 cards at a time of the same card. you are going to use a 12x12 sheet of paper in most instances so get your monies worth and stop wasting paper! Plus it is easy to assemble 2 identical cards at the same time. I just design and lay out for ease of color cutting.
See how everything just lines up perfectly, 1 cut two cards.
See, a perfect cut.
Lines up perfectly so I remove all the pieces and move to the next cut. I keep a template on my Gypsy for window cards so all I need to do was add my title and place them in order. It took only 15 minutes while watching TV with my handsome hubby to design all three cards. when I woke up in the morning I already knew which paper I wanted and went to work.
This is the get well soon design ready to go, again 1 cut 2 cards.
Lay the paper on your mat and cut your cards. Now while they are cutting you need to be scoring the 1st cut and getting your paper on the mat for the next cut.
Scoring is easy with the score pal. And for advise on this card so that you do not bend the front place the back of the card side up, draw the bottoms together making sure the bottom edge is lined up perfectly and gently close this card the first time then use your bone folder to tighten the crease. I share this because even though you scored this card it wants to fold at the weakest point which is at the top cut, so take it slow and it will work perfectly.
The second cut is perfect too! I'm almost afraid to continue as it is going so well!
The 3 set of cards is the Pretty Peas... I just love this card and the title. Pretty Peas on the front and you can hand write so many things on the inside like Get Well Soon, Meet Me For Lunch Next Week or Have The Best Birthday Ever and so on and so on!
Paper ready, soon as the machine is free go for the third cut.
I inked the 2 pea pods and the sentiments paper for the inside of this card and while it was drying I put my supplies away.
Then I packaged up all the little pieces and had a huge card kit to do at work during my lunch. I figured this would keep me busy for the week... WRONG!
Look how easy this goes together just a little Zip Dry Glue and time.
Piece by piece I just kept on going. I used my Glue Glider Pro to glue down the sentiment sheets on the inside of the cards.
Isn't the paper beautiful on this card?
Here is a quick peek of the inside.
With only 4 pieces to a card it goes together in no time at all.
I didn't like how plain the card looked so I quickly added the stickles and that took 5 minutes for both cards. I had asked Pam for advise on this but before she got to me I stickled it. Pam would have me to ink the edges and you know I think her way would have been a lot prettier. Next time as mine is wet now.
You have to love this black and white/ green patterned paper from Kand Company it is 2 sided and just awesome. The pink and red multi color and the greed solid colored stock is Stampin Up from my friend Barb at Snowman Lovers Paperie. The green glittery paper is DCWV the Songbird Stack.
Here they are and in just 15 minutes and that is with taking photos! Mind you they are standing and drying but they are done.
 
Here is another shot of all six cards. I hope you enjoyed today's project. I sure had fun with this one as I challenged myself to finish as fast as possible and I am thrilled with 6 cards in an hour! Fifteen to design, thirty to cut and another 15 to put together!
Now to get you started with your own card stash this is my Get Well Soon Gypsy File or Get Well Soon DS File; Laugh Often Gypsy File or Laugh Often DS File and finally my favorite Pretty Peas Gypsy File or Pretty Peas DS File. All you need to do is pick your papers, download, cut and put together. Have Fun! 
MyFreeCopyright.com Registered & Protected
I am always encouraged by your sweet - sweet words. Your comments inspire me to keep scrapping and sharing things with you!
signature