July 7, 2012

Gypsy Made Simple - 3 Fold Coyote Card


Good morning! Sure hoping you are having a great summer, enjoying the warm weather and all that comes with it. This week I am revisiting the Tri-fold card with a new design. I made this card for a dear lady that you probably know; Audrey from Cute And Some. She has been busy taking care of an ill family member for the last couple of months and has been away from crafting and blogging. All that know Audrey, know that she is a special lady that always has a sweet word of encouragement to those around her. So I had to come up with something special for her.
I absolutely love the Tri-fold design on a card as it is so unique, almost like a shape card on steroids so I had to do another! This design is similar to Amy at The Stamping Tree, I scraplifted a card that she made from my Gone Fishin' Shark Card. Amy did a wonderful design and I have been wanting to give it a try ever since I saw it.
So grab a cup of coffee, turn on your Gypsy and let's get to work.


Now see with this easy template it is very each to make a card of your very own. Click HERE to down load the Tri-Fold template.


I wanted you to see the steps I take on some of these cards to make them stand out, expecially those with the old cuts with no layers.

This is what the coyote looks like before and after it has a little inking. Dont you love the difference? I used some Tim Holtz distress inks and a black marker.


See how nicely this card comes together. I ready all the little pieces first and then assemble it. I used a lot of different ink from Close To My Heart. I reuse the daubers but keep them in there own little case that is labled thanks to Ian over at A Newbie Crafter. Ian designed the lable with all the Close To My Heart Ink names for the dauber case and I love it.
Here are just a couple of photos showing what it looks like as you open this card. As you can see there is plenty of space to stamp a sentiment of write a little note.

I just love the inside of this card. I had plenty of room to write a little note to Audrey and I sure hope this card put a smile on her face.

Here is a close up of my Saguaro Cactus. I couldn't remember the name of it if my life depended on it while making that video! Don't you just love the effect of the sponge on it? It looks like litle needles all over it.


With this close up you can see the little Micro Beads on the moon, isn't it awesome?


Don't you just love how that little coyote just peeks out and howls at the moon? Click HERE if you would like this card file too. Don't forget I made the card two up so you will have two cards when you complete it.
Here is what my finished cards look like. You can see I added a couple of hand drawn stars with a gel pen on the one on the right and I really like that. I hope you like today's post. I sure had fun making and designing this card and I am sure Audrey will love it, don't you? I hope you have a great week. I challenge you to make a card of your own this week and link it up. Click HERE for the template and HERE for the Coyote Card file and be sure to link up your card!
Thank you for your sweet sweet words of encouragement. Your comments inspire me to continue sharing with you. Have a blessed week.

July 6, 2012

Dream Where

Dream where troubles melt like lemon drops

Hi
This is Pam from http://papillondigitaldesigns.com/  and http://www.thebugbytes.com/. Today I am a designer at http://shesasassylady.blogspot.com/. Thanks Sheila for giving me this opportunity.
I love stamps and love coloring. I prefer digi stamps as I can resize them and even cut them on my silhouette cutting machine. For card making especially for print and cut I use my sd.
Recently I discovered the Hammermill Digital cover paper 80lb. They do fantastically well with copic coloring and are so economical. And they cut so well with silhouette too.
Today's card is an easel card using an image from Mos's digital pencil Spring Fairy Aleta.
I have used both copics and the spica pens to color.
Sorry for the picture quality as I did not have my regular camera with me.


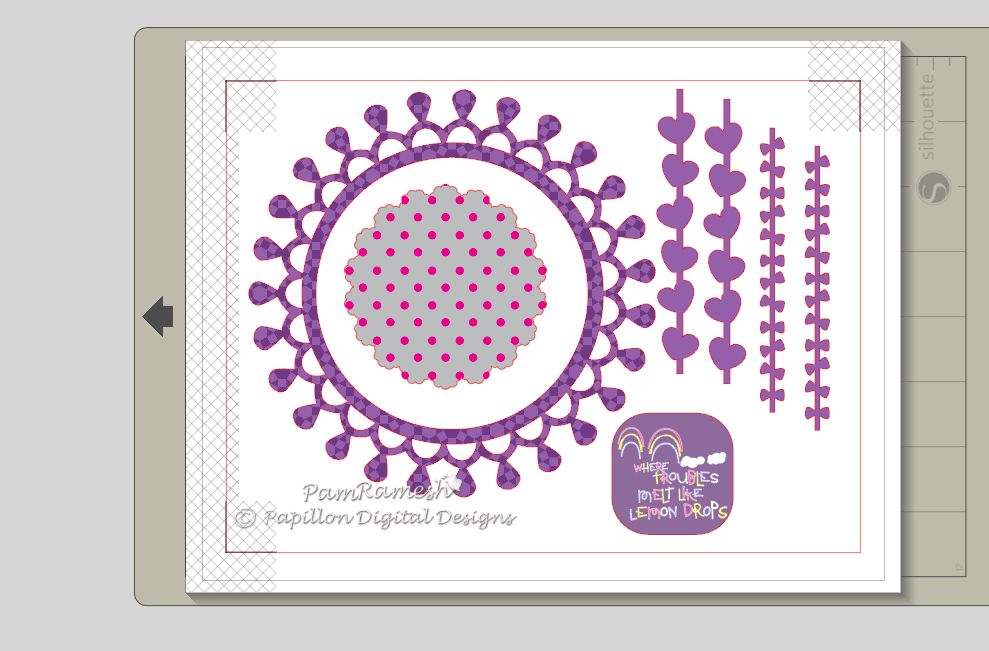
I have used silhouette images and tweaked and created my own for the rest. I had to make 3 files all   print and cut files with the registration marks.
Here is the view of the files

1st file

same file with cut lines shown. I made a score line in the front circle so that I could fold up for the easel effect. (note the images get dulled and the red lines show up when in cut window so that we can see what is getting cut)


The 2nd file


And the 3rd file


Hope you liked the card.
A similar file without sentiment, pattern paper or digi image is available for download at my blog papillillon digital designs under the silhouette studio tab.
Thank you for reading and thanks Sheila once again for giving us this opportunity every month to design on your blog.

post signature

July 5, 2012

My Memorial Day Pages

Well we had a blast on Memorial Day Weekend. We actually had family from Chicago come and visit so it was a really special time for all of us. My husband's sister Susan and her husband Greg spent a few days with us. We always stay with them when we go up north, so it was nice to reciprocate.
It was in the lower 90's so we spent the afternoon and evening in the pool just relaxing and spending time together. Our little pool hasn't been up for long so the water was really refreshing.


It was kind of funny because we had 2 floats and 3 recliners as well as noodles in the pool so we used up the space we had and laughed and laughed when one of us would 'accidentally' fall off a float. Good times for all of us. One of the things I love about living in Alabama is our long long summer. I love the beach and the pool.


I love that I was able to get on line and in a matter of just a few minutes I could produce these wonderful pages. You see I am so far behind in scrapping that I seem to be doing a lot of digital pages just to keep up. The good news is with the help of Studio J on the Close To My Heart Site I am able to keep up with this years events, and I love that. All you do is upload your photos, pick your layout and papers and just drag the photos onto the layout.... can't get much easier than that.

Look how sweet these pages are. The only thing I am missing is my grandson Justin in these photos as since he turned 9 he seems to shy away from the camera and I really don't like that. I will do better the next time as he is so handsome I don't want to miss him in any event. I love the little photo of my little Gavin with his goggles on don't you?

I chased my son around and got 5 photos of his back and he finally said here and posed for me! That's where Justin gets it! Two handsome guys just playing hard to get I guess! teehee

Well that is today's post. I hope you enjoyed it. Here at She's A Sassy Lady we like to give you all kinds of alternatives for crafting. We consider scrap booking be it traditional or digital part of that. We also consider it something to treasure for a lifetime. I hope you keep your memories alive in your albums too.
Thanks you for your sweet sweet words of encouragement. Your comments inspire me to continue sharing with you. Have a blessed week.

July 4, 2012

Multicolored Embossing Technique


Hi scrappers, this is Kate from Sassy and Scrappy.  I hope you enjoy this fun technique I'm sharing with you.  I've seen similar ideas around the blogosphere and wanted to give it a try.


I started by stamping a background stamp with Versamark.  Then I slowly started sprinkling my embossing powder in alternating colors.  Unfortunately, you will "waste" some powder since all the colors will mix together, but I think it's worth it.


And after all my colors are added.  Apparently I missed a spot, bummer.  This picture is before I set the powder with my heat gun.


I also decided to try it on black card stock and I love how it turned out.


Next I placed my heat embossed pattern on my cutting mat, as you can see I chose to use the black for this card.


Next up, cutting.  Pretty simple, right?!  I chose my sentiment from the Silhouette online store and lined it up in my window so it cut directly on my paper.  If you look close you'll see I accidentally cut off part of my 'y', thank goodness I had a big enough area I could cut it again.


Then I simply put my card together.  I used some twine and a border punch to complete my card design.  I have to admit, it feels like something is missing...but in any case, it's a finished card...for now at least.  Lol.


Details
Stamp:  Hero Arts/Basic Grey-Oxford Collection
Pattern Paper:  Basic Grey-'PB and J'
Embossing Powder:  Zing-Red, Yellow, Pewter
Border Punch:  Stampin' Up-Scallop
Twine:  The Twinery-Black
Cardstock:  Papertrey Ink
Button:  Papertrey Ink
Versamark 'Dazzle'
Embossing Buddy-Stampin' Up

Thanks for visiting and have a happy and safe 4th of July!

July 3, 2012

15 Note Cards For Sunday School Class


Good morning. Today I thought I would share a little project I am currently working on. I am trying to mass produce some cards for our Sunday School class. You see last Sunday two of the ladies in our class; Kathy and Jan volunteered to be do outreach for our class. She will keep in touch with those of the class that  is away do to personal reasons such as illness etc. Well I thought I would gift her with some cards to mail out if she needed them as not everyone has email in our class. This is the first dozen that I started with.
First I prepared the base of the card using just plain white 8 1/2x11 inch card stock cut in half. All corners were rounded and edges inked.  The New Testament cart was used and with just 2 cuts I had a dozen of the Jesus fish. The Cuttlebug was used for background and inking was done to offer contrast.


I then bagged all the pieces up and brought them to work. You see I was to meet a customer 1 hour before opening, and that always worries me when theses appointments are set... you never know if they are going to show up or not. This day I was thankful I brought this as the customer arrived two hours late! My doctor would make me reschedule, I was nice and said thank you!

I glued all my pieces together using Zip Dry glue.


Here is a close up of my embossing and how nice the fish looks on top of it.


This is what the finished card looks like and I made twelve of these for Kathy and Jan to use as note cards.

After I finished that dozen I decided to look around my scrap room for any other cards I could ready for the ladies outreach program as I really wanted to start them out with 15 cards. I didn't have anything cut and nothing else designed so I grabbed my scrap paper and went to work. In a half hour I had my 3 additional cards done... all made from scraps!


Don't you love this flower? It is a die that Emma designed from My Creative Time. It was great as I could line up those little scraps and in no time at all have a little flower cut that had little stitching for trim with just one swipe from my Cuttlebug.


Well I don't know if you have been here yet but you need to go to Dee's Bugaboo Boutique, she has got the cutest digital scripture stamps and they are FREE! I ran a couple out and colored in some of the areas with coordinating colors.... isn't that cute? The neat thing is we are studying Galatians so this was perfect.


Here is another front using the last sheet that I embossed and some white card stock. Ran it through the Cuddlebug for cut flower here too and inked it up added a little blue ribbon and the front was just right.


I then added another colored scripture stamp some coordinating scraps and that card was don.


This is one of those Z cards, again made with scrap paper.  There is a small space to write a little note when you open the card in the center. I love that I can coordinate the stamp with the paper. As you can see I have been busy this week getting everything ready for the ladies before I leave for vacation. I hope you enjoyed my little post today and you too bless someones life with your cards.
Thanks for your sweet sweet words of encouragement. Your comments inspire me to continue sharing with you. Have a blessed week.


July 2, 2012

Baseball Window Card


I am so excited to be the Guest Designer today at ShesASassyLady!!  Lori here from ScrappinMyStressAway with a fun window card.

Tanner's Coach Pitch Baseball season ended Friday night.  He got to play in the All-Star game which he called The All-Star World Serious!  Yes, serious ~ he has called the world series the world serious for years!!  This is the title of a near future layout!!!

***Side note:  we live near Omaha, Nebraska and get to visit the College World Series every year even if it is just to see the tents and shop.  We usually have baseball our own boys' baseball games to go to and can't always get tickets.  This year, we got to watch South Carolina's batting practice and Tanner got a baseball!***

  Back to Tanner:  He had a great year thanks to our two wonderful coaches.  He enjoyed playing catcher, first base, short stop and outfield the most!

I wanted to make a card for the coaches to say thanks.

I got out my Gypsy and got to work!

I found this window card base from Calligraphy Collection and sized it to 7.55w x 4.76h.

The glove is from Boys Will Be Boys and sized to 1.97w x 1.86h.  I hid the inside cuts and welded it inside the window.


In another layer, I copied the glove and ball.  I added the baseball bat border (also from Boys Will Be Boys) sized to 3.39w x 1.16h.

I used the font from Varsity Letter and sized them to .88 inches.


I used cardstock to cut out all of the pieces.  I cut out the letters in red since we were the Reds!

I inked the glove, ball and bats with Vintage Photo ink.

I added a touch of red with the twine to finish it off.

This card is modified from a file I created last year.  My wrist is getting better - I can now cut simple cuts with a scissors YAY!!!  I have 5 more weeks of PT!!!  So grateful I can do some crafting, and so grateful that Sheila has me over today!!!