November 8, 2012

Christmas Gift Ideas

Hello everyone! Java Jen here from JAVA JEN CREATIONS. I hope you're having a fantastic week! Mine is full of packing and cleaning out! Can you guess what I'm doing........? That's right! A cross country move from Texas to Ohio! We are relocating back around our family including our 3 precious grand boys! This is exciting, but as some of you may know, moving really stinks!! I'll be so glad when we're finally settled again!  With that said, and because of the fact that ALL of my craft supplies and machines are completely packed, I decided to post some pics of some past gifts I have made for friends and family. I had so much fun making these and they really are quite easy! Thank you, Sheila, once again, for allowing me to share here! It is always a pleasure!  I am also posting this over at CRICUT IS CLOSE TO MY HEART so be sure to visit that site - always great CTMH things happening!

                                        This is a FIRST CHRISTMAS ORNAMENT made 
                                         with one sheet of Paper Layerz paper! I will have some 
                                         links at the end of this post to some products and/or 
                                         techniques used.


Here is an ALTERED FRAME ready for a fishing pic!


Here is a FIRST CHRISTMAS MINI ALBUM made using the
back-to-back book binding technique that Heidi Swapp 
uses in a tutorial on My Craft Channel. I used my Creative Memories Cricut cartridge,
Cheerful Seasons.


Now, my favorite projects were my COOKIE SHEET MENU BOARDS!
I used several Cricut cartridges: Country Life, From My Kitchen and Art Philosophy.


I used the Cricut Lite cartridge Chore Chart to make my nephew a 
CHORE CHART! :-)


Another cookie sheet project was for my Mother-in-law - a MINI ALBUM on a
cookie sheet! I used the Cricut Imagine cartridge, Kate's Kitchen.


I hope you enjoyed this trip down memory lane with me! :-) Now for the promised links:
PAPER LAYERZ paper from Above Rubies Studio: HERE
HEIDI SWAPP'S BACK-TO-BACK BOOK BINDING TUTORIAL: HERE
MY CTMH WEBSITE: HERE
MY CREATIVE MEMORIES WEBSITE: HERE

Thanks for stopping by! 
JAVA JEN

November 7, 2012

Owl Treat Box


Hello scrappers, this is Kate from Sassy and Scrappy.  I have to admit I haven't had much crafty energy lately, but I'm trying to turn that around.  I'm hoping I will be inspired to start working on my Christmas cards and getting ready for December Daily, which I'm planning to take part in this year.  At times like these, to get myself back in the groove, I find it easiest to pick a project that requires minimal creativity...in other words, I chose to create a 3-D image that some other creative person already designed for me.


The owl box is from the Silhouette online store, which means all I had to do was pick out my paper and embellishments.


I did some inking around the edges of the card stock and pattern paper.  I assembled the owl before putting the box together, it just seemed easier that way.  It's difficult to see in the pictures, but I added glossy accents to the eyes and beak.


I thought a bow was appropriate for this girly owl.  Now all that's left to do is add some treats and pick who the lucky recipient will be.  I apologize for the washed out pictures, my lighting was a little off.

Details
Pattern Paper:  My Mind's Eye Stella and Rose (Hattie)
Solid Card Stock:  Papertrey Ink
Ribbon:  My Mind's Eye Stella and Rose (Mabel)
Glossy Accents
Stampin' Up Dimensional Adhesive
Ink:  Papertrey Ink-Vintage Tea Dye Duo

Thanks for hanging in with me.  I hope you enjoyed my little project, perhaps it will provide some inspiration for one of you.

November 6, 2012

My Portland Maine Pages

I am so excited to share these pages with you. Hubby and I went on a wonderful trip to Portland, Maine and we had the best time. It was a company sponsored trip yet I was able to tag along and we had 3 days of free time! It was great and we celebrated our 42nd wedding anniversary while we were there!
As you know things have been very hectic in my life as of late and I just want to thank you for all the wonderful letters, notes and prayers in our behalf. I am thankful for each and everyone of you. I also want to thank each and everyone of the Sassy Designers for being there and always sharing a wonderful post with you... they are THE BEST!


For this post I used the Close To My Heart Studio J digital page program and this time made a video showing you how easy it is to design the pages no matter which option you choose from the site. My video will show both options. Either way it will take you around 15 minutes to make 2 pages. And with my hectic life as of late this is a wonderful option.
This is the 2nd page. My handsome hubby and I did a lot of walking and check out the sites... so many special memories captured and saved to cherish. I just love the size of the photos in these shots. And I like that I can fit a lot or as little photos as I want using this program. Just pick and choose for your particular needs.
Here is what the pages look like completed. All I need to do is purchase and print and Close To My Heart ships my pages right to my house. I always purchase the Studio J 5 pack as it is only $39.95 which breaks out to $4 per 12x12 page and I love that.
I sure hope you liked my pages today. It was so nice to spend a little time with you. Thanks for joining me today and tank you for your sweet sweet words of encouragement. Your comments continue to inspire me. Have a blessed day!

November 5, 2012

Give Thanks Banner


Happy Fall Y'All!!!  I love the fall colors and especially the changing colors of the leaves.  It helps that my trees have tiny leaves so our mower eats them up and I don't have to rake them!!!

This is Lori from Scrappin'MyStressAway with a fun fall banner to share with you today!


I used the leaf from Gypsy Wanderings sized to 4.21 inches.  I hid the two inside cuts and cut out the leaves in white cardstock.


I used the font from Martha Stewart Seasonal Cake Art and sized them to 1.25 inches.  I originally cut them out of dark brown cardstock, but once I finished the leaves I changed my mind.  I cut them out of yellow cardstock.


My friend Jenny from Yogi Memories has been playing with inks Tim Holtz Style and inspired (and helped) me with this project!!


I started out with these inks and a mister of water.  I also had my heat gun plugged in and ready to go!


I crumpled my leaves and got ready to make a mess!!


By inking my mat and spritzing with water, I was able to get the colors to blend, bleed and make wonderful leaves.  If I did not like the look, I just added more ink and water.  The heat gun set the colors.


I had so much fun and made a huge mess!!!  I cut out a second set of leaves out of brown cardstock to staple to my leaves.  They were a little flimsy after the transformation!!


I added some twine bows and threaded them with some beading cord.  I inked the yellow letters with red ink and pop-dotted them onto the leaves.


I hung my banner above my French doors.  It is so hard to take a good photo of banners, so I added the close up shots!

Thanks for stopping by today!!


November 3, 2012

Time To Share The Tags You Have Sent In Along With A Couple Of Mine

Good day! Thought I would share 2 tags with you at the beginning of this post that I made and then share all the little tags that came in the mail… both by video and photo. This is going to be a photo heavy post filled with all kinds of neat ideas.


First I used the My Creative Time tag die and some scrap papers  along with a little stamp set from Close To My Heart.  All I did was stamp the little image on colored scraps and fussy cut them out. Note I could have cut them with the Art Philosophy cart but didn’t take the time to open up my expression and Gypsy. This was a great hands on project that anyone could do and it gave me the opportunity to just sit back and enjoy my time with you.

This is just another color tag from the same stamp set but the other tag die from the set.

 Doesn't it look great popped up with the little stones on it? It really has plenty of dimension.


Now wasn’t that easy? I just love creating and using all the little goodies that I have in my scrap room. Sometimes I think it takes longer making projects with scraps than with fresh paper as it takes a little longer to match things up. This time it was real easy, I just used what was on the top of the scrap pile! LOL When I finished it only took a few minutes to clean up and I have a couple more tags for Christmas.


It’s time to share those tags! First I want to thank all the ladies that participated by sending in their tags and even thank those of you that sent little notes saying they couldn’t participate this time because of family needs. It was really great hearing from all of you.


Designed by Geyda is just so adorable…. The tag is a shape card that has a little fold with a little sentiment on the inside. Geyda’s blog is Cards by Geyda cardsbygeyda.blogspot.com  so be sure to stop by and check out all the awesome things she designs. Thank you for sharing with us Misty.


This is the inside of the little tag, isn't it just perfect?


Misty also designed this awesome little Halloween tag. I just love the bright colors and the sparkly bat and letters…. AWESOME. I just can’t wait to see more! Be sure to check out Cards By Geyda.


Here is a close up.... wonderful isn't it?


This adorable little tag is just as cute as can be… I love the stickled Santa jacket and little hat. The little message is heat embossed and really looks great.

This tag was designed by Sue Horton of N Ridgeville, Ohio. Sue does not have a blog but I sure wish we did so we could see more of her awesome designs! Sue if you ever start up a blog just let us know and we will all be over to support you!
This awesome little tag was made by one of our Sassy Designers Lisa Sylva of Lisas Craft Room. and it is awesome. I thought it was as cute as could be but when I pulled it out of the little baggie it was in I was delighted to see it was on a little wobble.
So cute! Be sure to check out Lisa’s blog as she has many many designs that are sure to delight you! Thanks for sharing Lisa.

Aaron Brown of  Booth 32 made this adorable little mitten tag. It is made out of Close To My Heart papers and twine. I just love how Aaron used a paper piercer all along the edge to give it a stitched look. Thank you  for sharing with us Aaron.

Sandy Hentzel of  Scrapbook Blessings  shared this great little tag.  I just love the design and it reminds me of those winter eves when the snow falls and the children couldn’t wait till morning to play…. Don’t you just love little cards and tags that pull on your heart strings? Thanks Sandy for sharing with us.


Here is one of my tags made from the Very Merry Tag cart and I just love how prett it is and so simple to make. The great part is the the deer can be reserved to make another tag just as beautiful.


This great little tag is one of 24 that I made in just 2 hours while on my lunch hours at work.... so easy just punch, stamp, color and glue and they come together in no time at all.

Last and certainly not least is this AWESOME tag designed by Barb Sheffield aka Luvy of It's A Luvy World. Oh my goodness this tag just blew me away and made me look at tags totally differently than I ever did… This is like a work of art and when you are done drooling over the workmanship you get to eat a full size candy bar! AWESOME is the only way to describe this tag… AWESOME.  The base is embossed,  and has a wonderful little pocket to hold the candy in it. Love the rosette and the cat is perfect all glittered. Love it! Thanks for sharing with us Luvy!

Here is a close up of the little rosette and cat, isn't it just awesome with all that glitter and bright colors?
I have to tell you I was really excited that no one asked to have their tag sent back as I decided to make a little mini memory book of all the tags I receive this year as it will make a great idea book for years to come! She’s A Sassy Lady and The Bugs Byte joined together for a tag swap so there will be plenty to place in it with all of these!
I sure hope you enjoyed today’s post. It was great being able to share a couple of my tags with you, but even better to feature all these awesome tags you shared with me! Thanks for joining me today and thank you for all your sweet sweet words of encouragement. Your comments inspire me to continue sharing with you. Have a blessed week.

November 2, 2012

Treats ! There is always an occasion!

Hello
 This is Pam from The Bugbytes  & Papillon Digital Designs your designer today  on She's a Sassylady.
And wonder of wonders no copic colored project today for you. Gasp!!!
I thought I would share with your a simple project I made. This treat bag and card can be used for all occasions. You can just change the pattern paper to suit the occasion.


The treat bag is a pencil pouch from silhouette store.  I resized it to fit a 8 1/2 by 11 paper. When I resized I made sure to ungroup the circles (for the tie/bind) and then regrouped them so that the size of circles does not change as I did not want the punched holes too big or too small.
I used twine to close after adding the candies of course. I decided to bring in a little blue by adding it in the flower and also the small punched flower (ek success). The design is also from silhouette store.


For the card I decided to add some twine too like a border and punched some flowers (ek success) to go between the 2 rows of twine. Too make the Twine border I just ran my ATG scotch tape and cut 3 strips of twine and glued it on. 3 layers of twine fills in the tape beautifully. A center flower finishes the card


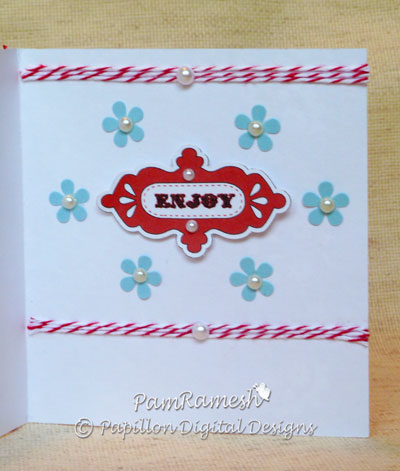
For inside of the card more twine and punches and a label cut in silhouette sd


So that's my project for today.
Hope you all enjoyed it. Thanks Sheila for letting us  post in your lovely blog.
Happy Crafting!

post signature