February 8, 2013

Scalloped Birthday Card

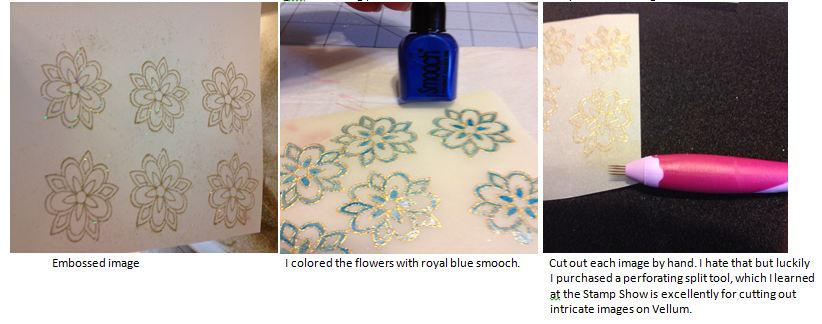
Hello, this is Danita from http://danitasdesigns.blogspot.com/. My project this month is was inspired by a technique I learned at the Stamp Show this past weekend in Atlanta. I don't stamp, so this was a real challenge for me.  I told myself I was going to the Stamp Show (first time ever) to try to get ideas and learn different stamping techniques. I didn't have enough time to go to each vendor to learn the different stamping methods, but I will share with you what I did learn. This is stamping and coloring on Vellum. On this card, I did the flowers.

 I took this picture outside so you can really see the Vellum and embossing.
  
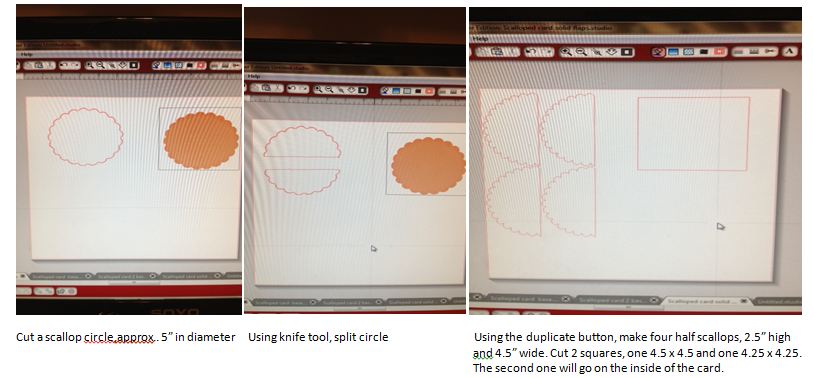
Here's the step by step instructions for this card (click on the picture for larger view)

First, the flowers:
 

 The card: ( Cardstock is from DCWV "The Green Tea Stack".)


I'm still trying to learn this method and hopefully by the next time I post for the Design Team, I will have mastered it!  Thank you for looking.

February 5, 2013

Elmo Makes Great Treat Bags


Good Morning Sheila here and I am so excited to be with you today. Not only is this showing on my blog today; She's A Sassy Lady, but I get to play along with Pam at The Bug Bytes she is such a sweetie and a great friend.

You know we all love crafting and making beatiful things with all the wonderful things we have collected. You know those yummy papers, embellishmets, ribbons and so on. And don't forget our equipment,,,, the Gypsy, the Cricut, CCR, Silhouette and so on. We all just love to craft... but sometimes we just have fun and this was just a fun project! My children grew up loving Elmo and when I looked at the cartridge I just knew I had to have it! but then I set it aside, well this week I got it out and in just minutes I had designed the treat bag topper.


Look how easy it was to put this together! Can you believe it. And so fast to cut out. In 30 minutes I had 12 Elmo's cut, and it only took a few minutes to put the little guy together. This gave me plenty of time to visit with you!


Look at these cute little guys.... I made up 8 right away with the little M&M bags and knew I had to make more! So I wnet back to my Cricut and cut out 6 more! Now my grandchildren will each get a little surprise in the mail for Valentines day and I know they will love them!

I hope you enjoyed today's post it was so much fun sharing with you! Thank you for your sweet sweet words of encouragement. You comments inspire me to continue sharing with you. Have a blessed week!

February 4, 2013

Be Mine Card

Hello and Happy February!!!  

This is Lori from ScrappinMyStressAway and I am in Valentine mode as I am sure most of you are!  I am so excited to be here at She's A Sassy Lady today!!

I bought my CTMH Artiste cartridge from Sheila and I LOVE it even more than the CTMH Art Philosophy cart!!  I was at a crop last weekend and saw some of the z-fold cards that are on this cart (from the CTMH vendor) and I was inspired instantly!!!!

I saw the cuts in the booklet and could not picture what they would make or look like (I am a visual person)!!

All of the function buttons on the "S" key are z-fold cards with different cut out shapes.  Naturally, I picked the heart to work with.  I sized two card bases to 5 inches.

NOTE - I created a file on my Gypsy with all of the cards and coordinating shapes so I would not have to hunt the next time I want to make one.   I labeled my file cards.artiste.

You can easily cut out the card base once and go with it, but I wanted to layer some paper on.  I cut one card out of red cardstock.  The other is a 2-sided paper from the Carta Bella Devoted Paper Kit paper.

It is super easy to fold the card in half and then fold the front half back.  There are score marks to guide you.


I trimmed off the front flap out of the Carta Bella paper.

 In order to create a red mat, I trimmed a tiny bit off of the sides.  I adhered it to the front of the card.

On Layer 2 of my Gypsy I placed the shapes I planned to use on the card.  I wanted one more card layer so I copied it onto this page as well.

I put "Be Mine" sized to 1 inch on my mat.

The hearts are sized from 3.20 to 3.47 inches.

I put white and black cardstock and another double sided paper from Carta Bella and cut them out.

I ended up using the back side of the cupid paper.  I inked the white heart with black and adhered the "Be Mine" sentiment.

Here you can see how the heart seems to move when you open the card.

Two patterned papers on one project is as many as I am comfortable with!!!  I left the heart red but added a Recollections white paper flower, red button and some twine.


What a fun card!  I can't wait to make the others!!!

Thank you Sheila for having me over today!!!


February 2, 2013

I Made My First Flip It Card


This is my first Flip It Card from Stamps Of Life. And it was so much fun I had to get the Die set for it! Can you stand it! Stephanie has a contest going on right now and she sent all members of her stamp lub 1 card to design so that you cound enter..... I did this one and it was so easy. I have cut out many more but need this one to enter as it was my first. I just the PinWheels 2 Stamp which was the January club stamp to make the card and look how fun!


This is how the card looks standing up.... you can even see the liquid pearls I used at this angle.


This is what the card looks like when you open it.... Don't you just love it. I used my Cricut to cut the scallop and the circle. Easy-peasy Card. Be sure to check out all the goodies on The Stamps Of Life site.... you will love it!

I hope you enjoyed today's post. Be sure to come back Tuesday I have a great project for you!

Winner!


What a great week and thank you for the wonderful comments and entries in last weeks post. I am so excited to announce the winner of last weeks little contest.  ENJOY! So without further due... Our winner is:

Please contact me via the contact button with your full name and address and I will get your little card kit sent out right away!

February 1, 2013

Love is Everything

Happy Valentine's day in advance
Hi
This is Pam from Papillon digital designs & The Bugbytes today on Shes a Sassylady
I love using whites especially when you want to make elegant cards for wedding or for those romantic moments. Combine them with pastel colors with just a touch of darker shade in focal point and they give a dreamy look.
So I decided to use lots of whites


This is cut with silhouette. I used a label and made it into a shape card. I wanted an easel card so I scored in half the front of card. remember when you make an easel card it is preferable that you make another layer of the front same size as when you fold you want it to remain same. You can then mat this. If you just go for the mat only then you will have the bottom half matted and top half will look strange when you make it stand as easel. I hope I am making sense
I embossed the front piece with cuttlebug swiss dot folder. The dove image is also a silhouette cut file and so is the sentiment. I added some flowers and a rhinestone ribbon. I added a Love sticker from studio G in the center between the doves.
Love silhouette for how intricately it cuts.
Hope you enjoyed this. Do share your creation with us.
Thanks Sheila for having me here.

post signature