August 22, 2012

Popsicle Card

Hey everyone! It's Candy here from Candy's Craft Corner. It's my turn to guest design at She's a Sassy Lady. Thanks so much for having me Sheila!
I want to share with you a summer card I just made. I used my new stamps from The Stamps of Life.
I stamped out the outline of the pops and then used the different patterned pop stamps to fill in. I then cut out the pops and popped them up on foam dots and covered them with glossy accents. 
Thanks so much for having me today Sheila!
Take care,
Candy

August 21, 2012

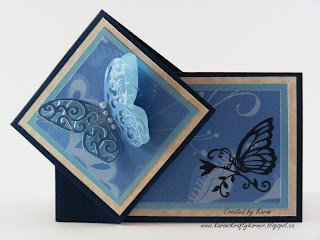
A Blue Birthday

Hi there - Karon here from Karon's Krafty Korner - I'm going to be here every third Tuesday of the month from now on. Thank you Sheila for encouraging and enabling me:-)

Not a "blue" birthday in the true sense of the word, but I haven't made a card all in blue and I wanted to try this out to see what it would look like.


I have been doing a series of folded cards on my blog and thought I would share a relatively easy one with you.  This is called a Side Diamond Springfold card.

Out of one piece of 8.5" by 11" card stock you can make two card bases. Your finished card will measure just under 4" by 5.5" (at the widest point).

To start you will need a piece of card stock measuring 8.5" by 5.5".

You will score along the 5.5" side at the 2.75" mark.  Turn your paper and score, along the 8.5" side, at the 2.75" and 4" marks.  Should look like this so far.


Next fold the long score line so you have a 2.75" by 8.5" card.  Have your open ends at the top (doesn't really matter but its easier as I have labelled the score marks), you are going to score on the diagonal from the top of the 2.75" mark to the bottom of the 4" mark whilst your piece is folded.  Like this.


Now open up your card and you will have two diagonal folds and nicely centred, like this.


Now we need to fold the score lines.  The two short score marks (the 2.75" and 4" marks) you need to make these valley folds.  Your long fold down the middle, and the diagonal folds will be mountain folds.

In the next photo I'm hoping you can see how I have folded the folds LOL.  It will make it easier to finish the last fold if it looks like this.


To finish the folding, start off like this (I used my daughter Shannon again - her hands come in real handy LOL).  


By pushing on the left side of the card you will bring the diamond down, like this.


And this is your finished card base.


Now comes the fun part.  We get to decorate it:-)

So, if you open up you card so the long mountain fold is to the right, you can decorate what is going to be the front of the card. 


My layers were cut at 4.25" by 2.5", 4" by 2.25", 3.75" by 2".  On the last layer I stamped a butterfly from a Recollections stamp set.

Next, flip your card over and decorate the inside and outside diamond (if you are going to use an image that needs to be a certain way up, make sure you have the orientation right, because when you close the card up, the diamond twists.


My layers for the Happy Birthday (inside of the card) were the same as above, I used a stamp from the CTMH stamp set that comes with Art Philosophy package. 

For the diamond, my square layers were cut at 2.5", 2.25" and 2".  I would leave adding any embellishments to this diamond until you have finished your card.

Here is a picture showing the best place to position your glue for closing and securing your card.


To finish off the front of my card I used the Art Philosophy cartridge and the butterfly (page 55) cut at 1.5".


I added some little pearl dots to finish off the butterfly and embossed the base layer, of the butterfly, with my Cuttlebug and the Devine Swirls folder.


Well I hope you all enjoyed this tutorial and will give it a try.

Happy Crafting.

Karon

August 18, 2012

Gyspy Made Simple - Window Card, Circle Shape

Now doesn't this look like a fun card? I really love the circle shape of this card and I can't believe but I have never made one before, but this is the first time!  I love it and it was so easy you are going to want to make one too. So grab a cup of coffee, turn on your Gypsy and let's get to work. I used the Close To My Heart Art Philosophy cart but, remember if you don't have the carts I used just substitute them for another that you have in your library. Just be sure when you choose a circle that it is a frame as you can not build your own and make it work.

Here are some photos of the paper I used a a close up of the three layers on my Gypsy. If you click on the photo you will enlarge it and then just click escape to come back to the post.

       
See how easy it is to position your colors. I used scraps for all the contrasting colors.


This little video will take you step by step in designing your window card. I love how I addressed the top in this one and that I used acetate for the actual window. I gives it such a finished look.


In this video you will see just how fast it is to complete this card with just a few simple steps. It really moves fast after you glue down the top layer.... I didn't bore you with doing that on this video as I figured you knew how to that portion.


Here is a close up of the card after it is completed. Don't you just love the shiny papers I used? And with these colors it is just perfect for a little boy. I love it.


Here is the front and inside of the card. The only portion that was inked was the sentiment area of the inside of the card and I used Close To My Heart ink for that. The color was Moonstruck.


Look how nicely this card stands. The acetate really adds stability to a window card and it has such an awesome finished look to it that I think I will do this more often... I just love the look and hope that you can see it, I think it shows up nicer in the second video than on these photos.
I challenge you to make a window card this week in the shape of a circle, and then link it up. School is just around the corner and you know you go through a lot more cards then. So be sure to make something you will use.
I am so happy you joined us today and hope that you learned something new or that I inspired you in some way. Thank you for your sweet sweet words of encouragement. Your comments inspire me to continue sharing with you. Have a blessed week.

August 17, 2012

Baby Carriage


Hi My Blogger Friends,

Hi, it's Lisa from Lisa's Craft Room. I must apologize to you all as I already did to Sheila. We were having issues with our internet and they had to replace a wire on the outside, so we were without internet for a few days. Thankfully, it is back and I am so happy, so is my son. So, I am so sorry that my post is late. Thank you Sheila for understanding and for having me here again this month.

This cute little baby carriage was made with the Scorpal. The wheels are from punches. If you go to Scor-pal Projects, there are so many cute cute projects. Baby Carriage Directions. I love this. My friend is having a baby boy in November and I want to surprise her with this, along with her gifts. Wouldn't this make such a cute baby shower favor?

The directions are so easy to follow and you don't need many supplies. Thank you so much for stopping by and again I am sorry for posting so late :)

August 16, 2012

Take Advantage Of A GREAT Special And Get A Double Stamp Set For Only $5

I just wanted to let you all know that there is a new special that starts today with CTMH!  This is a really great special.  If you place an order of $35.00 or more between now and the end of September, you will get this double stamp set (a $35.90) value for just $5.00!  Can you believe that?  It's really a great deal!!!
When you place your order, you will have the opportunity to add this to your cart at the end of the sale.  It will ask you if you want to add it to your order.  This is a while supplies last thing and will only be available for National Stamp Month.  If you are considering the Artiste Collection,  
You qualify for both sets.


Now is a really great time to order, because this qualifies you for two different specials!  You can get the above double set for $5.00 and the Stamp of the Month for $5.00!

So... you can get $53.85 worth of bonus stamps for just $10.00 with an order of $50.00 or more!  Now this is a GREAT DEAL!

Thanks so much for visiting today!

August 15, 2012

Space Party Mini Album

Hi Everyone! This is Elizabeth from 217Creations.  I am so happy to share my fun mini album.  I think these would make great favors for a party. In fact I made them to coordinate with the Space Party favors I made for post yesterday on my personal blog.  One of my favorite tools is the YourStory machine.  I don't use it as often as I should.  But when I do I fall in love all over again!  Here are a few close ups followed by all the cuts and directions.

Cricut Cuts
<UFO> 1.75 inches (real size off)
<UFOLyr> 1.75 inches (real size off)
<Alien> 2.5 inches (real size off)
<AlienLyr> 2.5 inches (real size off)
<Area51> 1.5 inches (real size off)
Supplies
Terrifically Tacky Tape
Raw chipboard
White Cardstock
Lime Green Cardstock
Black Cardstock
Mirrored Cardstock
Orange Metallic Cardstock
Lime Green Ink
Pop Dots
Various Neon Acrylic Paints
Metal bead chain
¼ inch orange ribbon
Metal glue (E6000 etc.)
Checkerboard Cuttlebug Folder
Space Party Cartridge
JT Imagine Cartridge
YourStory Cardstock Folder
YourStory Machine
Directions Step By Step
Cut and emboss with Checkerboard Embossing Folder a 5” by 6.50” of orange cardstock.
Distress the edges and ink the tears with Lime Green Ink
Cut <UFOLyr> <AlienLyr> <Area51> out of black cardstock
Cut <UFO> from Mirrored Cardstock
Cut <Alien> from Lime Green Cardstock
Cut chipboard to 5” by 7”.
Paint the edges with acrylic paint
Adhere Printed JT paper to the front and back of each page chipboard
Using a YourStory Cardstock Folder slip pages into the spine.
Heat the spine with the YourStory machine
Allow to cool.
Adhere the embossed paper to the cover of the album
Adhere cuts to embossed paper. Use pop dots to raise Area 51 off the page.
Using Terrifically Tacky Tape, line the spine of the book.
Place ribbon down firmly over the TTT.
Tie the ends
Using E6000, adhere the ball chain to the top of the orange ribbon.
 I hope you enjoyed my Space Party Mini Album. As always thank you for taking the time to comment and follow us here at She's A Sassy Lady and on my personal blog at 217 Creations.